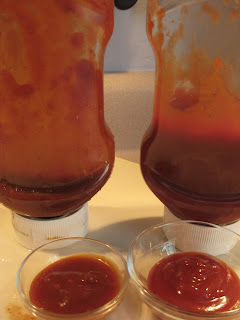
The Kitchen Witch has been playing around with BBQ sauces lately. I have my store bough favorites but they all contain high fructose corn syrup (HFCS), which is one of my no-no's ingredients wise. For years I've wanted to make my own sauce - but the only non HFCS ketchup I could find was small bottles of organic, which gets expensive after a while! Imagine my surprise when my Witchy Sissy found me Hunts HFCS FREE KETCHUP! Hooray!! Its in a BIG bottle, too :) Now that I was armed with HFCS Free ketchup BBQ sauce construction could begin. Who knew that making your own BBQ sauce was so simple? Why did I ever buy BBQ sauce before? Best of all you can adjust the sauce to your family's taste preferrances, want it sweeter? Spicier? More tangy? Adjust as you feel fit!
The first one I made was the Carolina style sauce. Its thinner than a regular BBQ sauce due to the high vinegar content. It has got quite a sour tang, from the vinegar and the mustard. It cooked down for about an hour which helped take the raw onion flavor out of it. Honestly, I only liked it on the pulled pork; it was too sour for chicken, in this Witches opinion.
The second sauce, Brown Sugar BBQ, uses basically the same ingredients as the Carolina style sauce but in different proportions. It's heavier on the ketchup and sugar and lighter on the vinegar & mustard. I liked this one a lot more, it was closer to what I envision BBQ sauce tasting like. More KC style than Carolina style.
In all actuality I think both sauces need a bit more work. The Carolina style needs more heat, I think it would play nicely with the vinegar. Maybe Sriracha could help here. The brown sugar one needs more 'sweet' but I didn't want to overload it with brown sugar. I think honey would be a delighful addtition. The Kitchen Witch also wants to incorporate fruit into the BBQ sauce, I love fruit on savory meat items, I think fruits natural sweetness would be great in a sauce. Fruits like maybe mango. Or pineapple. Yum! I can't wait to experiment with more BBQ sauces.
Do any of you make your own sauce? If so please share with me what you do to yours and maybe a link, if you have one! Happy grilling everyone!
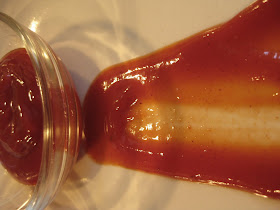
Brown Sugar BBQ sauce
makes about 3 c of sauce (1 bottles worth)
2 c ketchup
1/2 c brown sugar
2 T brown mustard
2 T cider vinegar
1 t kosher salt
1 t chili powder
heavy pinch cayenne pepper
1/8 t black pepper
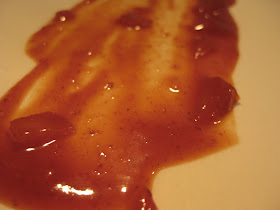
Carolina Style BBQ sauce
Makes about 3 cups (1 bottles worth)
1 c ketchup
1 c cider vinegar
1/2 c brown mustard
1/4 c brown sugar
1 t kosher salt
1/2 onion finely minced (1/2 c total)
1/2 t chili powder
1/8 t cayenne pepper
1/8 t black pepper
Cooking directions for both sauces:
In a heavy bottomed sauce pan heat the ingredients together. Cook over medium low heat for 45 minutes or until sauce has darkened in color and flavors have melded. Stir often, there is a lot of sugar in both of these sauces and you don't want them to scorch!
Nutrition Facts provided by Spark People recipe calcula
Brown sugar BBQ sauce
16 Servings
Amount Per Serving
Calories 68.0
Total Fat 0.0 g
Saturated Fat 0.0 g
Polyunsaturated Fat 0.0 g
Monounsaturated Fat 0.0 g
Cholesterol 0.0 mg
Sodium 485.4 mg
Potassium 25.7 mg
Total Carbohydrate 19.3 g
Dietary Fiber 0.0 g
Sugars 17.3 g
Protein 0.0 g
Carolina Style BBQ sauce
16 Servings
Amount Per Serving
Calories 44.5
Total Fat 0.0 g
Saturated Fat 0.0 g
Polyunsaturated Fat 0.0 g
Monounsaturated Fat 0.0 g
Cholesterol 0.0 mg
Sodium 384.3 mg
Potassium 35.0 mg
Total Carbohydrate 10.9 g
Dietary Fiber 0.1 g
Sugars 9.5 g
Protein 0.1 g
I love food! I love cooking, eating and discussing all things food. Cooking comfort foods with a gourmet edge - with out processed foods - is my specialty. I cook from scratch as much as possible. Everything that comes out of my kitchen has 3 guarantees: 1. NO HFCS - high fructose corn syrup 2. NO PHO's - partially hydrogenated oils 3. It will be delicious Happy Cooking!
Pages
▼
Sunday, May 30, 2010
Mock BBQ pulled pork
True barbeque is done over smoke at very low temperatures for a very long time. Low & slow. This dish is NOT real barbeque. It is a delicious alternative for those of us who don't own a smoker or have 24 hours to stand watch over a wood fire and want good BBQ flavor, anyway.
By using a dutch oven sealed tightly and a low heat oven we're able to mimic the low & slow barbeque process, sans the smoky flavor. If you'd like you can add some liquid smoke to your pork about 1/2 way through cooking. Liquid smoke isn't something to be afraid of, it's created from the smoking process, when moisture condenses in smokers the smoke collects in the water droplets and if you collect that, instant liquid smoke. All the smoky flavors with out the hassle of maintaining a fire for long periods of time. Its an indoor BBQ'er's best friend. If the Liquid Smoke isn't your thing, feel free to leave it out. I've made this pork both ways and both are delicious. Its strictly a personal taste preferance.
Our preferred way of ingesting this delicious pork is in sandwich form, with a toasted bun and a side of cole slaw. Its also quite good on a baked potato. Top with your favorite BBQ sauce and you're good to go! The leftovers are awesome as well, the Husband is very excited about pulled pork sandwiches for lunch. Lucky man :)
Mock BBQ pulled pork
makes approx 8-10 servings (for a 4 lb roast)
1 pork butt/shoulder, bone removed and cut into large hunks
2 large green onions, chunked (can use regular onion)
1 T oil
2 T ketchup
2 T cider vinegar
OPTIONAL 1-2 t liquid smoke
Rub:
1/4 c brown sugar
2 T dry mustard powder
1 t chili powder
1 t garlic powder
1 t paperkia
1/2 t cumin
2 t kosher salt
1/2 t pepper
QUICKER COOKING METHOD: I developed this quicker cooking method due to time constraints one day. I also liked how the smaller pieces of meat get more exposure to the rub therefore more flavor. Remove the bone from the meat and cut it into large hunks, about 4 in square approx. Some pieces will be bigger or smaller, its all good. Remove any excessive connective tissue and fat but leave some of it in, it adds flavor. If you have 6 hours available for cooking you can leave the roast whole and pull it after its cooked.
Mix the dry rub ingredients together in a bowl. Liberaly sprinkle rub over meat. Press it into the surface of the pork.
Heat a dutch oven over medium heat and add oil. Once its hot add 1/2 the pork and sear the outside. Once the pieces are browned (about 5 min) remove from pan and add remaining pork.
Once all pork is cooked add ketchup, vinegar and onions to the pan. Place the seared pork back in the pan, cover top with foil and then put the lid on the foil. Bake at 300 for 2.5-3 hours or until pork is very tender and falls apart when squeezed.
Once tender remove pork from oven and allow to rest in pan for 15 minutes. Drain off any excess fat and shred meat.
~*~Kitchen Witch Tip: To shred slow cooked or braised meats I use my tongs. When you squeeze a piece of meat with the tongs it should crumble and shred when pressure is applied. A few pinches with the tongs and voila! You've got easy pulled pork~*~
Nutrition Facts provided by SparkPeople Recipe calculator
Amount Per Serving
Calories 384.6
Total Fat 27.2 g
Saturated Fat 10.0 g
Polyunsaturated Fat 2.7 g
Monounsaturated Fat 12.2 g
Cholesterol 106.5 mg
Sodium 363.3 mg
Potassium 389.0 mg
Total Carbohydrate 8.2 g
Dietary Fiber 0.0 g
Sugars 8.1 g
Protein 26.6 g
Wednesday, May 26, 2010
Sweet and Spicy shrimp
It's no secret that the Kitchen Witch loves Asian flavors. The sweet, sour, spicy, savory combo is taste bud nirvana. At the urging of friends and fellow bloggers I FINALLY bought some Sriracha and hoisin sauces to expand my Asian cooking flavor base. I must say I'm happy I did, both flavors are in this shrimp dish and wow, was it good!
First lets talk about the hoisin sauce. I was NOT expecting it to be so sweet! However its sweetness is nicely paired with sour like the lime juice. Soy sauce of course provides the salty base along with its quintissential 'Asian' flavor. Garlic adds pungency and helps balance the sweet/sour/salty combo. The final ingredient is the screamin' hot Sriracha sauce. If hot's not your thing add 1/2 as much, taste & add more if you can handle it. The Sriracha has a nice heat, evenly across the palate but doesn't invade your throat like other spicy things can. I'm pretty wimpy when it comes to heat but Sriracha, oh boy I love its burn!! It has a great flavor on its own but it really sings when its incorporated into a recipe.
The shrimp get a very quick marinade, 15 minutes or so. They cook up in less than 4 minutes total, so realistically you can have this meal on the table, from start to finish, in 20 minutes! Pair it with your favorite veggies, quinoa or rice and you've got a healthy, tasty Asian style meal.
Sweet and spicy shrimp
makes 4 servings
1 lb shrimp, peeled and deveined (21-30 count)
2 T soy sauce
juice of 1 key lime (or 2T lime juice)
1 T hoisin sauce
3 cloves garlic minced
1 T Sriracha sauce
1 t oil for cooking
Mix the soy sauce, hoisin, lime juice, garlic and Sriracha together in a small bowl.
Peel and devein shrimp, remove tails if desired, and place into either a zip top bag or a bowl for marinating. Pour the marinade over the shrimp, toss to coat evenly and allow to marinate for about 15 minutes.
Heat up a heavy bottom skillet. Spread about 1t of oil in the pan. Put the shrimp in the pan circulary, so once the last shrimp is in the pan the 1st shrimp is ready to flip. Cook about 1-2 min max on 1st side, until the shrimp turns opaque on the sides and the bottom has slighly browned. Cook on 2nd side about 1 min. Promptly remove shrimp and serve.
Nutrition Facts provided by SparkPeople Recipe Calculator
Amount Per Serving
Calories 182.6
Total Fat 4.5 g
Saturated Fat 0.6 g
Polyunsaturated Fat 1.6 g
Monounsaturated Fat 1.7 g
Cholesterol 172.5 mg
Sodium 1,260.0 mg
Potassium 294.2 mg
Total Carbohydrate 9.9 g
Dietary Fiber 0.5 g
Sugars 2.2 g
Protein 24.7 g
Monday, May 24, 2010
Herb wine grilled chicken
I've posted my recipe for herbed chicken breasts in white wine sauce. Its a favorite around here. I use the basic marinade often, it makes chicken taste SO GOOD!!!
This week I decided to marinate the breasts for 4 hours and grill them over charcoal. Boy was that a great decision!!! The chicken took on some lovely color from the grill and the long marinade gave the chicken fantastic flavor. I poked the chicken breasts aggressivly with a fork in all directions, on both sides, to allow more of the marinade penetrate the chicken. The fork marks were not visible on the finished product and the chicken was juicy and flavorful.
I used fresh herbs from my garden, as of right now I have 4 to choose from: sage, thyme, oregano and chives. All 4 made it into this marinade. I also used chablis white wine, again it was what we had. Any dry white wine will work. If you're not a wine drinker you can use white wine vinegar, about 2T, in place of the wine. Its not exactly the same but it'll impart a tangy yet sweet flavor to your meal. My Witchy Sissy uses vinegar on hers and loves it.
Herb wine chicken
makes 2 servings
2 chicken breasts, boneless and skinless
1/2 c dry white wine like chablis or chardonnay
fresh herbs finely minced (about 10 chive stems, 1 sprig oregano, 6 sage leaves and 3 small thyme sprigs)
3 cloves garlic chopped fine
1/2 t kosher salt
pepper to taste
2 T olive oil
In a small bowl mix the herbs, wine, salt, pepper, garlic and oil. Pour over chicken breasts that have been punctured with a fork on both sides, in both directions so marinade can penetrate meat. Allow to marinate for 4-6 hours.
~*~Kitchen Witch Tip: Allow your meat to come to room temperature before grilling or cooking it. You'll have a tender piece of meat that won't dry out on the outside and be undercooked inside. Having your protiens at room temp helps ensure even cooking as well, since the interior of the meat is the same starting temp as the exterior. While food safty is always important, leaving your chicken out on the counter in the marinade for a few hours (up to 2 hours) is safe, as long as you cook it to an internal temerature of 160.~*~
Cook chicken on a hot grill or sautee pan. Cook about 7-8 minutes on the first side or until the sides begin to turn opeque. Flip and cook about 5-6 minutes on second side, until internal temp reaches 160.
Nutrition Facts provided by Spark People recipe calculator
2 Servings
Amount Per Serving
Calories 372.5
Total Fat 9.7 g
Saturated Fat 1.7 g
Polyunsaturated Fat 1.2 g
Monounsaturated Fat 5.7 g
Cholesterol 136.9 mg
Sodium 1,316.9 mg
Potassium 620.1 mg
Total Carbohydrate 3.5 g
Dietary Fiber 0.1 g
Sugars 0.0 g
Protein 54.8 g
Sunday, May 23, 2010
Cinnamon topped banana bread
A friend and reader requested a banana bread recipe. There are about 1,000,000 recipes for banana bread out on the internet, so what could the Witch do to make hers different?
I've made banana bread using applesauce in place of oil to save calories. It works but it makes the bread slightly gummy. Gummy is NOT a texture profile that I really enjoy. I've added whole wheat flour to the batter, to amp up the fiber and health quotient. Its not bad, but I was out of whole wheat flour this time. I've also added chocolate chips. That is really delicious, and the little Witch LOVES it, but I'm still out of chocolate chips. Drat.
That's when I thought of a strudle like topping. Cinnamon is usually added to sweet quick breads, so why not top my banana bread with a cinnamon topping? I cut back on the sugar in the bread to compensate for the additional sugar in the topping. The result is a beautiful golden heavenly scented loaf. The little Witch was napping when I made the bread and the first thing she asked me when she woke up was "Mom, whats that really good smell? What are you making?"
This bread turned out really well if I do say so myself. As a matter of fact, its the first banana bread that the little Witch has actually enjoyed, chocolate chips or no. I think I might make french toast out of the leftovers. I hope you all enjoy this recipe. If you have any dishes that you'd like to see the Kitchen Witch do please let me know, send me a message on facebook or here on comments.
Cinnamon topped Banana bread
makes 1 loaf
3 overripe bananas
3/4 c white sugar
1 T vanilla
1/4 c butter, melted
1 egg
1/4 c milk
1.5 c flour
1.5 t baking powder, aluminium free if you can find it
1 t salt (regular table salt here)
Topping:
1/4 c brown sugar
1 t cinnamon
I used my KitchenAid stand mixer: you can use a hand held mixer or even a wooden spoon to make this recipe.
In a medium sized mixing bowl mash bananas. Add the white sugar, vanilla, butter and egg. Mix well. Stir in the milk.
Mix the dry ingredients together and add to the banana mixture in 3 installments, scraping down sides after each addition of flour. Mix batter until it lightens in color and becomes thicker, like a pancake batter.
In a small bowl mix the brown sugar and cinnamon together.
Pour batter into a greased loaf pan. Sprinkle the cinnamon sugar over the top of the loaf, spreading it out evenly across the entire surface.
Bake at 350 for 30 minutes or until it tests clean in the center. Allow to cool before slicing and enjoying.
Nutrition Facts provided by Spark People recipe calculator
8 Servings
Amount Per Serving
Calories 294.3
Total Fat 7.0 g
Saturated Fat 4.0 g
Polyunsaturated Fat 0.5 g
Monounsaturated Fat 2.0 g
Cholesterol 42.7 mg
Sodium 397.8 mg
Potassium 238.0 mg
Total Carbohydrate 57.3 g
Dietary Fiber 1.8 g
Sugars 34.0 g
Protein 4.0 g
Wednesday, May 19, 2010
Vanilla bean cheesecake take deux
Have you ever indulged in the joy that is a silky cheesecake enhanced simply with pure vanilla, specks of black vanilla beans scattered through out its creamy interior? No? Well then my dear readers, its time that you get your taste buds ready for a serious trip! Vanilla bean cheesecake is one of the few things that can make this die hard chocoholic say "chocolate what? Who cares if there's chocolate, unless you want to put it on this cheesecake!"
Its amazing to me that we use the term 'vanilla' to describe something boring and plain. Real vanilla is anything BUT that! There are over 170 different flavor compounds in vanilla. Its harvested from the seed pod of an orchid originating from Mexico. Vanilla is very difficult to grow - the flowers must be pollinated by hand - and they only grow in certain areas of the world, something that you see translated into their cost.
I was asked to make this cheesecake for my nephew Ben's 9th birthday. It was only when we were almost done that I realized that D'oh! I don't have a good picture of the cheesecake yet!! Sorry folks, the power of the vanilla took over and photography was my last concern :) The texture of this cheesecake was light and fluffy, not dense. After being outside in the park for a few hours the cake's texture softened a lot and it was very difficult to cut, which contributed to photography issues as well. All in all, the cake was delicious, the birthday boy enjoyed it and had a fun day and since there was only 1/2 a slice left, I'd have to say it was a success!
Vanilla Bean cheesecake
makes about 16 servings
5 blocks cream cheese
1 c sour cream
4 eggs
1 c sugar
3 T flour
3 vanilla beans OR 2 T vanilla bean paste
Crust:
1 T good vanilla extract
1 sleeve graham crackers, crushed to crumbs
1/2 stick butter (1/4 cup), melted
1/4 c sugar
Allow cream cheese and eggs to come to room temp. first. Leave them on the counter top for a few hours.
preheat oven to 325.
Make crust:
Combine the graham crumbs, 1/4 c sugar and butter together until it resembles wet sand. Press into a springform pan thats been lines with parchment on the sides. Tamp crust with the bottom of a glass. Bake crust at 325F for 10 minutes while you assemble the filling.
Make the batter:
In the work bowl of a stand mixer cream the cheese until its smooth. Scrap down the sides often. Add the sugar, lemon, flour, vanilla beans scraped from pod and vanialla extract. Beat until smooth.
~*~To scrape vanilla bean pod cut a slit in the bean across the length. Spread it open and you'll see glossy black stuff. That's the vanilla beans. Take the back of your knife and firmly run it along the length of the pod, scraping out the seeds.~*~
Wrap bottom of a spring form pan in aluminium foil. Put the spring form pan on a sheet tray, then pour the batter into the spring form pan. Place the sheet tray with the cake in the oven and then add boiling water to the sheet tray making a water bath. The water will only come up about 1 inch on the springform pan but it's enough to provide the gentle heat and moisture for the cake to bake with out cracking.
~*~Kitchen Witch Tip: Water baths are a great way of cooking a dense custard like cheesecake. A water bath and it will insure that your cheesecake bakes evenly and slowly and doesn't crack. You can skip the water bath step - however cracked dried out cheesecake may result.~*~
Cook cheesecake in the water bath for 60 minutes. The center of the cake will be very jiggly still, that's OK it will set up as it cools.
Allow the cheesecake to cool in the oven with the heat off and the door closed for at least 8 hours. After 8 hours remove the cake, cover with plastic on top and chill in the fridge for another 8 hours.
~*~Kitchen Witch Tip: After 2 hours you can gently remove the cake from the oven and pour off the water from the water bath. Replace the sheet pan and the cheesecake in the still warm oven and allow it to cool for 6 hours more IN THE OVEN with the door closed. The warmth and slow cool down process allow the cake to finish cooking (its very dense!) and cool slowly so cracks don't happen.~*~
Before serving remove spring ring from pan and slice cake. Wipe the knife clean between slices for best appearance.
Simple Strawberry sauce
1 lb strawberries
1/3 c sugar
blend together in a blender until very smooth.
Nutrition Facts provided by Spark People recipe calculator
12 Servings, including strawberry sauce
Amount Per Serving
Calories 617.0
Total Fat 47.4 g
Saturated Fat 28.7 g
Polyunsaturated Fat 2.3 g
Monounsaturated Fat 13.7 g
Cholesterol 203.9 mg
Sodium 355.2 mg
Potassium 321.7 mg
Total Carbohydrate 40.3 g
Dietary Fiber 2.4 g
Sugars 31.9 g
Protein 10.9 g
Friday, May 14, 2010
Key Lime cookies with white chocolate
The little Witch had been asking to make cookies, like usual. Unlike usual I was out of chocolate chips. The horror!! I did however have white chocolate chips. And an excess of key limes and a touch of coconut.
Siri over at Siriously Delicious made and blogged about coconut white chocolate chip cookies a few days ago. She, of course, added the 'put the lime in the coconut and drink it all down' lyrics in her blog, which then promptly got stuck in my head. Thanks, Siri. On the upside, I got the idea to add some key lime zest and juice to something similar to her coconut white chocolate chip cookies.
I think its a successful marriage. Lime and coconut are delicious together. White chocolate helps add a sweet vanilla flavor to the sour lime. Zest adds a punch of lime as well as provide pretty specks of green in these pale beauties.
In the end the cookie is a hit with the adults. The little Witch, well she still wants her favorite chocolate chip cookies. Kids :)
Key Lime coconut white chocolate cookies
makes 24 cookies
1/2 cup butter (1 stick)
1/2 c white sugar
1/4 c brown sugar
zest and juice of 2 key limes
1/2 c coconut
1 egg
3/4 t baking soda
1/2 t salt
1 3/4 c AP flour
1 c white chocolate chips
Cream butter. Add sugars, beat until fluffy. Add zest, juice and egg, beat until light and fluffy again. Add coconut and 1/3 the flour, baking soda and salt. Mix until flour is incorporated. Scrape down the sides, add remaining flour in 2 installments, scraping after each. Add white chocolate chips. Scoop onto a baking sheet and bake for 11 minutes at 350.
Nutrition Facts provided by SparkPeople recipe calculator
24 Servings (1 cookie per serving)
Amount Per Serving
Calories 136.1
Total Fat 6.7 g
Saturated Fat 4.1 g
Polyunsaturated Fat 0.3 g
Monounsaturated Fat 1.9 g
Cholesterol 19.2 mg
Sodium 109.9 mg
Potassium 53.8 mg
Total Carbohydrate 19.5 g
Dietary Fiber 0.7 g
Sugars 11.1 g
Protein 1.6 g
Tuesday, May 11, 2010
Key Lime garlic chicken skewers with grilled veg
Pass it On this week is brought to us by Jenn at Jenn's food journey. I used her recipe as inspiration for this one. If you haven't already please check out Jenn's blog, she makes awesome sauces and quick yet delicious main dishes. Thanks Jenn :)
Last week I went to my favorite Mexican grocery store Rancho Liborio. I've talked about the incredible bargains I find there, please allow me to share this week's bounty with you as well.
12 key limes for .26.
3 jalapanos for .22.
3 zucchini for .55.
3 lemons for $1.
Corn tortilla chips $1.17 a bag.
8 lb watermelon for 2.30 (.33 per lb!).
Roma tomatoes, 8 for about $1.
Whole pineapple for $2.50 (admittedly not the best price ever but the little Witch really wanted it)
I spent $16 there total and had 3 reusable grocery bags full, love that! Just as a price comparison key limes are on sale this week at our Kroger affiliate - 10/$1. I got 12 for .26. Incredible deals!!
So thats why this is key lime garlic chicken, I had a lot of key limes to work with. My garden is producing a lot of oregano this year - hooray! - so I added a bit of it here, I like the subtle herbal note it gives with out an overpowering HERBED flavor. I was running low on time so I cut my chicken into long strips, giving myself a lot more surface area for the marinade to come in contact with, thus giving me a long marinated flavor in only 30 minutes.
Skewering or making kabobs is a favorite of mine in the summer. There's just something about food cooked on a stick that is yummy. I also like that you get lots of surface area exposed to the fire to create flavorful browning. The veggie kabobs were simply comprised of veg that needed to get used up, now. They were delicious. We rounded out the meal with a bit of brown rice. Everyone enjoyed this spring time dinner!
Key Lime garlic chicken
makes 3 servings
3 key limes, reserve one to be juiced on the cooked product
zest of 2 key limes
3 cloves garlic minced (garlic press works fine)
1/2 t kosher salt
dash ground pepper
1 small sprig oregano minced (about 1/2 t fresh, can use 1/4 t dried oregano)
2 T EVOO
2 chicken breasts cut into 1 in wide strips
Veggies:
whatever you have around the kitchen, I had 2 zucchini cut into 2 in pieces, 1/4 onion, 1/2 yellow bell pepper and a few handfuls of grape tomatoes. Cover all cut veggies with about 1 T EVOO and 3-4 generous pinches of kosher salt, tossing to coat evenly. Thread veggies onto soaked skewers.
In a small bowl mix the lime juice, zest, garlic, salt, pepper and oregano together. Stir well to dissolve the salt. Slowly drizzle in the oil and mix well to emulsify.
Slice chicken against the grain into 1 in wide strips. Place strips in a zip top bag. Pour lime mixture onto the chicken, being sure to evenly cover all pieces. Seal up bag and allow meat to marinade on counter for 30 minutes.
~*~Kitchen Witch Tip: to avoid burning bamboo skewers when grilling, soak the skewers in hot water for at least 30 minutes before threading food onto them. The soaking will hydrate the bamboo and help them from not burning up as quickly.~*~
Skewer chicken onto soaked bamboo skewers (3-4 skewers). Discard any left over marinade.
Grill chicken and veggies over a hot fire, cooking chicken about 15 minutes or until internal temp reaches 160. Squeeze remaining key lime over top of chicken and veggies before serving.
Nutrition Facts
Key Lime Garlic chicken skewers with grilled veg
3 Servings
Amount Per Serving
Calories 303.2
Total Fat 11.9 g
Saturated Fat 2.0 g
Polyunsaturated Fat 2.0 g
Monounsaturated Fat 7.2 g
Cholesterol 91.3 mg
Sodium 498.7 mg
Potassium 748.6 mg
Total Carbohydrate 12.8 g
Dietary Fiber 3.2 g
Sugars 0.8 g
Protein 38.2 g
Saturday, May 8, 2010
Southern Pecan pie
Recently I won a gift basket from Michelle at Girl Gone Granola that included pecans. Fresh pecans in the shell, what could be better? Making them into a gooey pie, that's what!! Michelle, being the thoughtful woman that she is, was kind enough to include a recipe for Southern Pecan Pie. I, having no self control whatsoever, decided that the inclusion of the recipe was more than a suggestion, it was meant to be! And wouldn't you know it, I had everything I needed to make said pie in my pantry. Its good to be the Kitchen Witch!
This recipe is not my creation but I'm sure glad I made it!!! Can you believe this was the 1st pecan pie I've ever made?? And you know what? It was as easy as pie!
Southern Pecan Pie
makes 8 servings
1 cup dark corn syrup
2/3 c white sugar
3 eggs
1/3 c butter melted
pinch salt
1 cup pecan halves
unbaked 9 inch pie crust
Preheat oven to 350. Put the pie shell on a baking sheet to catch any spills and make handling in and out of the oven easier.
In a mixing bowl blend the sugar, corn syrup and butter together. Add the eggs, 1 at a time, mixing well between each addition.
Scatter the pecans on the bottom of the pie shell. Pour the sugar/egg mixture over top. Bake for 55 minutes or until the top is candied and the center is just set. Remove and allow to cool for at least 1 hour before cutting.
See, easy as pie!
~*~Nutritional information is based on using a frozen ready to bake 9 in pie shell~*~
Nutrition Facts provided by SparkPeople Recipe Calculator
8 Servings
Amount Per Serving
Calories 450.4
Total Fat 24.4 g
Saturated Fat 7.8 g
Polyunsaturated Fat 4.1 g
Monounsaturated Fat 10.9 g
Cholesterol 100.2 mg
Sodium 190.1 mg
Potassium 116.2 mg
Total Carbohydrate 58.2 g
Dietary Fiber 1.5 g
Sugars 50.4 g
Protein 4.4 g
Friday, May 7, 2010
Quiche with country ham, broccoli and Swiss
Quiche is one of those dishes that was really popular in the 80's and has fallen out of vogue since then. I don't know why its not in vogue today, its so easy and delicious, and pretty much any flavor combo you like you can turn into a great quiche. Today that happened to be country ham and broccoli with swiss cheese.
The country ham is part of the Southern Foods foodie basket that I won from Michelle at Girl Gone Granola. Please take a minute to check out her blog, Michelle is incredible! She has 2 beautiful girls, a great garden, back yard chickens, heck she even makes her own wine, and that's all in addition to writing a fabulous blog! Michelle recently took a trip to TN to visit family and brought home some yummies for her fans. I was lucky enough to be the winner of this gift basket! Included was the ham, a pound of pecans, candied jalapanos and a set of Paula Deen pinch pots. I am thrilled with the basket and couldn't wait to get cooking with my new treats!
Quiche is more than scrambled eggs in a pie shell, its really more of a savory custard. The filling should be a soft curd that wraps around the ingredients, smooth, creamy and delicious. When I saw the ham I immediately thought QUICHE! Country ham is salty so I thought it would go nicely with the broccoli and egg custard. A touch of Swiss cheese highlighted the flavors nicely. It came together quickly and in less than an hour from start to finish we had a dinner that everyone, even the little Witch, enjoyed!
Quiche with country ham, broccoli and Swiss
serves 4
4 eggs
1 c milk
2 slices (about 4-6 oz) country style ham (any ham will work here)
1 head broccoli cut into florettes
6 slices swiss cheese diced fine OR 4 oz shredded swiss
small bunch chives minced
S&P
unbaked pie crust in a 9 inch pie pan
Preheat oven to 350.
In a skillet over medium heat, sautee ham and broccoli. You want the broccoli to turn bright green and start to become tender, this takes about 7-10 minutes. This step also helps cook out extra moisture from the meat & veg so your quiche isn't a watery mess. While its cooking prep the rest of the quiche.
In a mixing bowl whisk the eggs and milk together, adding a touch of salt & pepper. Add fresh herbs to eggs.
Dice (or shred) cheese
Put your pie pan on a sheet tray to catch any spills and make handling easier. Put 1/2 the cheese in the bottom of the pie shell. Top with the broccoli and ham. Sprinkle remaining cheese on top. Pour the custard/herb mixture over top, slowly to allow all the trapped air to escape. Give it a slight wiggle to work out any air bubbles.
Cook for 45 minutes (at my altitude) OR until center is slightly jiggly but mostly set. Kinda like jello. Allow quiche to rest for at leasts 5 minutes before cutting, this rest period allows the custard to fully solidify so you can cut wedges. Enjoy!
~*~Nutritional info is based on using a frozen ready to bake 9 in pie shell, if you're making your own this will alter the nutritional information~*~
Nutrition Facts provided by SparkPeople Recipe Calculator
4 Servings
Amount Per Serving
Calories 453.2
Total Fat 26.3 g
Saturated Fat 11.2 g
Polyunsaturated Fat 2.7 g
Monounsaturated Fat 10.0 g
Cholesterol 256.8 mg
Sodium 850.4 mg
Potassium 719.9 mg
Total Carbohydrate 28.3 g
Dietary Fiber 4.9 g
Sugars 5.9 g
Protein 27.7 g