Pages

Sunday, April 15, 2012

Tilapia in Papillote with leeks, asparagus and compound butter

Tilapia on Andrea the Kitchen Witch??  No, you're eyes aren't playing tricks on you.  Tilapia IS what today's post is about and, get this, I actually liked it!  This is a Kitchen Witch first!!  For those of you who don't know the Kitchen Witch does not like fish.   Unless it's batter dipped and deep fried, then it's pretty tasty.  Outside of that version the Witch was pretty convinced that all fish tasted like the dirty water it was pulled out of.  Eww.  She tried to make fish a few times before for the Husband (who adores fish) and every time the Witch was grossed out, tried a bite and couldn't do it.  The last time she tried to make fish, the fish had gone bad unbeknownst to her and well, that was scarring, let's just leave it at that.  Then came along Jenn, from Jenn's food Journey.  Jenn and I have been BFF (Blogging Foodie Friends) for a while now.  Her blog is awesome and she has been known to turn out a mean tilapia dish.  Week after week the Witch read Jenn's blog, looking at fish dish after fish dish and wondering, why, oh why! can't I like fish too???   The Witchy family had been asking for some variety in their protein choices,"Please can we have fish?"  Time after time the Witch said "I'll think about it" and promptly walked directly past the fish department in lieu of pork or chicken.   Suddenly, that changed.

One day while at the Sunflower Farmers Market the Witch found herself in front of the seafood department and wouldn't you know it, but out of her mouth came these words: "I'll take a pound of tilapia, please".  Proudly the Witch took her fish home and put it in the freezer.  There it stayed for over a month (so much for  bravery!) before she finally got up the courage to make the fish.  When she did, she was a HUGE baby about it; the Witch actually cried and pitched a full on hissy fit about the fish, one that her 5 yr would have been proud of.  It wasn't cute people.  The Husband said something snarky along the lines of "Watch, you'll discover that you love fish and it'll become your new favorite protein".  That really really pissed off the Witch at the time, but as it turns out, he was right.   The dish that Jenn recommended I try first was Parmesan Garlic Tilapia.  It was really really good!   If you're looking to convert a fellow fish hater, try this one.  It worked for the Witch (and she's a tough sell let me tell you!!)

Damn that Husband for being right (again)! As it turns out, the Kitchen Witch doesn't hate all fish.  As a matter of fact, after having tilapia the first time her mind hasn't stopped creating fish recipes.   Now the Witch realizes that papillote isn't a new cooking method in the slightest, and the flavors here aren't new or innovative.  Leeks, asparagus and white wine have been paired with fish more often than not;  they're good with fish!  The papillote method is a very easy to assemble, it's impressive to serve and most of all provides perfectly cooked moist fish every time.  I'll be the first to admit the tilapia isn't the most flavorful fish (which is why it's a great 'starter fish'), so if you have a favorite white fish, please use it here.  The fish could have used some more herbs, too, but my herb garden is only producing chives and parsley so far this year.  If you have fresh herbs, use them!  The finished dish is beautiful on the plate and tastes pretty darn good, too.  I hope you give this a try!

Tilapia in Papillote with leeks, asparagus and compound butter
makes 4 servings
4 tilapia filets
2 leeks dark green cut away, sliced into quarter moons and rinsed well
20 asparagus spears
1/2 stick butter
2 T fresh minced parsley
15-20 chive stems, minced
1/2 t dried oregano (or 1t of fresh minced)
1/2 lemon, cut into rounds
1/4 c Chardonnay or other dry white wine
kosher salt and pepper
12 grape tomatoes
parchment paper

Preheat oven to 400F

Make the compound butter first by combining the softened butter, a few pinches kosher salt and pepper along with the herbs.  Mix well to make the compound butter.  Place butter in the freezer while assembling the papillote.

Cut the parchment paper into large rectangles, about twice the size of the fish.  Make the parchment look like a fat lopsided heart - this will aid in rolling the papillote.

Rinse and dry your fish.  Season fish with kosher salt and pepper on both sides.

Lay 5 asparagus spears down on the parchment paper.  Lay a small handful of leeks on top of the asparagus.  Top the leeks with the fish.  Now take 1/4 of the compound butter (about 1 heaping tablespoon) and place it on top of the fish.  Top the butter with 2-3 lemon rounds and finish with 3 cherry tomatoes on top of the lemons.  Drizzle the fish with 1T white wine.

Fold the papillote, heavily creasing the paper as you go to seal in air and juices.  Place sealed papillotes on a baking sheet.

Bake for 15-20 minutes.  Remove from oven, cut the papillote open and slide the entire contents onto a plate.  Drizzle the juices on top of the fish and enjoy!


Nutrition Facts calculated at SparkPeople recipe calculator Amount Per Serving Calories 273.1 Total Fat 13.7 g Saturated Fat 7.7 g Polyunsaturated Fat 0.6 g Monounsaturated Fat 3.3 g Cholesterol 86.0 mg Sodium 551.1 mg Potassium 643.2 mg Total Carbohydrate 11.8 g Dietary Fiber 2.5 g Sugars 2.5 g Protein 25.2 g

Monday, April 9, 2012

Tamales: Pepper Jack and roasted green chiles

For Spring Break the Witch and family went on a little trip to Santa Fe, NM.  The weather was beautiful.  The scenery was stunning.  The food, oh my the food!!  It was amazing, delicious, and abundant.  I would love to have taken home a 55 gallon drum of green chili alas it wouldn't fit in my car.   Before embarking upon our voyage I asked the assistance of a friend who grew up in the Santa Fe area for her list of hot spots not to be missed while in the Land of Enchantment.  Arielle suggested that I stop by Alicia's tortilleria and get myself  'some of the best tortillas in all of New Mexico'.  Not one to pass by the 'best of' anything, I quickly obliged.  The Kitchen Witch left the great state of New Mexico with 3 lbs of corn tortillas, a dozen flour tortillas and 2 lbs of prepared masa harina -  all for $8.75!!  

Today the Kitchen Witch is going to do a photo tutorial on tamale assembly.  I forgot to get a photo of the finished tamales, we were too hungry and excited to try them to remember photography, so please forgive me.  You can find prepared masa harina in most Mexican grocers for a very affordable price, or you can make your own.  Masa Harina is available in the flour section of your grocery store.  Just make sure you get masa "For TAMALES" (there is a masa for tortillas and the grind/texture is different).   These tamales were meat free but feel free to fill your tamales with what ever you like.  The cheese/green chile mix was delicious and light.  I can't wait to make these again.  

Oh and Arielle, you were SO right!  Alicia's tortilleria is amazing, their tortillas are like nothing I've ever had and I wish I had quadrupled my order.  Looks like I need to go back to Santa Fe soon to replenish my supply!

Tamales
makes about 16 tamales
2 lbs prepared masa harina 
corn husks, rehydrated (soak husks in hot water for 1 hour minimum before making tamales.  The longer they soak the easier they are to work with.  Rip one or 2 small husks into strips for tying the tamales) 
3/4 lb pepper jack cheese shredded
4 green chiles roasted, peeled and diced

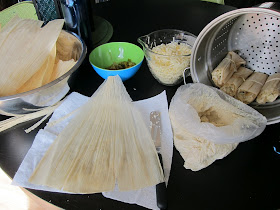
Begin by gathering all your ingredients and prepping your workstation.  I like to lay a few paper towels down for the wet corn husks to rest on while spreading the masa.

Take a large corn husk and unfold any edges.  Place it with the long side facing you and spread about 3T masa on the husk, making a layer about 1/8 thick, thick enough so the ridges of the corn husk don't show through the masa.  Spread masa to the end of the large end, leaving about 1 inch on the sides of the husk. (the husk shown was a HUGE one, I didn't spread the masa to the ends here cause it would have been a big tamale otherwise!)

Place a small amount of cheese then green chiles in the middle of the masa.

Fold the husk over itself, so the masa ends touch each other, sealing the filling.  Gently press down to release air trapped in the tamale.  

  Fold the end up towards the open end of the tamale and wrap the sides of the husk around the tamale, tucking the end into the husk fold.  If your husk is small or rips while folding, take another husk and wrap it around your torn one and continue.  No one will ever know!

Using a small piece of husk that's been torn into strips, tie the tamale to hold it shut.


Stack tamales in a steamer for cooking.  Repeat until you're out of ingredients.

Steam tamales in a steamer for 45-60 minutes.  The masa will firm up as it steams.  Allow tamales to cool a little before removing the corn husk and enjoying!  Tamales also freeze wonderfully.  Simply freeze tamales after wrapping, before steaming them.  They will last up to 3 mo in the freezer if kept air tight.  Steam from frozen, allowing 60-75 min for cooking.

Saturday, April 7, 2012

Strawberry Deliciousness

Strawberry deliciousness is the new dessert of Spring 2012.  Don't believe me?  Well it's got fresh berries, whipped cream, cream cheese and angel food cake.  Believe me now??   You should cause it's good people.  Really good.  Like push your Mom down to get the last slice good.  I know this because last weekend the Witch and family were at a dinner party at a good friends home and dessert was this:  Strawberry Deliciousness, and instantly, as soon as the 13x9 pan entered the house 6 adults and 3 children, all swarmed in on the bearer of said dessert, oohing and aahing and asking when dinner was done so we could eat the deliciousness.  After dining on our delicious meal everyone was ready for dessert.

As the Deliciousness was being doled out I got the recipe from my friend who brought it.  The original recipe used Cool Whip in lieu of whipping cream.  The Witch doesn't use Cool Whip normally and ok, I'll be honest, I forgot to get a tub while at the store.  Imagine my delight when I remembered that I had heavy whipping cream in the fridge.  Problem solved with out a return trip to the store.  Yay!  The original also calls for strawberry syrup or ice cream topping to be poured over the berries.  Well, again my brain forgot that at the store, so I decided to macerate my berries in sugar and allow them to make their own syrup.  Easy and no HFCS!  I did go with a store bought angel food cake, however if you have a favorite recipe feel free to use it.  Pound cake would be a great alternative to angel food cake, too.

The rest of the dessert is simple assembly, cake, cream cheese whipped cream and berries.  The flavor is that of a cheesecake topped with berries, but not as heavy.  This dessert is rich and yet light all at once.  It is dangerous, too, cause you really could eat the whole pan yourself, it's that good!!  Strawberry Deliciousness really IS the dessert of Spring 2012!  I hope you enjoy it!

Strawberry Deliciousness
makes 12 servings 
Source: Inspired by Gail
1 lb strawberries, cleaned, hulled and diced
1 1/4 c sugar, divided
2 (8 oz ea) packs cream cheese
1 cup heavy whipping cream
1 angel food cake

Begin by washing, hulling and slicing berries.  Put into a medium bowl and sprinkle 1/4 c sugar over berries.  Stir well and cover with plastic.  Allow berries to macerate (sit in the sugar) at room temperature for 1 hour.  This will draw out the berries juices and make it's own syrup.

Once the berries have sat for 1 hr you'll notice there's a lot more liquid in the bowl than you started with.  Using a potato masher smash berries.  You'll want to squish about half of the berries, releasing more of the juices, leaving some in larger chunks for texture as well as visual interest.

Using a mixer cream the cream cheese and remaining 1 cup of sugar.  Scrape down sides often and mix until cream cheese is lighter and fluffy.  Remove from mixer and reserve.

Whip the whipping cream with your mixer.  Once you have stiff peaks change to the blade beater (if using a stand mixer) and add the cream cheese mix to the whipped cream in thirds.

Get a 13x9 pan.  Cut the angel food cake into chunks about (1 inch) and put in the bottom of the 13x9 pan.  Using your hand press the cake into the bottom, compressing it somewhat.  Spread the cream cheese/whipped cream mix on top of the cake.  Pour berries and syrup over top of the cheese mix.  Cover and refrigerate until serving.


Nutrition Facts calculated at SparkPeople Recipe Calculator Amount Per Serving Calories 385.9 Total Fat 17.2 g Saturated Fat 10.6 g Polyunsaturated Fat 0.8 g Monounsaturated Fat 4.8 g Cholesterol 55.2 mg Sodium 368.8 mg Potassium 182.7 mg Total Carbohydrate 53.9 g Dietary Fiber 1.0 g Sugars 38.0 g Protein 6.3 g