Thursday, December 10, 2009

Holiday chocolate chocolate chip cookies


Chocolate cookies, yum. Chocolate chocolate chip cookies, really yum. Chocolate chocolate chip peppermint cookies, shut your mouth! Dark chocolate cookies, delicate minty flavor, creamy chips, could this BE more holiday?? Its seasonal baking at its finest.

Please note that the Kitchen Witch has a massive cookie problem, and holiday time is just an excuse to make an excessive amount of baked goodness, not to mention candies like homemade caramels, chocolate dipped pretzels and butter almond toffy. Enough confessions - on to the cookies!

Holiday chocolate chocolate chip cookies
2 sticks unsalted butter
1 c white sugar
1/2 c brown sugar
2 eggs
1 t vanilla
1 t peppermint extract
2 1/2 c AP flour
1 t baking soda
1 t salt
1/2 c cocoa **SEE NOTE
12 candy canes smashed, 1/2 c for cookies, remaining for topping
1 c chocolate chips


Cream butter. Add sugar, cream until light & fluffy. Add eggs, peppermint extract and vanilla, mix well.


Sift cocoa powder(s) with flour, salt & soda. Add dry ingredients in 3 installments, scraping down sides as you go. Add candy canes and chocolate chips, mix until evenly distributed.


Scoop with small cookie scoop, 1T approx, and top each with 1/4 t crushed candy canes.


Bake at 350* for 11 minutes. Allow to cool on sheet tray for 2 min before removing to cooling rack.


**Cocoa powder note: I use 1/4 c King Arthur Black Cocoa powder and 1/4 c standard cocoa powder in this recipe. The black cocoa really gives the cookies a deep dark color and intense chocolate flavor. Please take a look at the color difference, you can really see how intense the black cocoa is compared to the standard dutch process cocoa. Last I checked this wonderful ingredient was about $7 for a pound. I've had mine for about a year & its just now time to replenish my supply, and I use this stuff in everything that calls for cocoa powder. I highly recommend trying this if you like dark chocolate.

Filo wrapped chicken with feta & tomatoes


My garden was a late producer this year.  While that was kind of a drag in the middle of summer and produce wasn't ready to harvest, it was nice in October, before the first frost hit, to still be able to gather fresh produce from my back yard.  This recipe was created to use up some of my late summer bounty, and it does so in a very tasty manor, if I do say so myself.

Filo dough may look intimidating, and if not done properly it can be a nightmare.  Here's a few tips.
1. make sure dough is completely thawed, either 24 hrs in fridge or 8 hrs on counter
2. keep a damp cloth over the unused portion of filo dough to prevent it from drying out
3. make sure your butter is melted & ready to go, cold butter won't spread nicely, rather it will tear the filo & make you want to cry.  Not at all a pleasant way to spend an afternoon.
4.  Don't worry about rips & tears, they happen to everyone!  Once you've layered & rolled the dough you won't even be able to tell you ripped the dough.

Filo wrapped chicken with feta & tomatoes
2 chicken breasts sliced into 2 in chunks
2 cloves garlic, minced
1/2 t dill weed (can add more to taste)
1/2 t greek oregano
2 T red wine vinegar
2 T asiago cheese, shredded
1 T EVOO
S&P

1/4 med yellow onion
1/2 zucchini
15 cherry tomatoes, halved
1/4 c feta cheese
2 t oil

10 sheets filo dough
2 T butter, melted

OPTIONAL tzatziki sauce
1 container (1/2 c) plain yogurt, strained
1/2 cucumber shredded & squeezed dry
1 t dill or oregano or combo of both
1 clove garlic minced
S&P

Step 1
Marinate chicken w/ herbs, garlic, vinegar & oil in a zip top bag (or bowl, whatever!).  Marinate chicken for at least 30 min but you can go as long as 2 hrs for deeper flavor.


Step 2
Slice zucchini into planks, 1/8 in thick.  Slice onions also.  Pat veggies dry for best browning.  Heat a sautee pan over med hi heat, add oil.  Once hot (oil shimmers) add veggies.  Allow to cook about 5 min on each side or until they are caramelized.  Turn & brown on 2nd side, this goes faster than the 1st side FYI.   Set veggies aside to cool.


Step 3
In a food grinder (attachment to KitchenAid) grind the marinated chicken, adding the onions to the grinder as well.  Once all meat is ground put in 2 chunks of asiago cheese to clear the grinder, and add extra flavor!

NOTE : if you don't have a food gringer, well get one!  No, not really, if you don't have a food grinder you can use ground chicken.  Its in the chicken section of your grocery.  If you can't find it ask the butcher, maybe they can grind some for you.  If using ground chicken, marinate it for 30 min max (more surface area=quicker marinade), dice onions after browning & mix in with chicken.

Step 4
Lay out 1 sheet of filo.  Spread with melted butter to cover surface - a very thin layer is fine.  Repeat until all filo has been layered.

Step 5
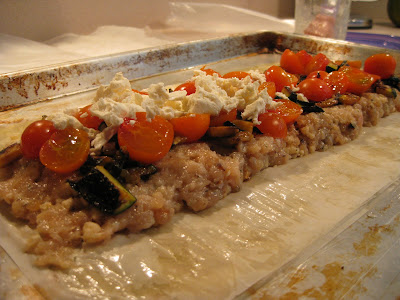
Spread chicken mix in center of filo, long ways covering 1/3 of the dough.


Top chicken with sliced tomatoes and feta cheese.  Fold the sides of filo over the top of the chicken/tomato/cheese layer, leaving a 2 in opening in the center.


Step 6
Bake at 400* on a heavy baking sheet for about 25 min.  Chicken layer should have an internal temp of 160* and outside should be golden brown & delicious (GBD).  Allow to cool about 5 min before slicing & devouring.


Tzatziki sauce:
When I made this I instantly thought Geeze wheres my tzatziki sauce???  I LOVE tzatziki sauce!  Unfortunately I didn't have ingredients on hand to make it that day.  I do highly recommend serving this with the sauce, it would add the missing final touch.  Since I didn't make the tzatziki that day I don't have photos of it to share with you.  Sorry about that!

strain plain yogurt in a sieve lined with either a tea towel or coffee filters.  Stir up yogurt & pour into strainer.  Put a bowl under strainer & allow to drain for 8 hrs to overnight.  This will drain off the whey from the yogurt, producing a thicker cheese like texture.  Add herbs, garlic, cucumber & S&P, mix well.  That's it :-)

Wednesday, December 9, 2009

Peppermint shortbread cookies


Ever since the holiday season hit I've had a taste for crispy buttery shortbread with mint & chocolate. Sounds good, right? I searched all my favorite food blogs looking for a recipe that would meet my need, no avail. I searched my tried & true cookbooks, only to be left wanting more.

So what does a good Kitchen Witch do when she has a very craving and no recipe that fills the need? She casts her spell & comes up with one of her own, of course!

It just so happens that we got snow last weekend. Lots of snow. It also so happens that we spent the day at a close friends house, the same good friends who have mad love for the York Peppermint patty. Ah ha! Could this be the time that I make the cookies?? I have a willing test audience and the peppermint patties, festive weather, all signs pointed to YES so the cookies were a GO! And they were a big hit too!

With out further adieu I present to you Peppermint Shortbread cookies.

2 sticks butter room temp
1 c white sugar
1 egg
1 t vanilla
3.5 to 4 c flour
1 t baking soda
1/2 t salt
30 bite sized York Peppermint Patties, unwrapped (You'll want a few extra for the cook to munch on of course)
colored sugars for sprinkling, optional

cream the butter in a stand mixer. Add sugar & allow to beat until light & fluffy. Add egg & vanilla, mix until thick & creamy. Slowly add dry ingredients (sifted together) until you have a very thick dough. This should be like play dough, very stiff. Add more flour if yours isn't quite thick enough.

Scoop dough into 1T balls, flatten with bottom of cup dipped in sugar (to prevent sticking to cup). Place a peppermint patty in the center of each flattened round. With fingers push the sides of the cookie up around the patty, so the patty is nestled in the cookie dough.

Bake at 350* for 15 min. Sprinkle with colored sugars as soon as removed from oven. Allow to cool on tray for 2 min. then transfer to a cooling rack.


Tuesday, December 8, 2009

Coconut double chocolate chip cookies


So its a snowy day and like any good Kitchen Witch I decide to make some cookies. But what kind of cookies I ponder. The husband suggests chocolate chip. I shoot it down immediately, no no no, not chocolate chip, thats an ordinary every day cookie. This is a snow day. It deserves better than a chocolate chip cookie. It needs coconut!

Mmm, yes, coconut indeed. Nice & flaky like the big ol' flakes falling from the sky. Yes, coconut indeed. But what realm of coconut cookie do we want? Crispy and crunchy? Soft & chewy? Maybe a macaroon...crispy on the outside, creamy & chewy on the inside. Yes a macaroon!

Imagine my horror then when I discovered that I had only 1 egg, not enough for the egg whites that a proper macaroon needs. Nor did I have sweetened condensed milk, another important ingredient in the macaroon mix. Curses! This is not how I pictured my snow day cookie baking extravaganza!


Time to put on the thinking cap. One egg. Sugar, flour, coconut. Chocolate chips. White chocolate chips. Wait a minute, maybe a soft cookie laced with coconut and both dark & white chocolate chips could work. Its gotta work - I'm running out of choices here! Its time to work some serious Kitchen Witchcraft or surrender to the plain every day chocolate chip cookie.

Coconut double chocolate chip cookies
1 1/2 sticks butter
1/2 c brown sugar
3 T white sugar
1 egg
1 1/2 t vanilla
2 cups coconut, divided
2 1/2 c flour
1 t cream of tartar

Preheat oven to 350*
Toast 1 c coconut on a sheet tray until golden brown, allow to cool on sheet tray.

Cream butter in stand mixer. Add sugar & beat until light & fluffy. Add vanilla and egg, beat until fluffy again.


Mix remaining 1 c coconut with flour, salt & cream of tartar. Add in 3 installments. Add chocolate chips, white & dark & stir to combine.

Scoop cookies with scoop packed well (1T approx). Roll the cookie in the toasted coconut. Place 12 cookies on a sheet. Bake 12 1/2 min. Coconut will deepen in color & bottom will just toast. They will not flatten out.


Kitchen Witch Basics: White Bread


Today was a good day. We woke up to a fresh layer of snow (6 inches!), schools closed across the city and the hubby decided to stay home & play too! I, not surprisingly, spent the bulk of the morning in the kitchen working some magick in the kitchen.

Bread. The very word can make your mouth water. The aroma of fresh baking bread is quite possibly the best aroma ever.

This simple bread recipe produces great results: tall loaves, crusty brown and light as air. Try this bread - you and the lucky folks that get to enjoy it will be agree: store bought bread with its high fructose corn syrup and partially hydrogenated oils (HFCS and PHO's)just aren't worth the health risks or the $3 a loaf price tag. Homemade bread is comfort at its finest and the perfect thing for a snowy day.


White Bread
makes 1 loaf

4 c King Arthur Bread flour
4 t white sugar (divided)
2 1/4 t yeast (1 packet)
2 T butter diced
1 1/2 t kosher salt (use 3/4 T of table salt if that's all you have)
2 c warm (110*) water

Proof yeast with 1 t sugar & 1/2 c warm water. Mix dry ingredients together in bowl of stand mixer. Once yeast has bloomed add it along with 1 1/2 c water. Knead dough in KitchenAid with dough hook. Add more water (about 1/4 c to 1/2 c depending on conditions) until all flour is incorporated & dough forms a ball. Knead on medium speed for 8 minutes.

Lightly oil a medium bowl. Form a ball with dough, toss in oil in the bowl, cover with plastic wrap & set aside in a warm spot (the kitchen counter is fine, if drafty cover with a towel) until doubled in size.

Once doubled remove dough from bowl. Knead by hand on counter until dough is smooth and elastic. Form into a loaf shape. Place in a sprayed loaf pan, cover loosly with plastic wrap and allow bread to double in size again.

Once bread has doubled, about 2-3 inches over top of loaf pan, remove plastic wrap and place in a preheated 350* oven.

Spray (or use pastry brush) bread with water every 10 min while baking. This helps the browning and produces a nice thick crusty crust. Believe me, water is all it takes!


Bake about 40-50 min or until internal temp reaches 212*. Allow to cool until you can handle bread then remove pan & allow to cool on a cooking rack. Slice & enjoy!

Related Posts with Thumbnails