Friday, September 3, 2010

No Roll Sugar Cookies

I was so happy to find this recipe for sugar cookies on Fat Girl Trapped in a Skinny Body. Julia is a fantastic baker so when she claimed that this cookie was sugar cookie perfection, I knew I had to try it!

In this Witches' opinion sugar cookies should be soft, chewy, vanilla flavored, buttery and sweet. Dry and crumbly should not apply. Neither should high maintenance, kitchen destroying or frustrating. The latter is usually what I experience when I make sugar cookies: High maintenance because you have to make the dough and then chill it for at least an HOUR. Kitchen destroying because you then have to spread flour all over the place and roll them out, cut them out then attempt to transfer to a cookie sheet intact. Frustrating because all the above is happening and usually the flavor isn't what you want anyway, or the dreaded dry crumblies hit. These reasons and more are why you've not seen a sugar cookie recipe on this blog. Until now.

These cookies are totally different. First of all, they're drop cookies! That means no chill out time, no rolling, no flour everywhere, no fuss, no muss! Second, the flavor is what I expect out of a sugar cookie: buttery, sweet and vanilla scented. Soft and chewy inside, slightly crunchy outside. Yes folks, these sugar cookies have it all!

Next time I make these I think I'll frost them instead. A fruit flavored or even a chocolate frosting would be pretty good I think. We chose to roll the cookies in sprinkles and colored sugars. It was a lot of fun for both myself and the Little Witch.


Sugar Cookies

makes 3 dozen cookies
1 1/4 c white sugar
2 sticks butter (1 cup)
3 egg yolks
3 t vanilla
2 1/2 c AP flour
1/2 t cream of tartar
1 t baking soda
1/4 t table salt
about 1/2 c sprinkles, colored sugars or granulated sugar to roll in

Cream the butter and sugar together in a stand mixer with the paddle until very light and fluffy, about 5 minutes on medium speed.

Scrape down the sides and add the vanilla extract. Mix until incorporated. Add the egg yolks one at a time, beating well between each addition and scraping sides of bowl and paddle after each addition.

Mix the flour, baking soda, cream of tartar and salt together in a bowl. Slowly add the dry ingredients, scraping down the sides after each addition.

Scoop balls of dough and roll in colored sugar or sprinkles, coating all sides.


Place 12 cookies on a sheet pan and bake in a preheated 350 oven for 11 minutes or until just set. You don't want these to brown, if they do they'll dry out and not be soft and chewy in the middle.


Nutrition Facts provided by SparkPeople Recipe calculator
Amount Per Serving
Calories 117.1
Total Fat 6.0 g
Saturated Fat 3.6 g
Polyunsaturated Fat 0.3 g
Monounsaturated Fat 1.6 g
Cholesterol 30.9 mg
Sodium 40.8 mg
Potassium 19.5 mg
Total Carbohydrate 15.0 g
Dietary Fiber 0.2 g
Sugars 8.3 g
Protein 1.2 g

Thursday, September 2, 2010

Green Beans Almondine

Green beans almondine is an old skool recipe that has fallen out of vogue. The Kitchen Witch is here to revive this old classic!!

I've had green bean almondine as a side dish in many frozen dinners in my time. I've also had it in a few restaurants, the results left me wanting more from my humble side dish. Sorry, but just dumping a few almonds on top of frozen beans does not constitute an almondine. Green bean almondine should be elegant, nutty flavored and simple yet elegant.

Turns out, like most things, that its not hard at all!! As a matter of fact this side dish takes about 5 minutes from start to finish - yet tastes like you spent all day. It is a family favorite around here, especially now that we've got lots of beans coming in daily from the garden. I hope you try this old time classic for your family soon!


Green Bean Almondine

serves 4
1/2 to 3/4 lb fresh green beans
1 T butter
2 T blanched slivered almonds
pinch of kosher salt

Pinch off any tough ends on the green beans. Place beans into a microwave safe dish with about 1 inch of water at the bottom. Cover with plastic wrap and microwave 3-5 minutes, until beans are tender crisp. Allow beans to rest 1 minute after taking out of microwave to finish the cooking process.

While the beans are steaming prepare the almondine. In a small pan combine the butter and almonds. Heat over medium high heat, stirring often to avoid burning. Cook about 2 minutes or until almonds are golden brown and smell toasty.

Drain green beans and add them to the butter almond sauce. Add the salt & toss to coat. That's it!


Nutrition Facts
provided by SparkPeople Recipe Calculator
4 Servings
Amount Per Serving
Calories 61.9
Total Fat 4.6 g
Saturated Fat 1.9 g
Polyunsaturated Fat 0.5 g
Monounsaturated Fat 1.9 g
Cholesterol 7.8 mg
Sodium 42.6 mg
Potassium 143.6 mg
Total Carbohydrate 4.7 g
Dietary Fiber 2.3 g
Sugars 0.2 g
Protein 1.8 g

Wednesday, August 25, 2010

Capellini Pomodoro

This bowl of beautiful cherry tomatoes, fresh picked from the garden, talked to me the other night.

"Make us into something delicious, please" they said.
"But what? What can you do with cherry tomatoes, other than throw into a salad?" the Witch wondered.
"Pomodoro" they replied. "Capellini Pomodoro"

Pomodoro, well that's a fresh tomato sauce, so yes! Why not? Cherry tomatoes could very well become pomodoro sauce, after all its supposed to be fresh, light and NOT marinara. When I think pomodoro I think summer garden, fresh herbs, light pasta. Summer garden & its bounty, check! Fresh herbs, check! Light pasta, check! Capellini pomodoro it is!

I added a bit of white wine to enhance the tomatoes tart flavor and chicken stock to extend the sauce while keeping the oil low. A few cloves of garlic makes everything happy and its pastas best friend. In less than 10 minutes, from start to finish, I had a satisfying dinner that everyone enjoyed.

Capellini Pomodoro
Makes 2 servings
1/2 lb cherry tomatoes
1 T olive oil
2 cloves garlic, minced
1/2 c chicken stock
2 T white wine
fresh basil
salt & pepper
1/2 box capellini or angle hair pasta

Quarter the tomatoes and mince the garlic.

Bring a large pot of water to a boil. Once boiling salt it heavily, should taste as salty as sea water, and cook the pasta according to directions.

While pasta cooks make the pomodoro sauce by heating a sautee pan over medium high heat. Add the oil, once its hot add the cherry tomatoes and toss to coat evenly. Add the garlic, stir well and often to avoid burning the garlic.

Add the wine and stock, simmer until reduced by half. Add salt & pepper and basil.

Once pasta is al dente drain and add to the tomato sauce, tossing to coat evenly.

Serve with shredded Asiago or Parmesan cheese.


Nutrition Facts provided by SparkPeople Recipe calculator
2 Servings
Amount Per Serving
Calories 296.3
Total Fat 8.6 g
Saturated Fat 1.0 g
Polyunsaturated Fat 1.1 g
Monounsaturated Fat 5.0 g
Cholesterol 0.0 mg
Sodium 822.8 mg
Potassium 216.1 mg
Total Carbohydrate 47.1 g
Dietary Fiber 3.0 g
Sugars 1.0 g
Protein 8.2 g

Tuesday, August 24, 2010

Raspberry Jam

Jellies and jams are a lot of fun to make. Oh sure, it might seem a little intimidating with all the steps involved, and it does seem a little daunting, the whole cooking food now, but preserving it to eat later. These 'old fashioned' techniques have served our mothers, grandmothers and beyond for many years, it helped them extend the harvest of hard won crops and provide food for families throughout the winter. Its a real shame that these 'old fashioned' arts are becoming endangered, and why not really? The Kitchen Witch will be the first to admit its a LOT easier to go to your local grocery & grab a jar of jam off the shelf, than it is to crush the fruit, boil the fruit, sterilize the jars, pour hot syrup into jars and process in a water bath. But once you've tasted homemade jams & jellies, no store bought jar will ever be the same.


The Kitchen Witch is NOT a jelly/jam/preserving specialist. She has, however, read a lot of material about the canning/preserving process and has enough kitchen skills, and equipment, to pull it off. The equipment was an inheritance from the Husband's grandmother in Nebraska. The Witch was delighted to be the recipient of a water bath processor, a pressure canner, tons of jars, rings & new lids as well as freezer containers, the fruit crusher/strainer and everything else you'd need to can a garden's bounty. All this equipment has been tried and tested by at least 2 generations before mine, and I feel a special kinship to those women when I use their canning equipment.

The fruit is straight from the Witches' back yard. Raspberries occupy a back corner of the yard and provide the bright red fruits for this jam. If you don't have a raspberry patch in your back yard, check farmers markets for fresh seasonal fruit or even craigslist, there are lots of people who have fruit trees in their yards and don't need, want or desire the actual fruits. Recently I've seen ads for crab apples, apples and other jamable fruits. All for free, I might add!

All the measurements are in pounds for this recipe, I feel that's the most accurate way of measuring the juice and sugar here, since all fruit produces different amounts of juice. One last note: please don't let the overwhelming amount of sugar used in jam/jellying scare you off. The sugar plays a few roles in the whole process; in addition to sweetening the fruits it also assists in the jelling process. Artificial sugar substitutes can not be used in this recipe, some natural sugars like honey can be used according to information out there. If you are looking to use honey in place of sugar please check a reputable source for the correct canning formula, its not as simple as 2 cups sugar = 2 cups honey, unfortunately. Here are a few good sources: Ball canning and home canning.

Raspberry Jam
makes about 6-8 jars
2.75 lbs raspberry juice (fruit that has been pressed thru a mesh sieve) (about 5.5 cups)
2.12 lbs cane sugar
1 box pectin

Sterilize 8 jelly jars by washing them in soapy water, rinsing then boiling in rapidly boiling water for 10 minutes. Leave jars in hot water until ready to use.


Press fruit through a cone shaped fruit strainer. Discard seeds and pulp once seeds start to come through the holes in the stainer. Believe me its not worth the excessive seeds for the small amount of juice you get.


Heat the juice and sugar in a large pot. I use my pasta/stock pot. The syrup really expands as it boils so make sure you've got plenty of room for expansion.

Once syrup starts to boil sprinkle on the pectin packet. Stir well to dissolve the pectin powder.

Bring to a rapid boil and cook for 10 minutes. A rapid boil is when you can't knock the bubbles down by stirring. Stir every few minutes to ensure even cooking and avoiding scorch spots.


~*~Kitchen Witch Tip: Be sure to sterilize all implements that will come in contact with the jam by boiling in rapidly boiling water for 10 minutes minimum. Do not touch any surface that will come in contact with food, IE jars, use a jar lifter and don't touch the lip or inner surface.~*~

Using a jar lifter remove jar from boiling water. I like to work on a sheet pan lined with an old towel for ease of clean up as well as stability for the jars. Place a sterilized canning funnel on top of the jar and using a sterilized ladle, ladle hot jam syrup into the jar, leaving 1/4 inch head space.

Place a new lid on top. Do not reuse the lids, the sealing compound is only good once. Put a ring on top of the lid and tighten it to finger tight.

Repeat with remaining jam and jars.

Place sealed jars back into the boiling water bath and process in rapidly boiling water for 15 minutes.

Remove jars from water and allow to cool completely. This can take 12 hours or more. Once fully cooled check the seal by pressing on the lid, there should be no give nor should it make a clicking sound. If it does then a proper seal hasn't been achieved. This jar is still fine to eat but it should be consumed as soon as possible and stored in the refrigerator. Properly sealed jars can be stored at room temperature for up to 2 years, if they last that long.


Nutrition Facts provided by SparkPeople recipe calculator
makes 8 jars: 8 servings per jar
Amount Per Serving
Calories 71.5
Total Fat 0.1 g
Saturated Fat 0.0 g
Polyunsaturated Fat 0.1 g
Monounsaturated Fat 0.0 g
Cholesterol 0.0 mg
Sodium 0.0 mg
Potassium 29.9 mg
Total Carbohydrate 18.0 g
Dietary Fiber 1.3 g
Sugars 15.8 g
Protein 0.2 g

Monday, August 23, 2010

Meatballs & red sauce

I love reading other peoples food blogs, I gain so much inspiration from seeing what everyone else out there is making. Meatballs were inspired by Jenn over at Jenn's Food Journey. Jenn makes delicious things, is a grilling guru and an all around great person. Check out her blog, you'll be glad you did.

I don't know why I don't make meatballs more often. These were a major hit, the little Witch ate 3 - which is saying a LOT! I had them leftover for lunch and they were fantastic, and this is coming from the queen of leftover hatred! They come together relatively quickly and make a weeknight dinner feel special. Meatballs will be making more appearances around here, that's for sure!

I sautee my onions and garlic before adding them to the meat mixture. Since these balls are on the smaller side they don't cook as long, and raw onions and garlic wouldn't have enough cooking time to lose their pungency. I also like the added flavors I get from browning them first, then deglazing with a splash of wine. The wine adds a nice acidity and allows all those yummy browned bits to end up in your meatball, where they belong.

The size of the meatballs is a personal preference. I've made large ones & small ones. The small ones seem to be our favorite, you get more yummy browned outside goodness with the small ones. And they fit nicely on a sub roll, too.

Meatballs & red sauce

makes 4 servings, 5 balls each
1 lb lean ground beef
1/2 onion diced
4-5 cloves garlic minced
1/4 c bread crumbs
2-3 T milk
1 egg, beaten
1/4 c Parmesan cheese
4 sprigs fresh oregano, 2 sprigs minced, 2 left whole
2 T white wine
kosher salt & pepper
1 can diced tomatoes
1 T olive oil

Dice the onions and mince garlic first. Heat a large non reactive skillet over medium high heat. Add the olive oil and once hot, add the onions. Cook onions about 3-4 minutes then add the garlic, stirring well. Once the onions and garlic lose their raw smell and start to brown, deglaze the pan with the white wine. Scrape the bits of fond up off the bottom of the pan. Remove the onions & garlic from the pan and allow to cool slightly.


~*~Kitchen Witch Tip: A non reactive pan is either stainless steel or non stick. Reactive would be cast iron or aluminum. Because these metals are untreated by teflon or enamel (like Le Crueset) it will have a chemical reaction to the acid in the tomatoes, wine or anything acidic. It causes the dish to have a metallic, off flavor. If you're unsure about your pan please ask the Kitchen Witch on facebook or in the comments, she's happy to help!*~*

Combine the bread crumbs with the milk and allow to absorb for 5 minutes, while onions are cooling.

In a mixing bowl combine the ground beef, broken up with fingers for ease of mixing, with the egg, 3/4 of the cooled onions and garlic, soaked breadcrumbs, Parmesan, minced oregano, about 1/2 t kosher salt and a few grinds of pepper.


Mix together well trying not to compress the meat too much. I find that using my fingers in a whisking motion helps keep things light and not compressed. Once the ingredients are thoroughly mixed form into balls. I used a cookie scoop to make smaller 1 oz size meatballs, perfect for sandwiches or pasta topping.


Cook meatballs in the same pan that the onions and garlic was cooked in. Heat pan and place meatballs in a circle. Allow to cook on medium heat until bottoms are browned. Turn meatballs 2-3 times for even browning.


~*~Kitchen Witch Tip: It is difficult to keep the round shape when pan frying meatballs, therefore if you desire you can bake them in the oven. In a 400 oven bake meatballs until golden browned and internal temperature is 175.~*~

In a blender combine the can of diced tomatoes, leaves of remaining oregano sprigs and remaining onions and garlic. Blend until smooth.


When meatballs are about 80% cooked remove from the pan. Pour the tomato sauce into the pan, deglazing and scraping any bits up from the bottom. Put the meatballs back into the pan, cover and cook over medium heat for 15 minutes.


Serve on sliced bread for a sandwich or over cooked pasta.
NOTE: This does not make a lot of red sauce, its really more suited for sandwiches than pasta. If serving with pasta the Witch recommends doubling the sauce recipe.


Nutrition Facts
provided by SparkPeople recipe calculator
4 Servings, 5 meatballs each
Amount Per Serving
Calories 428.5
Total Fat 30.5 g
Saturated Fat 11.7 g
Polyunsaturated Fat 1.6 g
Monounsaturated Fat 13.9 g
Cholesterol 143.7 mg
Sodium 906.2 mg
Potassium 456.9 mg
Total Carbohydrate 9.4 g
Dietary Fiber 1.0 g
Sugars 2.0 g
Protein 26.1 g

Monday, August 16, 2010

Roasted corn, potato & chipotle chowder

Another wonderful summer soup! This one was inspired by the veggies in the fridge that needed to be used up TODAY! You know the ones, usually a victim of a fantastic sale, in this case: corn, 5/$1. 4 ears and over 8 days later the corn was a bit past its prime. Not quite compost fodder, but also not hydrated enough to be eaten off the cob.

What do you do with corn that's dehydrated and needs to be used? Roast it in the oven! You could use the grill but I was lazy and wanted to stay in the AC. I've talked before about roasting peppers indoors, and the same steps apply to corn. A word of caution, as the corn roasts kernels will pop and explode. It's fairly loud, and as long as you keep your face a safe distance away, something that's not too hard to do around a hot broiler, you'll be fine. But be aware of some noises, its completely normal.

Chipotles were added for a few reasons, a bit of spice is always nice in a chowder, especially one consisting of corn and potatoes, which can be on the bland side. Chipoltes are dried, smoked jalapenos. The adobo sauce that they're packed in is tomato, onion and spices. The smoking of the chipolte adds an amazing flavor, reminiscent of bacon almost, and worked perfectly with the roasted corn and earthy potatoes. Finally, the chipolte and adobo sauce adds a delightful blush and burst of spiciness to the soup, elevating it to a delicious chowder that's full of veggies and flavor to boot.

Roasted corn, potato & chipolte chowder
makes 8 servings
2 ears corn, roasted
2 green chilies roasted & peeled
2 chipolte in adobo finely minced
dollop of the adobo sauce from the can (1T approx)
4 small yellow potatoes diced
1/2 onion diced
3 cloves garlic minced
1 t cumin
3 T butter
4 T flour
2 cups milk
4 cups chicken stock
4 oz grated extra sharp cheddar cheese
kosher salt & pepper

Roast the corn and green chilies in an oven under the broiler until the corn is slightly charred all over and the chilies are blackened and blistered. Allow to cool. Peel chilies and finely dice. Cut corn off the cob, discard cobs.

In a large soup pot heat the butter until melted. Add the onion and garlic, cooking until the raw smell cooks out, about 5 minutes.

Add the flour and whisk well to incorporate. It will be quite dry, this is ok.
SLOWLY whisk in the milk, about 1/2 cup at a time. The 1st addition of milk will make a very thick paste, each further addition will smooth it out, whisk constantly to avoid lumps.

Add the potatoes, corn, chilies and chipoltes along with the chicken stock and stir to incorporate. Season with salt & pepper to taste. Bring to a simmer and cook, stirring occasionally, for 20 minutes.

Once potatoes are tender and cooked through add the cheese and stir well to melt cheese into soup. Once cheese is melted and thoroughly incorporated, soup's on.


Nutrition Facts provided by SparkPeople recipe calculator
8 Servings
Amount Per Serving
Calories 239.1
Total Fat 10.8 g
Saturated Fat 6.5 g
Polyunsaturated Fat 0.5 g
Monounsaturated Fat 3.1 g
Cholesterol 33.9 mg
Sodium 938.3 mg
Potassium 476.1 mg
Total Carbohydrate 27.3 g
Dietary Fiber 2.8 g
Sugars 4.4 g
Protein 9.3 g

Friday, August 13, 2010

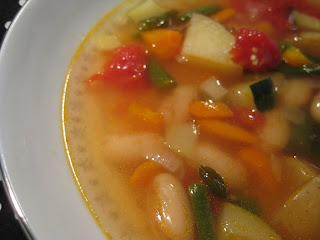
Minestrone soup

Soup might not be something you think about too much in the middle of summer, but I love it any time of year. Not only is soup delicious, but its a fabulous way to feed your family both an inexpensive and healthy meal. This version of minestrone is a lighter stock based soup rather than the tomato based that you may be used to. I prefer the lighter broth version for summer, the tomato based type tends to be heavier and more chili like, in this Witches' opinion.

All of the veggies in this soup, except the zucchini and the can of beans, came from the farmers market. The zucchini came from my garden, the can of beans came from the store. There's no real method or reason behind the vegetation I used in this soup,, nothing screams MINESTRONE!; I simply used what was available from the market and garden and relied on oregano and thyme to flavor the base. There's just something about the way the heady scent of oregano perfumes the broth and weaves the flavors of the veggies together. Potatoes might not be traditional to minestrone, but I had them, and enjoy them more in soup than pasta. Pasta tends to get too swollen and over cooked while the baby gold potatoes stay firm yet creamy.

When topped with the pungent flavor of Asiago or Parmesan cheese its pure heaven in a bowl. Add a bit of homemade bread for dipping and dinner's on. Summertime is the perfect time for a bowl of goodness, especially when its as delicious as this minestrone is. Enjoy!

Minestrone soup
makes 8 large servings
3 tomatoes, peeled and diced (2.5 cups)
2 carrots diced
1 onion diced
4-5 cloves garlic, minced
1 handful green beans, cut into 1 inch pieces
1 bell pepper diced
1 zucchini diced
1 can cannelloni beans (white kidney beans), drained & rinsed
10 cups chicken stock
1/2 c white wine
4 sprigs each thyme and oregano
1 T olive oil
kosher salt and pepper


Blanch tomatoes in boiling water for 30 seconds, put in an ice bath immediately to stop cooking and loosen skins. Peel skins and dice tomatoes. Reserve.

Dice all veggies, drain & rinse the beans. Bundle the herbs together & tie together for easy removal.

Heat a large dutch oven or soup pot over medium heat. Add the oil, once hot sautee the carrots, onions and bell pepper, stirring often, for 3-5 minutes. Add the garlic, stirring often, and cook another 5 minutes or until the raw sharp garlic smell cooks out and it starts to take on a nice toasty aroma.

Add the chicken stock, stirring up any veg that may be sticking to the bottom of the pan. Add salt and pepper along with the herb bundle and remaining veggies and simmer uncovered for 30 minutes, stirring occasionally.

Remove the herb bundle before serving. Taste for season adding more salt & pepper if needed. Serve with fresh Parmesan cheese and bread.


Nutrition Facts provided by SparkPeople recipe calculator
8 Servings
Amount Per Serving
Calories 113.7
Total Fat 3.4 g
Saturated Fat 0.3 g
Polyunsaturated Fat 0.3 g
Monounsaturated Fat 1.3 g
Cholesterol 0.0 mg
Sodium 1,474.2 mg
Potassium 497.5 mg
Total Carbohydrate 16.7 g
Dietary Fiber 4.1 g
Sugars 1.7 g
Protein 5.2 g

Wednesday, August 11, 2010

Mayonnaise

For over 30 years the Kitchen Witch has hated, despised and been revolted by mayonnaise. Why, I really don't know. Something about the texture, gloopy and gloppy, the flavor, kinda sour and strange, and the fact that 'everyone' said that I SHOULD like it was enough to convince me that I would NOT indeed like it, thankyouverymuch! Then one day an epiphany struck: most everything that's store bought is better, much much better, when homemade. The Kitchen Witch wondered about mayonnaise, would homemade be better than store bought? There was only one way to find out, that was to make some!

Turns out that homemade mayo isn't that hard, as long as you have a stand mixer with a whisk attachment. I've tried 3 batches of mayo now: the first was in the blender using Alton Browns recipe, the 2nd was Alton's recipe again but in the stand mixer and the last was this recipe provided by Aunt Ruth and Uncle Gene - slightly Kitchen Witched, of course. Here's my findings:

The Alton recipe has great flavor. The blender method did not work for me, it could be because my blender has a large carafe. There were chunks of unprocessed egg yolk in the blender version and it also broke & separated. It was NOT pretty I guarantee you that.

I remade the same recipe in my KitchenAid stand mixer and had much better results. The mayo didn't separate and had a nice emulsion. I also liked how Alton's recipe calls for adding the vinegar in 2 installments to denature the yolks which allows them to emulsify the oil better. Fantastic tip AB!

The 3rd is the one I'm posting here. I added a few things from AB's recipe to this one to make it more my own. It calls for a whole egg vs the yolk only and the emulsification was easier to achieve but it wasn't as thick as the yolk only version. It is however the one that I photographed so I'm posting it for you all :)

All in all I have to say that homemade mayonnaise is a lot better than store bought. The lack of artificial anything is fantastic and the flavor is astronomically better. I liked the consistency of the yolk only version so I'll be playing with these recipes more. Look for more mayo posts to come soon. Best of all I can now say that the Kitchen Witch is no longer a mayo hater, as long as its homemade that is.

Mayonnaise
makes about 20 servings, 1 tablespoon each
1 egg
1/2 t dry mustard powder
1/4 t paprika
dash ground red pepper or cayenne
1/2 t kosher salt
1 c oil (canola is fine)

Mix the vinegar & lemon juice together In a small bowl. Divide the oil into 2 bowls, 1/2 c each. Set aside.

In the work bowl of a stand mixer add your egg, spices and 1/2 of the vinegar mixture. With the whisk attachment beat the eggs until they are foamy, about 30 seconds.


Turn the speed up to 10 on the mixer and SLOWLY, and I mean slowly, add the oil, a few drops at a time. You'll want to slowly drizzle the oil in as the emulsification starts to take form.


~*~Kitchen Witch Tip: If you have a turkey baster use it to dispense the oil into the eggs. It will make your mayo making a lot easier. No baster? No problem! Simply use a bowl that will pour out in a small stream. The key to successful mayo is the slow introduction of oil to make an emulsification.~*~

Once you've added the 1st 1/2 cup of oil scrape down the sides, add the remaining vinegar mix, whisk until incorporated well. Then start to add the last 1/2 cup oil SLOWLY.

You can really see the mayo starting to come together here, its getting thick and rich.

The entire process takes about 15 to 20 minutes. Don't rush this or you will end up with an oil slick on top of some foamy eggs. I tried to outsmart it & rush things, it didn't go so well. Its gross, believe me.

After 20 minutes of whisking on HIGH speed you've got mayo!


Nutrition Facts provided by SparkPeople Recipe Calculator
20 Servings, 1 Tablespoon each
Amount Per Serving
Calories 100.6
Total Fat 11.2 g
Saturated Fat 0.9 g
Polyunsaturated Fat 3.3 g
Monounsaturated Fat 6.5 g
Cholesterol 10.6 mg
Sodium 10.9 mg
Potassium 4.1 mg
Total Carbohydrate 0.2 g
Dietary Fiber 0.0 g
Sugars 0.1 g
Protein 0.3 g

Friday, July 30, 2010

Caramelized onion goat cheese and zucchini galette

Another galette? Really, Kitchen Witch??

YES! A resounding YES is my answer to that question. If you haven't tried making a galette yet my only question is WHY NOT?!? They are easy, impressive and best of all, delicious!! Heck, the Kitchen Witch has become so obsessed with them that she now keeps a round of galette dough in the fridge ready to roll out: you never know when the galette jones is going to strike - who wants to wait 3 hours for deliciousness to be done? By keeping a round of pastry in the fridge I can have a galette on the table in 1 hour flat.

I've made and blogged about a few galettes now. Every time I make one I'm impressed with how flaky the pastry is, how delicious the filling is and how simple it was to prepare. A galette is the perfect canvas for any flavors you like, sweet or savory, using the best of whats in season in a different and tasty way. Which leads me to today's galette, caramelized onion goat cheese and zucchini.

Its no secret that the Witch loves the following items:
goat cheese
caramelized onions, deglazed with white wine preferably
zucchini
galette pastry
Which is why they ended up in the best galette I've made to date. Creamy. Smooth. Rich. Savory. Indulgent.
Goat cheese can be slightly grainy so the Witch counteracted that with a small amount of cream cheese. Whipping the two cheeses together with a bit of fresh thyme and a splash of white wine really smoothed out the texture making it perfectly spreadable. Goat cheese has a tang to it which played so nicely off the caramelized onions. I browned the onions slowly in a bit of butter and a few sprigs of thyme. 90 minutes later they were a golden color so I deglazed with white wine, the fond that had formed on the bottom of the pan was dissolved by the wine and redistributed onto the onions, added even more sweet delicious flavor. Garden fresh zucchini were sliced very thin and arranged on top of the cheese and onion layer, adding a pretty punch of color and a delicate flavor. A grating of Asiago cheese over top completed the galette, it also helped it to become golden brown in the oven.

The flavors in this galette are out of this world good. So savory, so rich, so delicious!! Both the husband and the Witch agreed that we'd be more than happy to spend up to $10 a slice for this deliciousness in a French bistro. If you've got some friends or family or just yourself that you'd like to impress with your mad cooking skillz, make this galette. You, and your guests, will be happy you did.


Caramelized onion goat cheese zucchini galette
makes 8 wedges
1 1/2 c flour
1 t table salt
1 stick butter diced
1/4 c sour cream
1/4 c ice water
2 t lemon juice
1 small zucchini sliced into 1/8 in slices
2-3 onions sliced thin
2 T butter
splash white wine (1-2T)
7 oz goat cheese, chevere
2 oz cream cheese
4 sprigs fresh thyme
2 T fresh grated asiago cheese
1 egg yolk and a splash of water for egg wash


Make dough
: In the work bowl of your food processor, add the flour, salt and cold butter. Pulse 10 times (1 second bursts). Mix the sour cream, water and lemon juice together. Add the liquid to the processor and pulse 7-10 more times, until the dough starts to form a ball. Remove dough and press into a large flat circle (about 10 in diameter), cover in plastic wrap and refrigerate for 1 hour minimum.

Caramelize the onions with 2 T of butter in a small dutch oven over medium low heat. This takes about 1.5 to 2 hours to achieve a blond color, do not rush this step! The slow caramelizing process really brings out the sweetness of the onion, rushing this step could result in burned bitter onions. Add 3 sprigs fresh thyme after browned, a pinch of salt and splash of white wine (about 2T) to deglaze. Stir up any browned bits from the bottom of the pan and reduce until liquid is syrup consistency.

Mix the goat and cream cheeses together with a pinch of salt, 1 sprig of thyme leaves and a splash of white wine. Whip well with a stand mixer (or hand mixer if that's what you have) until its lightened and fluffy.

Slice the zucchini thin, into 1/8 inch rounds and set aside.

Roll the chilled galette dough out to form a large circular shape (about 14-16 inches diameter). Transfer the rolled dough to a parchment or silpat lined sheet pan for construction.

Spread the goat cheese mixture in the middle, leaving at least 3 inches of pastry on the edges to form the top crust.


Top the cheese with the caramelized onions, removing thyme stems.


Arrange the zucchini slices in an overlapping spiral pattern over top of the onion layer.


Fold the edges of the galette over on top, making a crust/overlap. Fold and pleat the dough as needed to make it round(ish) and create an edge crust to hold everything in while baking. Brush the edges with the egg wash, applying an even coating to assist in browning. Top the entire galette with fresh grated Asiago or Parmesan cheese.


Bake at 350 for 30 to 45 minutes, or until galette is browned. Serve with a small salad if desired. Stand back, wait for the compliments to roll in and bask in the glory :)


Nutrition Facts provided by SparkPeople Recipe Calculator
8 Servings (1 slice per serving)
Amount Per Serving
Calories 353.6
Total Fat 25.0 g
Saturated Fat 15.7 g
Polyunsaturated Fat 1.0 g
Monounsaturated Fat 6.6 g
Cholesterol 87.8 mg
Sodium 450.3 mg
Potassium 134.9 mg
Total Carbohydrate 22.4 g
Dietary Fiber 1.4 g
Sugars 0.3 g
Protein 9.8 g

Wednesday, July 28, 2010

Cinnamon Ice Cream

Many years ago my Witch Sissy worked at a restaurant that had the best cinnamon ice cream ever. It was the only thing on the menu worth eating, by the way. Ever since the demise of said lousy restaurant I've heard her wax poetic about the joys of this cinnamon ice cream.

"Its creamy, sweet and spicy. It's got a strong cinnamon flavor that borders on red hots but not fake. It the best ice cream ever" says Witchy Sissy, the certified dark chocoholic. The Kitchen Witch thinks "Damn, that's gotta be some good ice cream for you to be talking about it still, more than 10 years later AND its not chocolate!"

So I made some for her for her, after all it IS national Ice Cream Month. I added the cinnamon to the cooking milk, cream and sugar, when cinnamon is heated it intensifies, bringing out that CINNAMON flavor that we associate with red hots, spicy and hot, but not overdoing it. The result is a flecked pale ice cream that does not hint of its deliciousness. Its sweet, creamy, spicy and very very cinnamon flavored. Perfect with an oatmeal cookie. Witchy Sissy agrees, its a winner - and just as good as the restaurants version. That makes me a happy Kitchen Witch!

Cinnamon Ice Cream
makes 8 (1/2 cup) servings
2 egg yolks
1/2 c sugar
2.5 c milk
1.5 c heavy cream
1 t vanilla extract
1 t cinnamon

In a small sauce pan over medium heat, combine the milk, cream sugar and eggs. Whisk well. Add cinnamon, stirring constantly until temperature reaches 160.

~*~Kitchen Witch Tip: the cinnamon will be difficult to incorporate, keep stirring!! I found that rubbing the back of the spoon against the pan to smash the cinnamon helped it incorporate better. Straining the ice cream base will remove any scrambled eggs as well as large unincorporated cinnamon chunks. It will NOT look pretty while cooking, this is ok! ~*~


Pour heated ice cream base through a sieve to strain out any lumps, add vanilla and chill in an ice bath or overnight in the refrigerator.

Once ice cream base is thoroughly chilled pour into an ice cream machine and follow manufacturers instructions, until ice cream is frozen and the consistency of soft serve. You can serve ice cream now or transfer to a freezer safe container and freeze to firm up.


Nutrition Facts
provided by SparkPeople Recipe Calculator
8 Servings
Amount Per Serving
Calories 256.1
Total Fat 19.1 g
Saturated Fat 11.6 g
Polyunsaturated Fat 0.9 g
Monounsaturated Fat 5.7 g
Cholesterol 118.4 mg
Sodium 50.3 mg
Potassium 40.5 mg
Total Carbohydrate 17.7 g
Dietary Fiber 0.2 g
Sugars 16.2 g
Protein 4.1 g

Friday, July 23, 2010

Indian Style Curry - potato, chick pea, zucchini, cauliflower and peas

I find the best recipes and ideas while out in the blogosphere. Design Wine and Dime is no exception. A few weeks ago she posted a mouth watering recipe for Rava Dosas with potato chickpea masala. After I read the post I could not get this recipe off my mind.

While browsing one of my favorite cookbooks, America's Test Kitchen, Best of 2008, I discovered a curry recipe. Most everything I've made from this book was delicious so I decided to go for it. It shared a lot of similar ingredients and methods with Design Wine & Dine's recipe, which sparked my curry thought pattern initially.

A trip to the farmers market yielded me some nice red baby potatoes. I found a great deal on organic cauliflower at the grocery store as well. The chick peas are a staple in my pantry, along with spices like curry and garam masala. Everything included this meal cost less than $5, it has all organic produce, some if from my very own yard, and was delicious!

Browning the onions and potatoes together help build the flavor base. Toasting the curry powder and garam masala aids in bringing the freshest flavors out of the spices, adding another layer of flavor. The dish takes about 45 minutes from start to finish, but tastes like it took all day. No one, even the meat loving husband, missed the meat in this dish. It is extremely hearty and filling and most of all, extremely delicious!


Indian Style Curry: Potato, chick pea, zucchini, cauliflower and peas

makes about 5 hearty portions
adapted from America's Test Kitchen best of 2008 Cookbook
2 T curry powder
1 1/2 t garam masala
1/4 c canola oil, divided
1 large onion, fine dice
12 oz, about 6 small, red bliss potatoes, cut into large dice
4 cloves garlic minced
1 T fresh grated ginger root
1 jalapeno pepper, seeded if desired, fine dice
1 T tomato paste
1/2 medium head cauliflower, cut into small florets
1 medium size zucchini, diced
1 (14.5 oz) can diced tomatoes, pulsed in a food processor or blender
1 1/2 c water
1 can chick peas, drained & rinsed
kosher salt to taste (veggies need lots of salt, season generously, 1 to 1.5 t kosher salt)
2 handfuls frozen peas
1/4 c heavy cream or coconut milk

Toast the curry powder and garam masala in a small skillet over medium high heat, stirring occasionally until spices darken slightly and become fragrant, 30 seconds to 1 minute.. Remove spices from pan and set aside.

Heat 3 T oil in a dutch oven over medium high heat. Once oil is hot add the onions and potatoes, cook stirring occasionally until potatoes begin to brown on edges and onions are golden, about 10 minutes. Once browning begins reduce heat to medium.

Push the potatoes and onions to the side of the pan making room in the center to work. Add the remaining oil along with the garlic, ginger, jalapenos and tomato paste, stirring constantly until fragrant, about 30 seconds. Add the toasted spices, stirring constantly, cool for about a minute longer.


Add the cauliflower & zucchini next, stirring well to cover in spices. Once the vegetables are thoroughly coated in spices add the tomatoes, water and chickpeas. Season with salt. Be sure to scrape up any browned bits off the bottom of the pan.


Bring to a simmer, cover and cook about 15 to 20 minutes, or until potatoes are tender. Stir occasionally while cooking to avoid veggies from sticking to bottom of pan.


Once potatoes are done add the peas and cook about 2 minutes longer. Add the cream or coconut milk, stir well, add more salt if needed and serve over basmati rice.


Nutrition Facts provided by SparkPeople Recipe Calculator
5 Servings
Amount Per Serving *not including rice*
Calories 292.5
Total Fat 13.2 g
Saturated Fat 1.4 g
Polyunsaturated Fat 3.9 g
Monounsaturated Fat 7.0 g
Cholesterol 2.3 mg
Sodium 677.5 mg
Potassium 1,103.5 mg
Total Carbohydrate 39.1 g
Dietary Fiber 8.6 g
Sugars 1.7 g
Protein 8.2 g
Related Posts with Thumbnails