Wednesday, October 10, 2012

Pasta e Fagioli


 I'm going to date myself for a moment;  I remember when the first Olive Garden came to our town, close to 25 years ago!  I had never heard of it, but the food looked amazing on the commercials, so upscale and different than anything our town had to offer.  We went there shortly after opening and I had pasta e fagioli soup for the first time.  The menu described it as Italian chili, I figured how could it be bad and ordered a bowl.  It's been my all time favorite Olive Garden soup ever since.  Every time we go there I look forward to the soup.  The few times I've gotten salad instead of soup, I regret it every time.  Oh sure, the salad IS delicious, but the pasta e fagioli...I love it!  Tomato broth, loaded with beans and pasta tubes, lightly seasoned but so very flavorful.  It's really just so good!  And yet I never tried to make it at home.  Until now!

Knowing that I wanted Olive Garden pasta e fagioli I decided to just search for a recipe online rather than try to recreate it from memory.  Sadly it's been years since I've enjoyed the soup at the restaurant - so a recipe was in order.  Todd Wilbur of Top Secret Recipes usually does a pretty darn good job of imitating the original restaurant recipes.  A quick look through the ingredients list and I knew this was the recipe for me.   It had the veggies that are in the soup and most importantly of all (in this Witches' opinion) he used the correct pasta.  So many recipes out there call for shells or elbows, all fine substitutions but come on, if you're  recreating the recipe use the right pasta for crying out loud!  The recipe is very easy and pantry friendly, I had everything on hand except the V-8.  No problem, a quick trip to the store fixed that and we were on our way to pasta e fagioli heaven!

What can I say?  This soup is every bit as good as the Olive Garden's.  Better, actually, because I know what I put in it.  It's perfect on chilly fall days, paired with traditional breadsticks and salad it makes a great meal.  The entire family loved this soup.  So much that I made a second pot 3 days later for us to eat for lunches.   Pasta e fagioli is a budget friendly, kid friendly, yummy and easy to put together meal that the entire family will enjoy.  I hope you make a pot of it soon!

Pasta e Fagioli
makes 8 generous servings
source:  Olive Garden, Top Secret Recipes
1 lb ground beef
1 small onion diced fine (1 cup)
3 stalks celery chopped (1 cup)
3 carrots grated (1 cup)
3 cloves garlic minced fine
2 14.5 oz cans diced tomatoes with juice
1 15 oz can tomato sauce
12 oz V-8 vegetable juice blend
1 T white wine vinegar
1 can cannolini beans (white kidney beans), drained and rinsed
1 can kidney beans, drained and rinsed
1.5 t dried oregano
.5 t dried thyme
1 T  kosher salt OR 1.5 t table salt
2 cans water (I use the tomato sauce and diced tomato cans, that way I rinse out the tomato residue into my soup)
1/2 lb (1/2 box) ditalini pasta (short round tubes)

In a large dutch oven or soup pot brown the beef.  Drain off any excess fat.  Add the onions, carrots, celery and garlic.  Sautee about 10 minutes or until the veggies are starting to soften.  Add everything EXCEPT the pasta to the pot.  Stir well, bring to a boil, reduce to simmer and cook for 1 hour, stirring 2-3 times during the cooking process.

Cook pasta according to package directions.  Drain and reserve.

Put about 1/3 c cooked pasta in each bowl and ladle hot soup over top.  Serve with grated cheese if desired.

Nutrition Facts calculated at SparkPeople recipe calculator 8 Servings Amount Per Serving Calories 369.0 Total Fat 12.7 g Saturated Fat 4.8 g Polyunsaturated Fat 0.7 g Monounsaturated Fat 5.2 g Cholesterol 42.5 mg Sodium 599.0 mg Potassium 872.9 mg Total Carbohydrate 45.2 g Dietary Fiber 7.3 g Sugars 6.5 g Protein 19.7 g

Tuesday, September 25, 2012

Bacon and broccoli mac and cheese

The Kitchen Witch is SO happy fall is here!  Food is always better in the fall; slow braises, oven baked casseroles, yes, this is when comfort food reigns king.  Speaking of comfort food, did you read the title of this one?  Bacon mac & cheese??  Yes, I'm serious.  And dude, it's goooooood!!  There's an unholy amount of cheese in this recipe, which only compliments the pound of bacon that's in it.  I said it was comfort food.  Not healthy food!

The smokey bacon enhances the sharp cheddar, Parmesan adds it's strong flavors as background support, cream cheese makes it velvety smooth, feta adds bites of sharp salty goodness.  Broccoli is only made better by cheese so it's a natural in this dish.  The bacon makes a return appearance in the crumb topping which is delicately herbed and provides a nice crunch to the soft texture of pasta in cheese sauce.


Bacon and broccoli mac and cheese
makes about 6 dinner size portions, 10-12 side dish size portions
1 package bacon, sliced into small pieces, cooked crisp, reserve fat
1 head broccoli florettes cut into very small pieces
1-2 T fine minced onions
3 cups shredded cheddar cheese
4 oz cream cheese
1/2 c grated parmesan cheese
1/2 c feta cheese
4 cups milk
1/4 c reserved bacon fat
1/2 c flour
1 lb shell pasta cooked al dente (use your favorite shape!)
3 slices bread OR1/2 sleeve butter crackers, crushed to crumbs
3/4 t thyme
pinch paprika
kosher salt & pepper to taste

Preheat oven to 400F.

Cook bacon until crisp.  Remove bacon from pan and set aside.  Reserve about 1/4 c bacon bits for topping.

In the bacon fat sautee the onions until they start to brown and caramelize, about 2 minutes.  When onions are at desired brownness add the  flour and whisk to incorporate.  Stir flour roux over medium to medium high heat until slightly browned and toasty smelling.  Slowly whisk in the milk, sauce may clump at first, keep whisking and slowly adding milk, it'll work itself out.  Bring sauce to a simmer, cook for 2-3 minutes stirring very frequently to avoid scorch spots.

Remove from heat, add the cheddar, cream and parmesan cheeses, stirring until melted.

While cheese sauce is cooking cook pasta.  When there's about 4 minutes left in the cooking add the broccoli to the pasta water.  Cook pasta according to manufactures instruction until pasta is al dente.  Drain well and add cooked pasta and broccoli to the cheese sauce, stir well then add feta cheese and bacon, mix to combine.

Pour into a sprayed casserole dish.  This will really fill up the dish so I'd recommend putting the dish on a baking sheet to catch any spill overs.

Make crumb topping by combining the crackers or bread with the thyme, paprika, a pinch of salt & pepper in the work bowl of a food processor.  Pulse until you have medium size crumbs.  Add the reserved bacon bits, pulse a few more times to chop bacon & distribute the bacon's fat to the crumbs.

Top the casserole with bacon crumbs and bake for 20-30 min or until crumbs are toasted and cheese is bubbling on the sides.

Nutrition Facts calculated at SparkPeople recipe calculator 6 meal size servings Amount Per Serving Calories 1,013.2 Total Fat 53.5 g Saturated Fat 30.4 g Polyunsaturated Fat 3.1 g Monounsaturated Fat 17.0 g Cholesterol 174.6 mg Sodium 1,620.4 mg Potassium 851.2 mg Total Carbohydrate 87.5 g Dietary Fiber 5.2 g Sugars 7.7 g Protein 47.5 g

Saturday, September 15, 2012

Pumpkin Cream Cheese bread

Earlier this summer the Witch found this pin on Pintrest.  You all know Pintrest, right?  It's the latest & greatest in social media.  Anyway, it was about 100F outside when I found this bread.  It took all my will power NOT to make it then.  It looked SO good, I had a can of pumpkin in my pantry & everything.  However, I resisted.  Even an avid pumpkin lover like the Kitchen Witch can't justify turning on the oven and making pumpkin bread when it's 100F outside.  No, a bread that's earthy and spicy like that needs fall.  It requires cool weather, maybe even some rain.  Am I the only one who has specific scenarios about weather & what you should be eating?  I'm strange, what can I say!  Imagine my delight when in the 2nd week of September I got my weather wish!  It was cold, 50 was the high of the day, and it rained.  Oh boy did it rain!  I had to make the pumpkin cream cheese bread, the weather won't get more perfect for it!  So I did.  And it was delicious, perfection with a cup of coffee on that dreary afternoon.

My cream cheese layer didn't stay on top like it did for An Edible Mosaic, but she also made hers into 3 demi loaves.  I don't have demi loaf pans so I made one regular sized one.  The cream cheese sunk into more of a tunnel in my bread, which was pretty darn delicious, like a cheese danish surrounded by pumpkin bread.  Mmmm!  When you test this bread for doneness don't go for the center, you're likely to hit a cream cheese pocket.  Rather, go closer to the edge where the bread layer lies.  The bread is spiced and earthy and super moist with out a ton of oil, something that is rare in quick breads.  I made extra pumpkin batter (the recipe easily doubles, and really who wants 1/2 a can of pumpkin kicking around the fridge?) and baked them into muffins with chocolate chips.  They turned out fantastically as well.  This is my new go to pumpkin bread recipe for sure!  Thank you to An Edible Mosaic and Pintrest for leading me to this bread.  Now go make some for yourself!

Pumpkin Cream Cheese bread
source:  An Edible Mosaic
makes 1 loaf, approx 8 servings per loaf

Cream cheese batter:
8 oz cream cheese at room temp
1 egg at room temp
1/4 c powdered sugar
1/2 t vanilla extract

Pumpkin bread batter:
3/4 c brown sugar
2 large eggs
3/4 c pumpkin puree (about 1/2 a can)
2 T canola oil
1 t  vanilla extract
1 1/4 c all-purpose flour
1 1/4 t baking powder (aluminum free preferably)
1/4 t baking soda
1/4 t salt
3/4 t cinnamon
1/2 t nutmeg if using preground.  If grinding fresh nutmeg reduce the amount to approx 1/8t.
1/4 t ground ginger
1/8 t ground cloves

Make the cream cheese batter first by mixing the ingredients together with a mixer until smooth and creamy.  Set aside.

Make the pumpkin batter next by combining the brown sugar, oil and eggs together.  Mix until lightened in color.  Add vanilla and pumpkin and mix until incorporated.

Combine the dry ingredients together and slowly add to the pumpkin mix in the bowl.  Stir until just barely combined.

Spray a loaf pan with non stick spray and line with parchment to make a sling.  Pour the pumpkin batter into the pan and top with the cream cheese batter.  Bake in a preheated 350F oven for 45 minutes or until the edges are golden browned and it tests clean with a tooth pick.  Allow to cool before removing from pan.


Nutrition Facts provided by SparkPeople recipe calculator 8 Servings per loaf Amount Per Serving Calories 327.7 Total Fat 15.5 g Saturated Fat 7.1 g Polyunsaturated Fat 1.9 g Monounsaturated Fat 5.6 g Cholesterol 100.6 mg Sodium 380.9 mg Potassium 199.9 mg Total Carbohydrate 49.0 g Dietary Fiber 1.2 g Sugars 32.0 g Protein 6.7 g

Friday, September 14, 2012

Roasted garlic and tomato zucchini galette

The Kitchen Witch hasn't done a galette in a while.  It's been too long, really.  One bite of this delicious pie and I remembered why it is that I adore a galette so much.  Rich.  Flavorful.  Simple yet bold.  It's just so darn good!!  This particular galette has a cream cheese base, flavored with roasted garlic and is topped with vine ripe tomatoes and zucchini.  I reduced balsamic vinegar to a thick syrup and drizzled it on top, crowing the glorious thing with a chiffionade of basil.  It was amazing!

The balsamic reduction really hit some amazing notes, the sourness of the vinegar is toned down by reducing, bringing out a lot of sweetness.  Yet enough of the tart vinegar remains to help cut through the rich buttery crust and cheesy filling.  And the deep color of the balsamic syrup was very pretty against the golden crust, red tomatoes and green zucchini.  Fresh basil adds the much needed herbal addition as well as burst of fresh green color.

Roasted garlic and tomato zucchini galette 
makes 8 slices
1 1/2 c flour
1/2 c butter cut into cubes
1 t table salt or 1.5 t kosher salt
1/4 c sour cream
1/4 c ice cold water
juice of 1/2 lemon (2T)
8 oz cream cheese at room temperature
zucchini
2 tomatoes
kosher salt & pepper to taste
4 cloves roasted garlic
3 T grated parmigiana cheese
1 egg yolk
approx 1/2 c balsamic vinegar, reduced to2-3T syrup
10 leaves basil chiffionade

Make galette dough
Combine the flour, salt and cubed butter in a bowl.  Place bowl in the freezer for 30 minutes to chill ingredients.  Mix the sour cream, lemon juice and ice water together in a separate bowl.  In the work bowl of a food processor add the flour & butter.  Pulse 5 times - using 1 second bursts of power.  Add the liquid and pulse 5 more times.  Pour dough out onto plastic wrap, form into a round, wrap with plastic and refrigerate for 1 hour minimum.

Prepare the cheese mixture next.  In the work bowl of a stand mixer add the cream cheese,2T  parmigiana cheese, garlic cloves and a pinch of S&P.  Beat with flat beater for about 2 minutes until cheese is light and fluffy and the garlic has mashed into the cheese.

Slice the tomatoes and zucchini very thin.

Roll the galette dough out to a 14 inch round (approx).  Spread the cream cheese mixture in the center, leaving about 3 inches of dough on the edges.  Layer the zucchini and tomatoes in a fan pattern around the galette.  Fold the dough edges up and over, covering some of the tomatoes and zucchini.  Brush crust edges with egg wash and sprinkle with remaining 1T parmigiana cheese.  Bake in a preheated 375F oven for 45-60 minutes, until the sides are browned and crisp.

While galette bakes reduce the balsamic vinegar by boiling it until it reduces by half.  The syrup will thicken as it cools.

After gallette is baked chop the basil.  Drizzle the balsamic syrup on top of the galette and top with basil chiffionade.


Nutrition Facts provided by SparkPeople recipe calculator 8 Servings, 1 slice each Amount Per Serving Calories 357.7 Total Fat 26.1 g Saturated Fat 16.1 g Polyunsaturated Fat 1.1 g Monounsaturated Fat 6.8 g Cholesterol 96.0 mg Sodium 467.7 mg Potassium 212.1 mg Total Carbohydrate 24.2 g Dietary Fiber 1.3 g Sugars 0.6 g Protein 7.8 g

Wednesday, July 4, 2012

Potato Salad - the best ever!


Happy 4th of July!  What goes better with a cook out than potato salad?  Here's a recipe for a delicious and easy one that even potato salad haters will like.  This recipe is from Andrea the Kitchen Witch archives - it's an oldie but a goodie!

Let me first say that the Kitchen Witch is NOT a potato salad kind of girl. I have this mayo hate issue that I just can't seem to get past...and cold potatoes, well lets just say there's not much to potato salad for me to like. That is until I tried this one. I've adapted it from America's Test Kitchen. I liked the techinque they used of pouring pickle juice and mustard over the hot potatoes, the potatoes absorb this flavorful liquid as they cool, so each potato piece is seasoned. That intrigued me.

Lets just review real quick like, shall we? The Kitchen Witch does not like the following things:
Mayo
Mustard (I know, I know, I try to like it but its just not my thing I'm sad to say)
cold potatoes
pickles
celery seed

And yet this recipe has all of these in it. (Well except the mayo, I used Greek yogurt this time, awesome! I have made it with mayo as well and even then it was delicious.) So its chock full of all sorts of ingredients that on their own I don't like. At all. But for some strange reason of cooking Witchcraft, when combined into this potato salad, well they are a symphony of flavors that compliment each other perfectly. And this is from a tried and true potato salad hater.

Try this one, I'm pretty sure you'll be glad you did!

Potato Salad
makes about 6 servings
4 large or 6 small red potatoes, peeled & diced into 1/2 in cubes (Yukon golds are good too)
1/2 red bell pepper finely diced
1/4 small onion, finely diced
2 large dill pickles, finely diced
1 small rib celery, finely diced
4 hard boiled eggs, diced
3 T yellow mustard
½ c pickle juice
1/4 c Greek yogurt
2T sour cream
1/2 t celery seed
S&P

Boil potatoes in heavily salted water about 7-9 min or until done but still firm. DO NOT OVER BOIL or they will fall apart.


While potatoes cook mix mustard & pickle juice w/ about 1 t kosher salt and 1/8 t ground pepper, set aside until potatoes are cooked.


When potatoes are tender and no longer crunchy inside, drain them then pour onto a sheet pan. Pour mustard mix over potatoes, stiring to coat all sides. Allow potatoes to cool at least 1 hour.

While potatoes cool chop all veggies and set aside.

Once potatoes are cooled mix the yogurt, sour cream, celery seed & a pinch of kosher salt & a few grinds of pepper until smooth & creamy.

In a large bowl add potatoes (drain off any excess mustard liquid, there shouldn't be much as the potatoes absorb this flavoring) and diced veggies. Mix well to incorporate. Add the dressing, stir well to coat potatoes in creamy sauce. Top with diced eggs & serve.


Nutrition Facts provided by SparkPeople Recipe Calculator
6 Servings
Amount Per Serving
Calories 191.3
Total Fat 4.7 g
Saturated Fat 1.7 g
Polyunsaturated Fat 0.6 g
Monounsaturated Fat 1.7 g
Cholesterol 143.1 mg
Sodium 630.6 mg
Potassium 699.3 mg
Total Carbohydrate 27.9 g
Dietary Fiber 3.7 g
Sugars 2.7 g
Protein 10.1 g

Thursday, June 14, 2012

Roasted Garlic

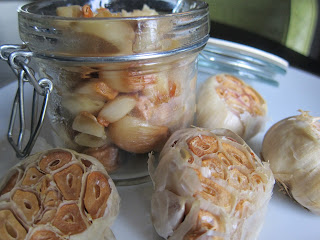
My local grocery store had a pound of garlic for $1.50 - a fantastic price and a LOT of garlic.  After getting home I looked at that garlic and thought What am I gonna do with all this garlic??  Chicken with 40 cloves came to mind immediately, it's delicious no doubt, but we were having a heat streak and it just didn't seem seasonally appropriate.  That's when I thought I'd roast it!  Roasted garlic had it's hayday back in the early 90's.  It may not be the uber hot flavor anymore but roasted garlic is still delicious and deserves to be known about.  And because I like to use my blog as my own cookbook/reference tool, I thought it was high time I posted this easy yet very important recipe.

Here's a few ideas of where you can use your roasted garlic:  
hummus 
smear on toast for flavorful bruschetta
add to soups & stews
add to mashed potatoes
vinaigrette and salad dressings
marinades
add to rice for a light garlicky scent


Roasted Garlic 
whole garlic heads (as many as you want, there's about 15 cloves in each head on average)
drizzle of olive oil
sprinkle of kosher salt
aluminum foil for making a roasting pan to hold garlic


Cut the tops off the garlic heads, going down about 1/3 of the way to expose the garlic cloves.  Discard or compost the cut off tops.

Make a small bowl that will hold the garlic heads upright out of aluminum foil.  Crumple the sides to support the garlic.  Place on a sheet pan and put the garlic heads in your foil boat.

Drizzle tops with 1/2 t oil, allowing it to soak into the cloves.  Repeat with another 1/2 t oil on each head (1t each total).  Sprinkle the oiled heads with kosher salt.

Place sheet tray in a preheated 350F oven.  Roast garlic until it's turned golden and smells roasted & sweet.  Remove from oven and allow to cool.

Squeeze garlic head to remove cloves.  Use where ever you would use fresh garlic for a softer more mellow garlic flavor, or store in fridge until ready for use (good for up to 1 month).


Sunday, April 15, 2012

Tilapia in Papillote with leeks, asparagus and compound butter

Tilapia on Andrea the Kitchen Witch??  No, you're eyes aren't playing tricks on you.  Tilapia IS what today's post is about and, get this, I actually liked it!  This is a Kitchen Witch first!!  For those of you who don't know the Kitchen Witch does not like fish.   Unless it's batter dipped and deep fried, then it's pretty tasty.  Outside of that version the Witch was pretty convinced that all fish tasted like the dirty water it was pulled out of.  Eww.  She tried to make fish a few times before for the Husband (who adores fish) and every time the Witch was grossed out, tried a bite and couldn't do it.  The last time she tried to make fish, the fish had gone bad unbeknownst to her and well, that was scarring, let's just leave it at that.  Then came along Jenn, from Jenn's food Journey.  Jenn and I have been BFF (Blogging Foodie Friends) for a while now.  Her blog is awesome and she has been known to turn out a mean tilapia dish.  Week after week the Witch read Jenn's blog, looking at fish dish after fish dish and wondering, why, oh why! can't I like fish too???   The Witchy family had been asking for some variety in their protein choices,"Please can we have fish?"  Time after time the Witch said "I'll think about it" and promptly walked directly past the fish department in lieu of pork or chicken.   Suddenly, that changed.

One day while at the Sunflower Farmers Market the Witch found herself in front of the seafood department and wouldn't you know it, but out of her mouth came these words: "I'll take a pound of tilapia, please".  Proudly the Witch took her fish home and put it in the freezer.  There it stayed for over a month (so much for  bravery!) before she finally got up the courage to make the fish.  When she did, she was a HUGE baby about it; the Witch actually cried and pitched a full on hissy fit about the fish, one that her 5 yr would have been proud of.  It wasn't cute people.  The Husband said something snarky along the lines of "Watch, you'll discover that you love fish and it'll become your new favorite protein".  That really really pissed off the Witch at the time, but as it turns out, he was right.   The dish that Jenn recommended I try first was Parmesan Garlic Tilapia.  It was really really good!   If you're looking to convert a fellow fish hater, try this one.  It worked for the Witch (and she's a tough sell let me tell you!!)

Damn that Husband for being right (again)! As it turns out, the Kitchen Witch doesn't hate all fish.  As a matter of fact, after having tilapia the first time her mind hasn't stopped creating fish recipes.   Now the Witch realizes that papillote isn't a new cooking method in the slightest, and the flavors here aren't new or innovative.  Leeks, asparagus and white wine have been paired with fish more often than not;  they're good with fish!  The papillote method is a very easy to assemble, it's impressive to serve and most of all provides perfectly cooked moist fish every time.  I'll be the first to admit the tilapia isn't the most flavorful fish (which is why it's a great 'starter fish'), so if you have a favorite white fish, please use it here.  The fish could have used some more herbs, too, but my herb garden is only producing chives and parsley so far this year.  If you have fresh herbs, use them!  The finished dish is beautiful on the plate and tastes pretty darn good, too.  I hope you give this a try!

Tilapia in Papillote with leeks, asparagus and compound butter
makes 4 servings
4 tilapia filets
2 leeks dark green cut away, sliced into quarter moons and rinsed well
20 asparagus spears
1/2 stick butter
2 T fresh minced parsley
15-20 chive stems, minced
1/2 t dried oregano (or 1t of fresh minced)
1/2 lemon, cut into rounds
1/4 c Chardonnay or other dry white wine
kosher salt and pepper
12 grape tomatoes
parchment paper

Preheat oven to 400F

Make the compound butter first by combining the softened butter, a few pinches kosher salt and pepper along with the herbs.  Mix well to make the compound butter.  Place butter in the freezer while assembling the papillote.

Cut the parchment paper into large rectangles, about twice the size of the fish.  Make the parchment look like a fat lopsided heart - this will aid in rolling the papillote.

Rinse and dry your fish.  Season fish with kosher salt and pepper on both sides.

Lay 5 asparagus spears down on the parchment paper.  Lay a small handful of leeks on top of the asparagus.  Top the leeks with the fish.  Now take 1/4 of the compound butter (about 1 heaping tablespoon) and place it on top of the fish.  Top the butter with 2-3 lemon rounds and finish with 3 cherry tomatoes on top of the lemons.  Drizzle the fish with 1T white wine.

Fold the papillote, heavily creasing the paper as you go to seal in air and juices.  Place sealed papillotes on a baking sheet.

Bake for 15-20 minutes.  Remove from oven, cut the papillote open and slide the entire contents onto a plate.  Drizzle the juices on top of the fish and enjoy!


Nutrition Facts calculated at SparkPeople recipe calculator Amount Per Serving Calories 273.1 Total Fat 13.7 g Saturated Fat 7.7 g Polyunsaturated Fat 0.6 g Monounsaturated Fat 3.3 g Cholesterol 86.0 mg Sodium 551.1 mg Potassium 643.2 mg Total Carbohydrate 11.8 g Dietary Fiber 2.5 g Sugars 2.5 g Protein 25.2 g

Monday, April 9, 2012

Tamales: Pepper Jack and roasted green chiles

For Spring Break the Witch and family went on a little trip to Santa Fe, NM.  The weather was beautiful.  The scenery was stunning.  The food, oh my the food!!  It was amazing, delicious, and abundant.  I would love to have taken home a 55 gallon drum of green chili alas it wouldn't fit in my car.   Before embarking upon our voyage I asked the assistance of a friend who grew up in the Santa Fe area for her list of hot spots not to be missed while in the Land of Enchantment.  Arielle suggested that I stop by Alicia's tortilleria and get myself  'some of the best tortillas in all of New Mexico'.  Not one to pass by the 'best of' anything, I quickly obliged.  The Kitchen Witch left the great state of New Mexico with 3 lbs of corn tortillas, a dozen flour tortillas and 2 lbs of prepared masa harina -  all for $8.75!!  

Today the Kitchen Witch is going to do a photo tutorial on tamale assembly.  I forgot to get a photo of the finished tamales, we were too hungry and excited to try them to remember photography, so please forgive me.  You can find prepared masa harina in most Mexican grocers for a very affordable price, or you can make your own.  Masa Harina is available in the flour section of your grocery store.  Just make sure you get masa "For TAMALES" (there is a masa for tortillas and the grind/texture is different).   These tamales were meat free but feel free to fill your tamales with what ever you like.  The cheese/green chile mix was delicious and light.  I can't wait to make these again.  

Oh and Arielle, you were SO right!  Alicia's tortilleria is amazing, their tortillas are like nothing I've ever had and I wish I had quadrupled my order.  Looks like I need to go back to Santa Fe soon to replenish my supply!

Tamales
makes about 16 tamales
2 lbs prepared masa harina 
corn husks, rehydrated (soak husks in hot water for 1 hour minimum before making tamales.  The longer they soak the easier they are to work with.  Rip one or 2 small husks into strips for tying the tamales) 
3/4 lb pepper jack cheese shredded
4 green chiles roasted, peeled and diced

Begin by gathering all your ingredients and prepping your workstation.  I like to lay a few paper towels down for the wet corn husks to rest on while spreading the masa.

Take a large corn husk and unfold any edges.  Place it with the long side facing you and spread about 3T masa on the husk, making a layer about 1/8 thick, thick enough so the ridges of the corn husk don't show through the masa.  Spread masa to the end of the large end, leaving about 1 inch on the sides of the husk. (the husk shown was a HUGE one, I didn't spread the masa to the ends here cause it would have been a big tamale otherwise!)

Place a small amount of cheese then green chiles in the middle of the masa.

Fold the husk over itself, so the masa ends touch each other, sealing the filling.  Gently press down to release air trapped in the tamale.  

  Fold the end up towards the open end of the tamale and wrap the sides of the husk around the tamale, tucking the end into the husk fold.  If your husk is small or rips while folding, take another husk and wrap it around your torn one and continue.  No one will ever know!

Using a small piece of husk that's been torn into strips, tie the tamale to hold it shut.


Stack tamales in a steamer for cooking.  Repeat until you're out of ingredients.

Steam tamales in a steamer for 45-60 minutes.  The masa will firm up as it steams.  Allow tamales to cool a little before removing the corn husk and enjoying!  Tamales also freeze wonderfully.  Simply freeze tamales after wrapping, before steaming them.  They will last up to 3 mo in the freezer if kept air tight.  Steam from frozen, allowing 60-75 min for cooking.

Saturday, April 7, 2012

Strawberry Deliciousness

Strawberry deliciousness is the new dessert of Spring 2012.  Don't believe me?  Well it's got fresh berries, whipped cream, cream cheese and angel food cake.  Believe me now??   You should cause it's good people.  Really good.  Like push your Mom down to get the last slice good.  I know this because last weekend the Witch and family were at a dinner party at a good friends home and dessert was this:  Strawberry Deliciousness, and instantly, as soon as the 13x9 pan entered the house 6 adults and 3 children, all swarmed in on the bearer of said dessert, oohing and aahing and asking when dinner was done so we could eat the deliciousness.  After dining on our delicious meal everyone was ready for dessert.

As the Deliciousness was being doled out I got the recipe from my friend who brought it.  The original recipe used Cool Whip in lieu of whipping cream.  The Witch doesn't use Cool Whip normally and ok, I'll be honest, I forgot to get a tub while at the store.  Imagine my delight when I remembered that I had heavy whipping cream in the fridge.  Problem solved with out a return trip to the store.  Yay!  The original also calls for strawberry syrup or ice cream topping to be poured over the berries.  Well, again my brain forgot that at the store, so I decided to macerate my berries in sugar and allow them to make their own syrup.  Easy and no HFCS!  I did go with a store bought angel food cake, however if you have a favorite recipe feel free to use it.  Pound cake would be a great alternative to angel food cake, too.

The rest of the dessert is simple assembly, cake, cream cheese whipped cream and berries.  The flavor is that of a cheesecake topped with berries, but not as heavy.  This dessert is rich and yet light all at once.  It is dangerous, too, cause you really could eat the whole pan yourself, it's that good!!  Strawberry Deliciousness really IS the dessert of Spring 2012!  I hope you enjoy it!

Strawberry Deliciousness
makes 12 servings 
Source: Inspired by Gail
1 lb strawberries, cleaned, hulled and diced
1 1/4 c sugar, divided
2 (8 oz ea) packs cream cheese
1 cup heavy whipping cream
1 angel food cake

Begin by washing, hulling and slicing berries.  Put into a medium bowl and sprinkle 1/4 c sugar over berries.  Stir well and cover with plastic.  Allow berries to macerate (sit in the sugar) at room temperature for 1 hour.  This will draw out the berries juices and make it's own syrup.

Once the berries have sat for 1 hr you'll notice there's a lot more liquid in the bowl than you started with.  Using a potato masher smash berries.  You'll want to squish about half of the berries, releasing more of the juices, leaving some in larger chunks for texture as well as visual interest.

Using a mixer cream the cream cheese and remaining 1 cup of sugar.  Scrape down sides often and mix until cream cheese is lighter and fluffy.  Remove from mixer and reserve.

Whip the whipping cream with your mixer.  Once you have stiff peaks change to the blade beater (if using a stand mixer) and add the cream cheese mix to the whipped cream in thirds.

Get a 13x9 pan.  Cut the angel food cake into chunks about (1 inch) and put in the bottom of the 13x9 pan.  Using your hand press the cake into the bottom, compressing it somewhat.  Spread the cream cheese/whipped cream mix on top of the cake.  Pour berries and syrup over top of the cheese mix.  Cover and refrigerate until serving.


Nutrition Facts calculated at SparkPeople Recipe Calculator Amount Per Serving Calories 385.9 Total Fat 17.2 g Saturated Fat 10.6 g Polyunsaturated Fat 0.8 g Monounsaturated Fat 4.8 g Cholesterol 55.2 mg Sodium 368.8 mg Potassium 182.7 mg Total Carbohydrate 53.9 g Dietary Fiber 1.0 g Sugars 38.0 g Protein 6.3 g

Wednesday, March 21, 2012

Chopped at Home: Beets, Endive, pork and sweet chili sauce

A round of Chopped at Home happend this past weekend at the Kitchen Witches' home.  Good friend and cooking buddy Eric brought the ingredients for our challenge.  This time we had the following to work with:

Pork Loin roasts (2 of them, rolled and tied from the butcher)
4 bunches of fresh beets
Endive
Sweet Chili Sauce

Our rules were simple:  Make something for dinner using the secret ingredients and any pantry items I had on hand and the meal needed to be as low carb as possible.

The beets were easy.  We decided to roast them with some olive oil, salt & pepper.  When they were half way done we drizzled them with the sweet chili sauce.  The sweetness of the beets was maximized by the roasting and the sweet chili sauce was a nice glaze.  The heat in the chili sauce wasn't very prominent, it really cooked out, but ever now & then you'd get a hint of spice and it was a nice contrast to the beets.  We decided to throw the endive into the roasting pan with the beets when they were 3/4 of the way done.  The bitterness of the endive was tempered by the sweet beet and chili sauce glaze.   I am a tried & true beet hater.  I even grew some a few years ago to see if homegrown beets would be better than store bought ones (turns out nope, beets taste like beets regardless of where they're grown LOL!).  But you know what???  These beets, they were amazing!!  Really really good.  Sweet, earthy and delicious.  They will definitely be made again!

Now, onto the pork!  A wet paste of dijon mustard, thyme, extra hot horseradish, garlic and S&P was made from my pantry ingredients.  I also had fresh parsley and rosemary on hand so I minced up a lot of that, too.  We decided to half the roasts, slather them with the mustard sauce and herbs then re-roll the pork into a nice bundle.  More mustard on the outside covered with the fresh herbs and the pork went into the oven.  It LOOKED good, the mustard paste tasted good, sure hope it is good!  Verdict:  Success!!  The strong flavors of the mustard rub accented and seasoned the pork perfectly.  The fresh herbs added a great spring time flavor, as well as color, and really lightened things up.  When the pork was paried with the beets, well it was divine!  Sweet beets, savory pork laden with herbs and mustard.  Yeah it was good stuff!!!  The pork is defiantly another hit and one I'll be making again!

This round of Chopped at Home was incredibly successful in this Witches' opinion.  Eric, I'm pretty sure that we'd hear Ted Allen telling us that we are indeed the Chopped (at home!) CHAMPIONS!  Now where's our check for $10,000??  Ha ha ha!

Beets and endive with sweet chili glaze
Makes 4 servings
4 bunches beets, washed and peeled
6-8 heads endive, trimmed and halved
about 4-6T olive oil
kosher salt and pepper
1 jar sweet chili sauce (or make your own, awesome recipe here!)

Herb and Mustard Roasted Pork
makes 4 servings
1 pork loin roast, about 1.5 lbs
2T dijon mustard
1/2 t dried thyme
1/8 t white pepper
1/2 t kosher salt
1 t extra hot prepared horseradish
4 springs rosemary
1/4 head parsley minced
Butches twine for tying roast

Prepare beets and endive:
Preheat oven to 450F.  Peel the beets and trim the tops & root end.  Put them into a roasting pan and drizzle with 2-3T oil, kosher salt & pepper.  Reduce oven to 375F after putting the beets in.  Roast beets for about 45 min, stirring twice during that time, then add about 1/2 bottle (or 1/2 c) sweet chili sauce.  Stir well to coat beets evenly.  Continue roasting for another 30 minutes.  Add trimmed endive to roasting pan, drizzle with the remaining oil and sweet chili sauce.  Stir well to coat endive in the reduced sauce glaze and roast for 30 min longer.  Bottoms of beets will be deeply browned and caramelized.

Prepare pork:
Mix the wet rub by combining mustard, thyme, salt & white pepper and horseradish into a small bowl.  Stir well to combine.  Finely mince the parsley and rosemary.

Unwrap pork and remove the butcher twine/wrap.  Slice pork roast in half long wise.  Slather the inside cuts of the pork with the mustard mixture, about 1T for the inside.  Sprinkle herbs on the mustard and press both halves of the pork together.

Using butchers twine tie the roast back together, using 3-4 knots.  Coat the outside of the roast in remaining mustard mixture and then encrust it with the remaining herbs.  Place crusted roast on a sheet pan and bake for 60 minutes, or until a thermometer reads 145F minimum for medium-med well cooked pork, up to 160F.  Do not let it cook longer than 160F.  Remove roast and allow to rest for 15-20 minutes before slicing.  Remove and discarding strings as you slice the roast.  Enjoy!


Friday, March 9, 2012

Chicken Pot Pie

 Is there anything that ranks higher on the comfort food meter than a pot pie?  I didn't think so.  Pot pie is really one of my favorite dishes of all time.  Sure it's basically a chicken soup or beef stew in a crust, but man, something happens to that soup or stew when you add pastry.  It changes from ho hum, albeit delicious, to holy hell that's GOOD stuff!  Just ask anyone, I can pretty much guarantee you that pot pie is a comfort king amongst your friends and families.  Now imagine what a rock star you'll appear to be to those pot pie lovers when you present this fresh baked, home cooked, pure deliciousness of a pie.  And best of all, it's really not that hard to do!

Being a Kitchen Witch, I make my own pie dough.  The food processor makes quick work of it and it's always tasty and delicious.  If you aren't a pastry maker feel free to use refrigerated pie crust, it comes in a red box and you unfold the sheets of pastry and put it into your own pie pan.  If you don't have a pie pan (and that's OK!) get a frozen pie shell for the bottom and use the boxed pastry for the top crust.  Pie plate problem solved!   Look for refrigerated pie crust by the eggs & cheese, that's where it is in my store.

The Witch uses chicken thighs in her pot pie, it makes a richer more flavorful gravy and I like the flavor of dark meat better.  If you like white meat you can use breast meat, however the flavor won't be as rich.  Breast meat is also a lot harder to shred, so you may have to cut it into cubes.  No matter, it'll still be delicious, regardless of the type of chicken you choose to use.  I added a few green beans to this pot pie, they were on sale this week and their bright green pop of color was nice in an otherwise golden pie.  Frozen or fresh peas could be used instead.  As always, add or subtract the veggies based on what your family likes, but a mix of carrots, celery, onion, potato and either bean or peas can't be beat!

Chicken Pot Pie
makes 8 servings, 1 slice each
For Chicken stew filling
1 lb boneless skinless chicken thighs or breasts (thighs will be a LOT more flavorful)
2 carrots, sliced into rounds
2 ribs celery, sliced
1/2 medium onion fine mince
2 cloves garlic, diced fine
1 russet potato, peeled and diced into 1/4 in chunks
about 10 green beans sliced into 1/2 inch pieces
3/4 t dried thyme
1 bay leaf
1 T butter
kosher salt & pepper to taste (about 1.5t salt and 1/4 t pepper)
EITHER 1 t Better than Bullion chicken flavor OR 1 chicken bullion cube OR 1 can chicken broth
6 cups water * if using chicken broth then reduce to 4 cups water
2T corn starch
1 egg for eggwash

For Crust:
4T very cold butter cut into cubes
4T vegetable shortening
2.5 cups flour
1.5 t kosher salt
1/2 c (give or take 2T) ice water

Make crust first by combining flour, salt and fats into a food processor bowl.  Pulse 4 times to cut fat into flour.  Add 1/3 c water, pulse 2-3 times and test to see if it can form a ball by squeezing dough together.  If not add more water, 1T at a time, until dough will stay together when squeezed.

Divide dough into 2 sections, one slightly larger than the other.  Form dough into a disc about 3/4 inch thick and wrap both in plastic wrap.  Chill in refrigerator for 1 hour before rolling out.

Make chicken stew next.  Heat a medium size pan over medium high heat and melt butter.  Once it stops foaming add the onions, celery, carrots and garlic.  Sautee for about 5 minutes until the onions are translucent and other veggies are starting to soften slightly.  Add the chicken, herbs, salt & pepper and water.  Bring to a boil then reduce to a low simmer, cover and cook for 25-30 minutes.

Remove the chicken and the bay leaf from the cooking liquid and allow to cool (discard bay leaf).  Add the potatoes to the cooking liquid and cook for 10 minutes.  Potatoes will not be fully cooked.  Thicken the sauce with the cornstarch dissolved into 2T water, making a slurry, add the slurry to the stew stirring well.  Increase heat to a rapid simmer and gravy will begin to thicken considerably.  You want this pretty thick, a lot thicker than normal gravy, so it doesn't just run out of your pot pie.   Once chicken is cool shred it and remove any fat and gristle.  Add chicken and cut green beans to the stew and stir to coat everything.  Turn heat off and set aside.

Roll dough out using the slightly larger disc for the bottom crust.  Place bottom crust into a pie pan and dock (poke with a fork) the bottom and sides slightly to release air while baking.  Fill the crust with the stew.  Roll out remaining disc of dough to make top crust.  Crimp the edges together well.  Brush top with eggwash and cut a few slits in the top dough to release steam.  Place pot pie on a baking sheet (to catch any drips) and bake in a preheated 350F oven for 45-60 minutes, or until pie is golden browned and gravy is bubbling through the vent slits.  Allow pie to cool for 15 minutes before slicing and enjoying!


Nutrition Facts calculated at SparkPeople recipe calculator Amount Per Serving Calories 349.9 Total Fat 16.0 g Saturated Fat 6.8 g Polyunsaturated Fat 3.9 g Monounsaturated Fat 4.1 g Cholesterol 67.5 mg Sodium 787.7 mg Potassium 449.9 mg Total Carbohydrate 37.2 g Dietary Fiber 2.9 g Sugars 1.3 g Protein 13.6 g

Wednesday, March 7, 2012

Diva Chocolate Pudding

We were invited to a dinner party at our good friend Staci's house.  The menu was "Kid Food" in honor of the Little Witch, who was joining us.  We had chicken fingers and mac and cheese that night, man it was good too!  I was in charge of dessert.  As soon as I heard our theme of the night was "Kid Food" I knew I had to make pudding.  Ok I didn't know, I was rather clueless.  It wasn't until Staci said what about chocolate pudding that I went DING and sprung into action!  You know that skin that forms on pudding if it's not covered with plastic wrap?  Well that was always my favorite part of the pudding.  It was so dark and chocolaty and really had that great chocolate pudding flavor.  Well, after you peel back the skin you're left with pale lackluster pudding.  The chocolate isn't as intense as the 'skin'.  Actually the whole thing is rather milky, thin and lackluster.  Boo!  This is not the greatness that the skin promised!  I want pudding that tastes like the skin does, rich, thick, chocolate to the max.  So I created it!

This is not a chocolate pudding that someone who's ambivalent about chocolate should embark upon.    No, this pudding is one that only the true chocoholic in your life should try.  Dark, rich, indulgent, velvety and decadent are just a few of the words that Staci offered to me to describe this pudding.  Seeing as how I serve it in fancy antique tea cups, she also deemed them "Diva like", a term I love and named this pudding after!  Only a chocolate diva could appreciate the rich chocolate punch that this pudding pulls.

The chocolate factor is amped up from my traditional chocolate pudding by the addition of 2 cocoa powders, chocolate chips and coffee.  I use Ghiradelli cocoa powder for it's overall intense chocolate flavor and Hershey's Special Dark OR Black Onyx cocoa powder for the deep color and matching flavor.  The chocolate chips that reign supreme in the Witch household are Ghiradelli double chocolate chips, and unlike some other chips, they melt fantastically.  Coffee is a supporting player here.  The coffee flavor doesn't really come through, but rather it makes the chocolate taste more chocolaty, so it's a natural addition here as well.  The result is a chocolate pudding that is thick, velvety, rich and most importantly, CHOCOLATY!  Finally, a pudding who's interior is as dark and flavorful as the skin on top.  Success!


Diva Chocolate Pudding
makes 12 servings - 1/2 c each
3/4 c sugar
1/2 c cocoa powder total (1/4 c ea Hershey's special dark and Ghiradelli cocoa)
1 t kosher salt
1/4 c corn starch
1 c chocolate chips (Ghiradelli double chocolate)
1/2 c hot strong brewed coffee
4 c milk (2%)
3 eggs

In a large pan mix the sugar, cocoa powders, salt and corn starch together.  Whisk well to incorporate, allowing the shards of sugar to help break up the cocoa powders and corn starch.  Slowly add in the milk, whisking well.  The mixture will be very foamy at first, this will clear out as it heats.

Put the chocolate chips into a heat safe bowl.  Pour very hot coffee over top of chips.  The chips will melt from the heat of the coffee, allow to rest for about 5 minutes.  Using a whisk, stir the coffee/chocolate mixture until all chocolate is melted making a form of ganache.

Beat the eggs in a seperate bowl.  Once beaten slowly add eggs to the melted chocolate coffee ganache whisking well.  The mixture will thicken.

Heat milk & cocoa mixture over medium high heat stirring constantly until boiling.  Allow to boil for 1 minute.  After 1 minute slowly whisk in the egg/chocolate mixture.  Cook for 2 minutes longer over medium heat, whisking often to avoid scorch spots.

Ladle hot pudding into cups and allow to cool before serving.  Top with fresh whipped cream and chocolate curls if desired.  If you don't want a 'skin' to form on the pudding simply place a piece of plastic wrap over the surface of the hot pudding.  Remove plastic before serving.


Nutrition Facts calculated at SparkPeople recipe calculator Amount Per Serving Calories 203.5 Total Fat 9.3 g Saturated Fat 5.2 g Polyunsaturated Fat 0.3 g Monounsaturated Fat 1.0 g Cholesterol 52.8 mg Sodium 85.9 mg Potassium 156.0 mg Total Carbohydrate 28.7 g Dietary Fiber 2.0 g Sugars 22.3 g Protein 5.9 g

Tuesday, March 6, 2012

Carnitas

Carnitas is a Mexican dish meaning "little meats" but we traditionally know it as braised then fried pork.  This carnitas dish accomplishes exactly that, with 3 ingredients.  The simplicity of the dish is deceptive once you try the pork.  Salty and crispy, almost bacon like in aroma and taste, yet tender and succulent and completely addictive.  All that from 3 ingredients?  You bet it's Witchcraft!  I got this recipe from my friend and cooking buddy Phyllis.  She acquired it from Diana Kennedy when she was working as her soux chef in the '80's.  Knowing that the recipe is a tried and true one from Phyllis - and that she worked directly with the chef creator -  really sealed the deal for this Kitchen Witch.  Carnitas were on the menu!

Here's how these carnitas go down.  Get your pork - butt (shoulder) or country style ribs are great choices.  You want to make sure you have plenty of fat and connective tissues - therein lies the secret to these great carnitas.  Either have your butcher (or yourself if you've got the knife skillz to do that) debone the butt, or find a boneless variety, and slice the meat into 2 inch wide by 5-6 inch long strips.  The Kitchen Witch found a great deal on country style ribs and used those in this recipe with great success, and bonus, the ribs are already cut into the size I needed.  Less prep work = happiness!  Once your meat is deboned and cut into strips place them into your largest skillet.  If you don't have a skillet big enough a dutch oven will work as well, it just takes a bit longer to cook off the liquids.  Sprinkle the meat with kosher salt then cover with water so the meat is covered just barely in liquid.  Bring it to a boil, then reduce to a hard simmer (medium heat, you want bubbles breaking the surface) and allow it to simmer until all the water has cooked off.  Once the water has cooked off you'll hear a distinct difference in the sound of the cooking, it changes from simmer to a sizzle.

As the meat is simmering in the water it is braising, cooking and becoming tender and delicious.  The connective tissues are also breaking down and becoming flavorful while the fats are rendering out of the pork.  The fat sits on top of the water while it's simmering and once that water is gone, the meat begins to sizzle.  Here's the real secret of good carnitas, frying the pork in it's own fat (or confit).  Allow the meat to fry and brown in the rendered fat, it takes about 5-10 minutes per side.  Be sure to flip the chunks to brown evenly.  This will make your cooking pan look like an utter disaster but I promise you all that the extra clean up is totally worth it.  And the crispy parts on the bottom of the pan, well those are just bonus treats for the cook.  Yay!  Once the meat is evenly browned remove it from the pan and either serve as chunks or shred and eat with tortillas.

From start to finish these took about 2 hours and were some of the most amazing pork I've ever made.  Tender and succulent, crispy and indulgent all at once.  I really hope you try and enjoy this dish soon!

Carnitas
makes 8 servings
SOURCE: The Cuisines of Mexico by Diana Kennedy
3-4 lbs of boneless pork shoulder (butt) or country style ribs
2 t kosher salt
water

Cut pork into strips about 1 inch wide and 4-5 inches long.  If using country style ribs they are precut so no extra work is needed.

In a large skillet or deep pan add the pork. Sprinkle with salt.  Add water to the pan to cover the pork.  Heat the pan over high heat until boiling then reduce the heat to an aggressive simmer (medium heat).  Cook until the water cooks out and only pork and fat are left in the pan.  Continue to cook pork in the fat until browned, turning pieces to brown evenly on all sides.

Serve with your choice of warmed corn or flour tortillas and toppings of your choice.


Nutrition Facts calculated at SparkPeople recipe calculator Amount Per Serving Calories 503.2 Total Fat 36.6 g Saturated Fat 13.6 g Polyunsaturated Fat 3.2 g Monounsaturated Fat 15.8 g Cholesterol 147.9 mg Sodium 580.3 mg Potassium 557.6 mg Total Carbohydrate 0.0 g Dietary Fiber 0.0 g Sugars 0.0 g Protein 40.6 g

Wednesday, February 1, 2012

Chicken and dumplings

Chicken and dumplings is one of our favorite meals here in the Witches' household.  It gets made at least once a month and no one is ever sick of it.  Comforting, homey, savory and delicious, chicken and dumplings is comfort food in it's finest form.  One of the things I love most about it is that it's not heavy and fat laden like a lot of wintery soups and stews can be.  I also love it because it's chock full of veggies and I know that the Little Witch will eat veggies if it's in chicken and dumplings.

When frozen veggies are on sale I stock up my freezer with them.  Soups like this are a great place to use these veggies, when their fresh counterparts are out of season.  Change it up with different veggies and it's a new dish each time you make it.  I've found it to be a great vehicle for trying out new tastes with the little ones, too.  Anything enrobed in a delicious chicken broth is bound to be good.

The dumplings are soft and pillow like.  If you don't have a food processor to make the dumplings you can use a pastry blender or 2 forks to cut the butter into the flour.  If all else fails you can use a prepared baking mix (bisquik) instead of the flour, salt, baking powder and butter.  The dumplings are dropped into the simmering stew which does two things; it steams and fluffs the dumplings and  it thickens the stew.  I hope you treat yourself and your family to a pot of this delicious and hearty stew soon!

Chicken and dumplings
makes around 6 generous servings
6 boneless skinless chicken thighs (can use breasts, see notes)
6 cups chicken stock
5-6 carrots, peeled and sliced into rounds
3 ribs celery, sliced
1/2 onion diced very fine
1 t dried thyme
2 T fresh minced parsley
kosher salt to taste (around 1.5-2t) and ground pepper
choose up to 2 (1/2 c. each) optional veggies:  frozen corn, peas, green beans, broccoli, diced potatoes, whatever your family likes
Dumplings
1 1/4 c all purpose flour
1.5 t baking powder
1.5 t kosher salt
1 egg white
1/4 c water
1/4 c milk
1/4 c (1/2 stick) cold butter, diced

In a dutch oven or other large pot add everything except the optional veggies.  Bring to a boil then reduce to a low simmer.  Allow to simmer for 45 min.  Remove the chicken thighs to a plate to cool slightly before shredding.  If you are using chicken breasts only cook them for 25-30 minutes before removing.  


After removing the chicken taste the broth for season.  Adjust salt & pepper if needed.   Add optional veggies to the stew at this time.

Shred the chicken and discard any gristle and fat pieces.  Set aside.

Make the dumplings - in the work bowl of a food processor add your flour, baking powder and salt.  Pulse to incorporate.

Add the cold diced butter.  Pulse 5 times using 1 second bursts of power.  The mixture should resemble coarse meal or damp sand.  Pour flour mix into a bowl.

In a separate small bowl mix the egg white, milk and water.  Pour the wet ingredients over the dry and combine with a fork until all flour is dampened.  A few lumps are OK, just don't overwork the batter.  It will be like thick pancake batter.

Add the shredded chicken back to the stew and stir well.  Stew needs to be at a bare simmer, not too many bubbles breaking the surface, to cook the dumplings.  If the stew is simmering too rapidly it will break apart the dumplings.

Using a tablespoon size scooper or 2 spoons, scoop dough into balls on top of simmering stew.  Try not to let dumplings touch when being dropped into stew.  Once all the dough is added cover the stew and allow to steam cook for 10 minutes.  DO NOT OPEN THE LID until the 10 minutes is over or the dumplings will not cook properly.

Once the dumplings are cooked they'll float to the surface.  Sprinkle with minced parsley before serving.

Nutrition Facts calculated at SparkPeople recipe calculator chicken Amount Per Serving Calories 324.6 Total Fat 11.1 g Saturated Fat 5.7 g Polyunsaturated Fat 1.2 g Monounsaturated Fat 3.2 g Cholesterol 78.8 mg Sodium 1,351.0 mg Potassium 782.7 mg Total Carbohydrate 34.5 g Dietary Fiber 3.6 g Sugars 3.8 g Protein 23.8 g

Thursday, January 26, 2012

Ricotta cheese


Cheese making has been a goal of the Kitchen Witch for as long as she cares to remember.  Maybe it was reading Little House books, or just the foodie that's always been there, but even as a young teen the Witch has wanted to make her own cheese.  That's normal, right?  Don't you all dream about making your own cheese?  No?  Well...pretend like you do, 'k?  Do you need to make your own ricotta?  No, you don't.  Should you make your own ricotta?  Yes!  Yes you should indeed !   It's easy, quick and really doesn't require any specialty equipment or ingredients.   4 ingredients is all it takes to make the smoothest, richest, silkiest ricotta cheese you've ever been lucky enough to try.

If you aren't a ricotta fan, don't despair.  This ricotta isn't at all like the grainy rubbery ricotta in the tubs at the grocery store.  There is some grain to it, but it's not at all rubbery and if you aren't a fan of the grain, simply drain off more of the whey until you get a cheese that you're happy with.   Other than the noticeable difference in texture there's a taste difference.  Store bought ricotta is bland and rather flavorless to me.  Between the lack of flavor and the nasty texture it's defiantly not high on my like list.  Homemade ricotta, on the other hand, is sweet from the cream and milk, salty and slightly tangy.  It's delicious in lasagna as well as dessert.

Ricotta Cheese
Source:  Ina Garten
Makes about 1 cup of cheese (approx. 8 servings) ~*~easily doubled or tripled~*~

2 cups whole milk (2% works fine too)
1 cup heavy whipping cream
heavy 1/2 t kosher salt
1 1/2 T white wine vinegar

In a stainless steel pan add the milk, cream and salt.  Bring to a full boil over medium high heat, stirring to avoid scortch spots.  Once liquid is boiling turn the heat off and add the vinegar.  Give it one good stir to incorporate the vinegar and allow to sit for at least 1 minute to form the curd.

While the curd is forming dampen some cheesecloth.   Lay a double layer of cheesecloth in a fine mesh sieve placed over a bowl to catch the whey.  Pour the cheese curds and whey into the cheesecloth and allow to drain undisturbed for about 20-30 minutes.  The longer the cheese sits the finer and less distinct the grain becomes.  Transfer the ricotta to a air tight bowl and use anywhere you'd normally use ricotta like lasagna or stuffed pasta recipes.   Stores in the refrigerator for up to 7 days.


Cheese curds set and ready to be seperated

Whey draining from curds
Curds after draining for 10 minutes
 ~*~Kitchen Witch Tip:  No cheesecloth?  No problem!  Simply drain your curds through a clean wash cloth or kitchen towel.  Paper towels absorb too much and don't allow the whey to drain, save those for something else and use cloth to strain cheese.~*~


Nutrition Facts calculated at SparkPeople recipe calculator Amount Per Serving Calories 133.5 Total Fat 12.2 g Saturated Fat 7.6 g Polyunsaturated Fat 0.5 g Monounsaturated Fat 3.5 g Cholesterol 45.6 mg Sodium 156.3 mg Potassium 125.1 mg Total Carbohydrate 3.8 g Dietary Fiber 0.0 g Sugars 3.0 g Protein 2.6 g
Related Posts with Thumbnails