Friday, April 30, 2010

Chocolate chip cookies - for high altitude


Thanks to all my Facebook fans for encouraging me to post this cookie recipe. I hope you all enjoy it. If you're not a fan of Andrea the Kitchen Witch on Facebook, please take a minute to click on the link on the left side to become one. The Kitchen Witch thanks each and every one of you for your support!

Chocolate chip cookies are A#1 most requested cookies here at Kitchen Witch headquarters. The little Witch only likes white cookies with brown chocolate chips (her words, not mine) so chocolate chip gets made often. I have become quite a pro at whipping these babies out, in less than 5 minutes I can have a batch of dough made up and the kitchen is clean again. Yes, I've got these down to a science!

I've modified everyone's favorite cookie recipe from Nestle Tollhouse for my high altitude. Those of you who don't live at 6,000 ft above sea level probably have no idea the trials and tribulations of baking in high altitudes. Suffice to say that its challenging. Cookies spread too much and become thin crispy wafers, not tender soft and chewy cookies. With a few modifications I've come up with a pretty fool proof chocolate chip cookie that will be chewy and crispy all at once. Even at 6,000 ft above sea level!

Chocolate Chip Cookies - for high altitude
makes about 2 dozen cookies
1 stick unsalted butter
1/4 c plus 2T brown sugar
1/4 c plus 2T white sugar
1 egg at room temperature
1 t vanilla
1 3/4 c flour
1 t baking soda
1/2 t salt
1 c (1/2 bag) chocolate chips

Preheat oven to 350.

Cream butter. Add sugars and beat until light & fluffy. Add the vanilla and egg, mix until thick and creamy.

Sift the dry ingredients together. Slowly add them in 3 installments, scraping down the sides as you go. You want a very thick dough, almost the consistence of play dough. Depending on the humidity of the day it may be necessary to add more flour. Add any additional flour in 1T increments. Too little flour yields a flat crispy cookie, too much makes them too dense and dry and they won't spread at all.

Add the chocolate chips, mixing until they are just incorporated into the batter.

At this point you can refrigerate the dough for future use, freeze it for long term storage or bake it. I usually just bake it :)

~*~Kitchen Witch Tip: Invest in a cookie scoop! You'll get even sized and therefore evenly baked cookies. They don't have to be expensive, I got my Chefmate brand scooper (1.5 oz I believe) at Walmart for about $7. Be sure to look for all metal construction. Think about how thick cookie dough is, a plastic scooper would break under those conditions. The scoop should feel solid and not flimsy in your hand. Small cookie scoops can do double duty as a petite ice cream or sorbet scoop and they are ideal for filling mini muffin cups perfectly.~*~

Scoop dough into 1T size balls. Bake at 350 for 11-13 minutes or until browned on the bottoms and slightly on the edges. Remove from oven and allow to cool on tray for 2 minutes before transferring to a cooling rack.


These cookies last about 2 hours before they're gone around here, however, I suppose you could store them for up to 5 days. They will dry out as they age so I recommend eating them as soon as they're cool enough not to burn your mouth.

Nutrition Facts provided by SparkPeople Recipe calculator
24 Servings
Amount Per Serving
Calories 114.4
Total Fat 5.6 g
Saturated Fat 3.4 g
Polyunsaturated Fat 0.2 g
Monounsaturated Fat 1.4 g
Cholesterol 19.5 mg
Sodium 105.7 mg
Potassium 49.1 mg
Total Carbohydrate 16.8 g
Dietary Fiber 0.6 g
Sugars 9.2 g
Protein 1.5 g

Wednesday, April 28, 2010

Flour Tortillias


A few days ago I was blog browsing and ran across a recipe for homemade flour tortillas. I was mesmerized as Ellie from Home Cooking in Montana took 5 ingredients and turned them into beautiful flour tortillas.

Hooray, the Witch thinks, something new to make! Trying to find flour tortillas with out hydrogenated oils is hard. Oh sure the package MIGHT say 0 grams trans fat per serving but did you know that according to the FDA if there is >.5 g of trans fat they (food manufacturers) can claim that it has 0 grams? That means is that your 'trans fat free' tortilla can have up to .5 grams of trans fat in it. Am I the only one who sees a problem with this? Read your labels everyone. If you see the following words PARTIALLY HYDROGENATED OR HYDROGENATED OIL, put it down and walk away. The health risks of trans fats aren't worth it, in this Witches' opinion.

I decided to pair my flour tortillas with chicken fajitas and spicy black beans. Click on the links if you'd like the recipes. I highly recommend them, and the tortillas as well. They have a very soft and slightly chewy texture, something I really liked. They reminded me of fresh tortillas from a good Mexican restaurant, something you know wasn't sitting in a plastic bag for a week before it hit your plate.

Honestly, the hardest thing about these tortillas was rolling them out, but anytime you have to roll something out its hard. To me at least. I wasn't able to get them round but that's OK, it adds to the rustic homemade effect.

Flour Tortillas
makes 8-9 tortillas
2 cups of all-purpose flour
1 1/2 teaspoons of baking powder (I use non aluminium type)
1 teaspoon of salt
2 teaspoons of vegetable oil
3/4 cups of warm milk

In the work bowl of a food processor add the dry ingredients. Pulse to combine. Slowly drizzle in the milk and oil. You want this to form a dough ball, I had to add about 2 T additional milk as mine was too dry with 3/4 c.

Run machine 2 minutes longer to knead dough. Once its kneaded put the dough ball into a bowl, cover with plastic wrap and allow to rest for 20-30 minutes.

Divide dough into 8-9 balls (about 2 oz ea)

Roll each ball out until its very thin, less than 1/8 inch thick. Stack rolled tortillas with plastic or parchment between layers.

Heat a cast iron (or other heavy bottomed skillet) pan or griddle over medium high heat. Once hot add the tortilla. Cook about 1 minute on 1st side. It will bubble up with air blisters. Press the tortilla down to make as much contact with the pan as possible. Once browned, flip and cook on 2nd side.

Once 2nd side is browned remove tortilla. Continue cooking remaining tortillas.

Nutrition Facts provided by SparkPeople recipe calculator
9 Servings
Amount Per Serving
Calories 125.4
Total Fat 2.2 g
Saturated Fat 0.4 g
Polyunsaturated Fat 0.6 g
Monounsaturated Fat 1.1 g
Cholesterol 1.6 mg
Sodium 348.5 mg
Potassium 29.9 mg
Total Carbohydrate 22.4 g
Dietary Fiber 0.8 g
Sugars 1.0 g
Protein 3.5 g

Sunday, April 25, 2010

Oatmeal waffles

When I woke up this morning I had a craving for a waffle, but not your average waffle. I wanted something cinnamon scented, hearty and different than your average run of the mill waffle. Cinnamon pairs wonderfully with oatmeal which lead me to think that I could incorporate oatmeal into the waffle, giving it the heartiness that I was after.

Taking the oatmeal and running it through the food processor to break it into an oat flour is something I've done before when making cookies. It adds extra fiber and flavor with out a distinct oatmeal texture. I decided to try that method with these waffles. Adding 2 teaspoons of baking powder help to keep things nice and light and fluffy, not dense and heavy which is a real possibility when working with oatmeal.

The Kitchen Witch has used whipped egg whites that were folded into a batter for waffles before but what a pain! Instead of going through all the time and hassle of separating eggs and then whipping the whites and then folding them into the batter I decided to just run them in my food processor. The speed of the blades whipped them up nicely, I had a very thick foam on top which added to the light and airy texture of the finished waffle.

These waffles were a hit! The little Witch enjoyed them and ate her entire waffle. Serve with your favorite syrup, like the Sasktoon berry syrup I was lucky enough to win from Sarah at All Fingers in the Pie. If you're not lucky enough to have this awesome syrup I recommend blueberry, apple or good old maple syrup.

Oatmeal waffles
makes 10 single waffles
1 cup oatmeal, old fashioned oats
1 1/2 cup flour
2 t baking powder
1/2 tsp of salt
3 eggs
1 1/2 c milk
2 T brown sugar
1 T vanilla extract
1 t cinnamon
2 T melted butter

Plug in your waffle iron to preheat it while you make the waffle batter.

In the work bowl of a food processor pulse the oatmeal until its finely grained like coarse flour. Add the flour, baking powder, salt and cinnamon, pulse together then pour into a medium sized mixing bowl.


In the food processor bowl add the eggs and brown sugar. Run until the eggs are thickened and foamy, about 2 minutes. Mix the milk, vanilla extract, melted butter and egg mix together.

Pour the wet ingredients into the dry and mix until it just comes together. Let it sit for about 1 minute before cooking, this allows the oatmeal to absorb some of the liquid.


Spray your waffle iron and pour about 1/2 cup of batter between the 2 waffle indentions. Don't worry if it doesn't fill it up, it will as it cooks. Close the lid and cook for 4 minutes (your time will vary based on your iron's temperature) then flip it over if your iron cooks unevenly (as mine does). Cook for 3-4 minutes longer or until waffle is golden browned and crispy on the outside.


Nutrition Facts provided by SparkPeople recipe calculator
10 Servings
Amount Per Serving
Calories 167.6
Total Fat 5.3 g
Saturated Fat 2.5 g
Polyunsaturated Fat 0.6 g
Monounsaturated Fat 1.7 g
Cholesterol 72.9 mg
Sodium 248.9 mg
Potassium 45.4 mg
Total Carbohydrate 23.4 g
Dietary Fiber 1.4 g
Sugars 3.4 g
Protein 6.1 g

Saturday, April 24, 2010

BLT pasta salad

BLT's are one of the best sandwiches ever, in my humble opinion. That is what I planned on making for dinner the night this delightful salad was created. Imagine my dismay when I realized that I was out of bread (and making a new loaf is a 6-8+ hour job so just whipping a loaf up wasn't happening!), out of lettuce and only had cherry tomatoes. Basically all I had was the bacon. Since I had already primed my taste buds for BLTs I had to do something with the same flavors or else my mouth would be mad at me. And no one wants an angry mouth.

Pasta I had. Lots of it, thanks to an awesome sale recently. I decided to transform my BLT sandwich to a BLT pasta salad. I chose Ronzoni Smart Taste for its added fiber, calcium and overall good taste. The Ronzoni Smart Taste is a white pasta so the kids will eat it, and it really looks & tastes like the original stuff, something that whole wheat pasta doesn't do. The cherry tomatoes are way better suited for a salad than a sandwich, this was working out well. I was still out of lettuce but being a Kitchen Witch, I decided to use fresh spinach leaves in the lettuces stead. Chiffonade cut on the spinach gives it a delicate look and helps distribute the greens better than chunks of spinach ever could. A touch of bacon, onions, cheese and a cream dressing. Dinner is served!

BLT pasta salad
serves 4 as a side dish
4 strips bacon, diced
1/2 onion, diced
10-12 cherry tomatoes, quartered
15 leaves spinach cut chiffonade
1/2 box pasta (I used Ronzoni Smart Taste rotini)
2 T your favorite buttermilk/ranch dressing
2 T sour cream
2 oz extra sharp cheddar cut into 1/2 inch dice

Cut bacon into small pieces. Cook over medium heat in a heavy bottomed skillet. When bacon is about 1/2 done add the onion and finish cooking. Remove and drain bacon and onions once bacon is crisp and onions have browned.

Cook pasta according to package directions in heavily salted water. Drain then cool pasta with cold water to stop cooking. Drain well.

Wash spinach leaves then gather up into a small pile. Tightly roll the leaves to form a cigar shape. Take your knife and slice the spinach roll into very thin strips. This is called chiffonade - a french term for ribbons, which is essentially what you're doing, cutting the spinach into ribbons.

Quarter the tomatoes and dice the cheese. In a large mixing bowl put the pasta, bacon & onions, spinach, tomatoes and cheese. Mix the sour cream and dressing together then pour over the salad. Toss the salad to evenly coat all pieces with dressing.


Nutrition Facts provided by SparkPeople Recipe Calculator
4 Servings
Amount Per Serving
Calories 313.3
Total Fat 13.9 g
Saturated Fat 5.4 g
Polyunsaturated Fat 0.7 g
Monounsaturated Fat 3.2 g
Cholesterol 22.9 mg
Sodium 317.0 mg
Potassium 379.3 mg
Total Carbohydrate 33.0 g
Dietary Fiber 4.4 g
Sugars 2.2 g
Protein 14.7 g

Thursday, April 22, 2010

Grilled shrimp with lemon and garlic

Shrimp meals are one that I go to on busy nights, or days when I don't feel like cooking but want to eat something good. Shrimp is awesome for that, they cook in no time, are able to take on pretty much any flavor you put on them and are just plain good. There's something about shrimp that make an otherwise ordinary meal into something special in a way that no chicken breast can.

I realize that most of my, ok ALL, of my shrimp recipes involve garlic, herbs and lemon or white wine. This one is no exception. I promise as the summer grows and more herbs become available I'll widen my perspectives. Until then I give you grilled shrimp with lemon garlic and fresh herb marinade.

Grilled Shrimp with lemon and garlic
makes 2 servings
14 large shrimp
juice of 1/2 lemon
1 large clove garlic sliced thin
about 5 chive stems minced
1 sprig oregano minced
1/2 t kosher salt

Mix everything but the shrimp together in a small bowl.

Peel, devein and remove tails of shrimp, put them into a bowl. Pour the marinade over top, toss the shrimp to evenly coat each shrimp in marinade. Allow to marinade for 15 minutes.

Heat a grill pan over medium high heat. Once its hot add the shrimp.


~*~Kitchen Witch Tip: Lay shrimp in a circular pattern. By the time you get the last shrimp on the grill pan you'll be back where you started & can start to flip them in the order in which they were laid down. Shrimp take very little time to cook and even less time to overcook and turn rubbery. For most 'large' shrimp (21-30 count) it takes only 2-3 minutes over medium high heat to cook perfectly.~*~

Flip shrimp and finish cooking, 1 minute longer. Remove promptly and serve.


Nutrition Facts provided by SparkPeople Recipe Calculator
2 Servings
Amount Per Serving
Calories 56.4
Total Fat 0.9 g
Saturated Fat 0.2 g
Polyunsaturated Fat 0.3 g
Monounsaturated Fat 0.1 g
Cholesterol 74.5 mg
Sodium 654.4 mg
Potassium 102.8 mg
Total Carbohydrate 1.4 g
Dietary Fiber 0.1 g
Sugars 0.0 g
Protein 10.1 g

Wednesday, April 21, 2010

BBQ chicken pizza

It was Friday Fun Night at the Kitchen Witches house which means that I need a kid friendly meal that won't take forever to make. We did Sicilian style pizza last time, ok we've done it the past few times, and everyone loves it, kids and adults alike. I decided that we needed a change from our usual pizza routine - however not wanting to venture too far outside of our comfort zone, we went with the BBQ chicken version of pizza.

Turns out we liked this so much that I forgot to take a photo of it finished out of the oven. Just imagine the same pizza, just a little darker. The BBQ sauce on the chicken pieces got slightly singed in the oven, which really added to the BBQ flavor, nice and caramelized, just like BBQ chicken on the grill. We all really enjoyed this pizza, the left overs got eaten pretty quickly by yours truly, and I usually don't like left overs. I have a feeling we'll be seeing more of this pizza as summer progresses.

BBQ chicken pizza
Makes 2 pizzas, serves about 8 people
2 chicken breasts
1 bottle BBQ sauce
1/2 onion
6 slices bacon, cut into bits
8 oz mozerella cheese
4 oz cheddar cheese

Pizza dough
4 c King Arthur bread flour
2 t yeast
4 t sugar
1.5-2 c water
2 T EVOO

Make the dough first. Please note it takes at least 2 hours for the dough to rise and develop flavor, please plan accordingly!

In a bowl mix yeast, 1 t sugar and 1/2 c warm water. Mix well and let it sit about 5 minutes, it should be very foamy after 5 minutes. If not then your yeast is dead, get fresh yeast & try again.

Mix the flour, salt and remaining sugar together in the work bowl of a stand mixer. Add proofed yeast, olive oil and 1 cup of warm water and mix with the dough hook. Slowly add in additional water until dough comes together in a ball. Knead dough 5 minutes.

Transfer kneaded dough to an oiled bowl and coat dough ball with oil. Cover with plastic wrap and allow to double in size in a warm area in your kitchen. Cover with a towel if its chilly or drafty.

Once dough has doubled in size punch down and divide into 2 equal dough balls. Press dough into a sheet pan, leaving a slightly raised crust on edges. Dock the dough by piercing it with the tines of a fork - this allows air to escape so you don't get large air pockets.

Cook chicken, I use the George Foreman grill for this. Once its cooked slice it thin and toss with about 1/4 c BBQ sauce.

Cook bacon until crispy. When the bacon is about half way done add the onions, allowing them to caramelize while the bacon finishes cooking. Remove both bacon & onions and drain well.


Pizza Assembly:
Equally divide the remaining BBQ sauce between the 2 crusts, spreading it evenly out to the edges.
Lay the bacon and onions on next, followed by 1/2 the cheese. Spread the BBQ chicken evenly over the 2 pizzas then top with remaining cheese.

Bake at 450 for 20 min or until pizza is browned & bubbly. Allow to cool about 5 minutes before slicing and serving.

pretend that this is browned & bubbly as the Witch forgot to take a finished product photo. Oops!


Nutrition Facts provided by SparkPeople Recipe Calculator
8 Servings
Amount Per Serving
Calories 458.1
Total Fat 15.8 g
Saturated Fat 6.8 g
Polyunsaturated Fat 1.8 g
Monounsaturated Fat 6.3 g
Cholesterol 39.8 mg
Sodium 819.5 mg
Potassium 226.2 mg
Total Carbohydrate 55.1 g
Dietary Fiber 2.1 g
Sugars 2.6 g
Protein 22.4 g

Tuesday, April 20, 2010

Asian slaw salad with shrimp

The other day I was searching for something to eat for lunch. I decided on salad. However my salad idea was thwarted by my lack of lettuce. I did however have a head of cabbage. I didn't want cole slaw, this was lunch, not a side dish.

The thought of slaw got me thinking about Chinese chicken salad, a favorite at potlucks and family gatherings. Its basically a sweet dressing over cole slaw mix with fried ramen noodles and a bit of chicken. Not the healthiest of salads but it sure is good! I could cast my Kitchen Witch spell over this one, its overdue for a face lift anyway!

I decided that the dressing needed to have more acidy and less syrupy sweetness. An easy fix, I upped the vinegar and lowered the sugar content. A dash of crushed red pepper flakes add a mild spice and the clove of garlic scents the dressing. This dressing was starting to take on a more grown up feel. I kept the salad pretty basic, added a bit of crunchy celery and removed the ramen noodles which keeps it on this side of healthy. Almonds were standard in the original and I didn't see any reason to omit them either. Rather than chicken I went with salad sized shrimp, I found them on sale for $2 a bag and was looking for a place to use them.

This salad looks and tastes delicious in its grown up version. I hope you enjoy it too.

Asian slaw with shrimp salad
makes 2 servings
1/2 head cabbage sliced very thin
1 carrot shredded
2 stalks celery sliced thin
small bunch chives (about 15 stems) minced
1/4 c almonds, chopped
sprinkle sesame seeds

Dressing:
1/2 c White Wine vinegar
2 T brown sugar
2 T soy sauce
dash crushed red pepper flakes
1 clove garlic smashed

Small salad shrimp, 1 oz per person

Make dressing by dissolving the sugar in the vinegar. Add the garlic and red pepper flakes. Bring to a boil and boil for 4-5 minutes. Add the soy sauce, cook 1 minute longer. Remove from heat.

Remove garlic clove and discard. Add about 1/4 c oil to the vinegar mixture. Shake well to emulsify.


Salad prep:
Shred cabbage and carrot. Add sliced celery and chives, toss well to distribute evenly. Add 2 T dressing and toss again, this will help soften the cabbage slightly.

Place slaw on a plate, top with almonds and sesame seeds. Add shrimp and drizzle additional dressing over top.

Nutrition Facts Asian style dressing provided by SparkPeople Recipe Calculator
4 Servings
Amount Per Serving
Calories 176.7
Total Fat 14.0 g
Saturated Fat 1.0 g
Polyunsaturated Fat 4.1 g
Monounsaturated Fat 8.2 g
Cholesterol 0.0 mg
Sodium 931.9 mg
Potassium 25.3 mg
Total Carbohydrate 13.7 g
Dietary Fiber 0.1 g
Sugars 13.2 g
Protein 0.5 g

Nutrition Facts for Asian slaw with shrimp salad provided by SparkPeople recipe calculator
2 Servings
Amount Per Serving
Calories 138.2
Total Fat 1.4 g
Saturated Fat 0.2 g
Polyunsaturated Fat 0.6 g
Monounsaturated Fat 0.2 g
Cholesterol 55.3 mg
Sodium 245.1 mg
Potassium 1,265.5 mg
Total Carbohydrate 24.3 g
Dietary Fiber 10.1 g
Sugars 1.4 g
Protein 11.7 g

Monday, April 19, 2010

Orzo salad with asparagus, tomatoes, spinach and feta

After a hard days work in the yard I was in the mood for a light, refreshing veggie packed pasta salad. I had orzo pasta in the pantry just for this - I love how the small rice sized grains pick up the dressing flavors and are small enough to allow you to get a bit of everything into one bite. The vegetables needed to be able to stand up to the acidity of the lemon juice dressing, both asparagus and spinach fit that niche nicely. Sweet cherry tomatoes add a bright burst of color and help balance the lemony tartness. Creamy salty feta is the final touch, bringing the whole salad to a harmonious balance.

For the dressing I selected the freshest of herbs, ones from my own garden. The oregano is a classic paring with lemon, chive adds a nice mild onion flavor and parsley, well what can't stand a touch of parsley? I wanted just a hint of garlic in this dressing, really just a perfume of it if you will. I had a lot of garlic for the shrimp I made along with this dish (shrimp recipe will be posted soon) so I borrowed about 1/2 a cloves worth. Making a paste of the garlic helped distribute its potent flavor amongst the salad.

Feel free to use any veggies that your family likes. I'm looking forward to making this many more times through out the summer, using the best of what the garden has to offer.

Orzo salad with Asparagus, Tomatoes, Spinach and Feta
makes 6 side dish servings
1/2 lb orzo pasta
8-10 cherry tomatoes, cut into quarters
1/2 lb asparagus, woody ends snapped off and then cut into 1 in pieces
about 15 leaves of spinach washed and cut into small chunks
1/3 to 1/2 c feta cheese
juice of 1 1/2 lemons
small bunch of chives (about 15 stems)
2 sprigs oregano
small bunch parsley (maybe 1 T minced)
3 T EVOO
1/2 clove garlic
1 t kosher salt

First, make the dressing. Finely mince all the herbs and put into a bowl. Mash the garlic with a pinch of salt, once you have a paste put it into the bowl. Squeeze the lemon juice onto the herbs, add remaining salt and EVOO. Whisk it well to emulsify the dressing.

Cut up the spinach and add about 2 T of dressing to it. Toss well. The acid in the dressing will start to break down & wilt the spinach. Add the quartered cherry tomatoes on top of the spinach.

Cook the orzo. When there's 1 minute left add the chopped asparagus, cook remaining 1 minute, the asparagus should have taken on a bright green color and be tender crisp. Drain well.

Add orzo asparagus to the spinach & tomatoes. Whisk up the dressing again and pour it on top of the orzo, toss well to coat everything evenly. Add the feta cheese and serve.

Nutrition Facts
6 Servings
Amount Per Serving
Calories 180.8
Total Fat 9.6 g
Saturated Fat 2.4 g
Polyunsaturated Fat 1.2 g
Monounsaturated Fat 5.4 g
Cholesterol 7.8 mg
Sodium 412.2 mg
Potassium 411.6 mg
Total Carbohydrate 20.8 g
Dietary Fiber 3.1 g
Sugars 0.7 g
Protein 6.2 g

Sunday, April 18, 2010

Snickerdoodles

Cinnamon covered buttery cookies with a slight tang. If that intrigues you then please, allow me to introduce you to my friend the snickerdoodle. Maybe you've heard of them before, they are pretty old skool. But, like most good trends from days past, they are becoming popular again. And why not, whats not to love about these spicy delights? The cinnamon provides the perfect foil to the cookie's sweetness, cutting through it yet complimenting it simultaneous. Cream of tartar adds a sour tang and somehow manages to make the cinnamon taste more cinnamon-y.

Treat your family to an old fashioned favorite soon, they'll thank you!

Snickerdoodles
makes approx. 22 cookies
1 stick butter softened
1 egg
3/4 c sugar
1 3/4 c flour
1 t cream of tartar
1/2 t baking soda
1/2 t salt
Topping:
2 T sugar
2-3 t cinnamon

In a bowl mix the flour, salt, cream of tartar and baking soda together.

In a work bowl cream the butter. Add the sugar, beat until light & fluffy. Add the egg, beat until fluffy again. Scrape down sides of the bowl.

Add the flour mix in 3 installments, scraping down sides between each installment. Once dough is mixed cover with plastic wrap and refrigerate for a minimum of 1 hour.

Once dough has chilled scoop into balls (1 T approx). Roll the balls in the cinnamon sugar mix. Place coated balls on a baking sheet.

Bake at 350 for 11-13 minutes. You don't want these cookies to brown at all, you want them to be set yet soft in the middle. Allow to cool on the tray for 2 minutes before removing to cooling racks.

Nutrition Facts provided by SparkPeople recipe calculator
22 Servings (cookies)
Amount Per Serving
Calories 107.6
Total Fat 4.5 g
Saturated Fat 2.7 g
Polyunsaturated Fat 0.2 g
Monounsaturated Fat 1.3 g
Cholesterol 20.9 mg
Sodium 113.9 mg
Potassium 39.0 mg
Total Carbohydrate 15.7 g

Dietary Fiber 0.4 g
Sugars 7.8 g
Protein 1.4 g

Saturday, April 17, 2010

Parmesean Garlic Mashed potatoes

Mashed potatoes are what many consider the quintessential comfort food, but they can be bland, lumpy, gluey and generally lackluster if not done right. The Kitchen Witch is here to show you how to make not only fluffy mash, but flavorful fluffy mash.

Here's a few common mistakes that people make when it comes to mashed potatoes
1. Cooking potatoes too long
~~This results in watery potatoes, since the spuds absorb the cooking liquid, cooking them until they fall apart is bad, you'll end up with nasty wet watery mash. Cook until they are tender enough to easily split open with a fork and no crunch is left in the center.

2. Adding raw garlic to the cooked potatoes
~~This results in a overpowering sharp garlic taste, not a gentle perfume. Too much garlic can overpower your pallet rendering it useless to taste anything but garlic. Cooking the garlic cloves with the potatoes allows the scent of the garlic to infuse in the potatoes, leaving you a definite garlic flavor, but not one that everyone in a 2 block radius can smell as well.

3. Bland mashed potatoes
~~This is the easiest one to correct. Salt! Add a bit more salt & taste again. Still bland? Add more salt! Salt enhances foods flavors, adding more won't make your food taste salty, it'll just make it taste good. I salt the water the potatoes cook in and I salt again when mashing. Taste often to determine correct seasoning level.

4. Cold mashed potatoes
~~With mashed potatoes you really want to smash them minutes before serving dinner. As soon as you break the tubers open they start to lose precious heat. As you mash, whip & stir the heat is escaping quickly. Have your meal ready to go THEN mash the potatoes and serve. If you HAVE to mash them before you're ready to put the meal on the table, keep them covered and turn your heat on LOW/KEEP WARM. If worst comes to worse, you can microwave cold mashed, but be warned that the microwave can alter the texture of the potatoes.

Parmesean Garlic Mashed Potatoes
serves 4-6 as a side dish
4 medium/large potatoes (I used russets because thats what I had)
3 cloves garlic, peeled
2 T butter
1/2 c milk
1/2 c shredded parmesean cheese (I have used the green can as well as real Parmesean, both were delicious)
S&P

Peel potatoes and cut into large chunks. Put potato pieces and garlic cloves into a large pot of cold water. Bring water and potatoes up to a boil. Once it boils reduce heat to a simmer and cook until potatoes are fork tender all the way through, about 15-20 minutes at my altitude.

~*~Kitchen Witch Tips: put cut potatoes into a pot of cold water and bring it up to a boil together. Starting the potatoes in cold water helps them not absorb as much water, keeping your mash nice & fluffy and not watery or gluey.~*~

Drain potatoes well and put them back into the cooking pot. Cover the potatoes with a clean tea towel (or paper towels) and allow them to steam for about 5 min with the towel on. This process of steaming the potatoes allows the surface moisture to evaporate resulting in a smooth fluffy potato that doesn't get gummy. You'll know your potatoes are ready to mash when they are white and fluffy looking on the outside. They may appear dusty, this is GOOD, its the starches coming out, in insuring that you'll have fluffy mash.

Heat the butter and milk together in a microwave until its hot (about 1 min 30 seconds).

With a potato masher smash the potatoes and garlic BEFORE adding the liquids. this breaks up the potatoes but the gluten is not activated in the potato. What that means is that you can go to town on these babies and get them nice & mashed with out worrying about them turning gluey.

Once the potatoes are nicely mashed add the liquids. Switch to a wooden spoon and start to whip them up.

Add the cheese, stir it in well and allow it to melt a bit, like 1 minute. Stir it once more after cheese has melted and serve.

Nutrition Facts provided by SparkPeople Recipe Calculator
4 Servings
Amount Per Serving
Calories 253.5
Total Fat 8.1 g
Saturated Fat 5.0 g
Polyunsaturated Fat 0.3 g
Monounsaturated Fat 1.8 g
Cholesterol 18.0 mg
Sodium 682.8 mg
Potassium 907.7 mg
Total Carbohydrate 39.4 g
Dietary Fiber 4.7 g
Sugars 3.1 g
Protein 7.5 g

Friday, April 16, 2010

Pass it on Week 4: Not your mama's meatloaf


This weeks Pass it On recipe is a meatloaf from Jamie Olive's book Jamies Food Revolution. Megan from Tomato Tots selected this weeks recipe for us, and she did good!

When I read the list of ingredients I was a bit baffled on how this would all come together into a cohesive meatloaf. I mean garbanzo beans? What? But, being a brave Kitchen Witch I put my best food forward & got creative. (Megan just provides us with an ingredients list, we take it from there, you see) Admittedly I forgot a few ingredients (OOPS!) like balsamic vinegar, and I was out of fresh rosemary. I didn't have any saltines so I used my homemade bread and made bread crumbs. It worked out just fine. When I saw Megan's post I realized that the garbanzo beans & tomatoes were to make a sauce over top of the loaf. Well, that's not how the Witch did it - I mixed it all together. It made for an extremely moist, tender and flavorful meatloaf, a very modern interpretation of a classic. The Husband really enjoyed this - as did the little Witch. I think this version will become our new go to for the comfort classic meatloaf. Here's what I ended up creating with this weeks list of ingredients.

Not your Mama's meatloaf
serves 8
1.5 lb lean ground beef
1 can garbanzo beans, drained & rinsed
1 can diced tomatoes (I used fire roasted)
1 onion, diced fine
2 large cloves garlic, minced
2 slices bread made into crumbs or 12 crackers crushed
1 egg
1 t dried oregano
1.5 t cumin
1 t Paperkia
1/8 t ground pepper
kosher salt
juice of 1/2 lemon
2 T Worcestershire sauce
1 T Dijon mustard
6 strips bacon cut in half

Sautee the onions in the oil, cook on high heat until onions start to brown. Add the garbanzo beans, tomatoes with juices and spices, stir well allowing the tomato juices to deglaze the pan. Pour the onion/garbanzo mix into a large mixing bowl and allow to cool about 15 min or until cool enough to handle.

Add Worcestershire sauce, Dijon mustard and lemon juice to the bowl. Mix well. Add the ground beef, bread crumbs and egg. Using your hands mix it all up but don't over mix this. You just want it to come together.

Spray a sheet pan with cooking spray. Pour the meat mixture out onto the sheet pan and form it into a long rectangular loaf, about 2 inches high. Make an indention down the middle of the loaf, this will prevent it from becoming dome shaped when it cooks.

Layer the bacon strips over top of the loaf.

Put the meatloaf into a 450 oven and immediately turn the heat down to 350. The initial high temps will help crisp up the bacon. Cook about 60 minutes or until internal temperature reaches 155-160. If needed put the loaf under the broiler for a few minutes to crisp up the bacon. Allow the meatloaf to rest at least 5-10 minutes before serving.


Nutrition Facts provided by SparkPeople Recipe Calculator
8 Servings
Amount Per Serving
Calories 302.9
Total Fat 20.1 g
Saturated Fat 7.3 g
Polyunsaturated Fat 1.6 g
Monounsaturated Fat 9.2 g
Cholesterol 83.8 mg
Sodium 578.9 mg
Potassium 358.3 mg
Total Carbohydrate 12.6 g
Dietary Fiber 2.2 g
Sugars 0.7 g
Protein 17.1 g

Thursday, April 15, 2010

Cheese crackers

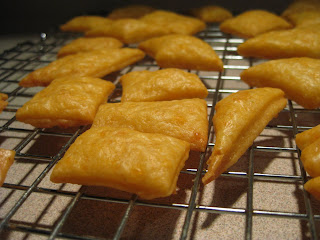
One day while blog browsing I found a recipe for cheese crackers from Home Cooking in Montana. I knew immediately that I needed to make them. Soon.

I told one of my Thursday story time moms about these crackers a few weeks ago. She was wondering where they were on the blog, as she wanted to make them too. That was all the motivation I needed to get these delicious treats made. It also helped that the little Witch was a good witch and took a nap which gave Mama Witch time to roll the dough out.

I've never made crackers before so I learned a few things while making these:
1. Bake them until they are nicely browned on the bottoms. This will also help in making them nice & crispy. It took 19 minutes at my altitude.
2. Roll them thin and evenly
3. Keep the dough cold! As it warms up it gets sticky and likes to stick to your cutting wheel. Not as much fun as you'd think.
4. Make a double batch because these are amazing!

Cheese crackers
makes about 16 oz of crackers (16 servings approx)
8 oz cheddar cheese shredded
1 c flour
3/4 t salt
dash paperika
dash cayenne pepper
3-4 T water
4 T cold butter cut into cubes

In the work bowl of a food processor pulse the flour, seasonings and salt together.

Pulse in butter until it resembles coarse meal

Pulse the cheese in 4 installments, process until its looks coarse meal

Add the water 1 T at a time. Start with 3 and slowly add the 4th if needed. Pulse in 2 second bursts until dough can be pressed into a ball.

Press dough into plastic wrap, forming a disc. Refrigerate for 20 min to 24 hours. The cooling process allows the butter and cheese to solidify producing a cracker that's crispier. It also makes rolling out easier when the dough is very cold.

Roll dough out to 1/8 inch.
~*~Kitchen Witch Tip: Next time you're in your local kitchen gadget store look for rolling pin bands/guides. They are thick bands, like a rubber band, that come in different sizes so you get the perfect thickness when rolling out dough. I found mine for $3.~*~

Transfer the rolled out dough to a sheet pan and cut into desired shape, or simply into squares, using a pizza cutter.

Bake at 350 for 15-20 minutes or until the crackers are browned on the bottoms and puffed. Start to watch them after 10 minutes (peek at the bottoms) as cooking times & ovens vary. Remove crackers from tray and cool.

UPDATE: after making these I wanted to post a few updates on my finding, etc.
1. make sure you roll them thin enough OR bake them a touch bit longer if they are on the thick side. As they cool they tend to get softer (the condensation from cooling causes this) and the next day they are pretty limp, and not cracker like. The ones that I baked longer didn't have this issue as much so make sure you bake them until they are nice & golden (around 19 to 20 min)
2. if you have any left over and they are soft, pop them back into a 350 oven for 5 min or so, it'll crisp them up again.
3. make a double batch! These didn't last long here at all!

Nutrition Facts provided by SparkPeople Recipe Calculator
16 Servings
Amount Per Serving
Calories 111.0
Total Fat 7.7 g
Saturated Fat 4.8 g
Polyunsaturated Fat 0.3 g
Monounsaturated Fat 2.2 g
Cholesterol 22.7 mg
Sodium 197.6 mg
Potassium 23.2 mg
Total Carbohydrate 6.1 g
Dietary Fiber 0.2 g
Sugars 0.0 g
Protein 4.4 g
Related Posts with Thumbnails