Thursday, September 30, 2010

Dill Pickles

The husband and little Witch LOVE dill pickles. We go through a LOT of them around here. Which is why I planted cucumbers and dill in the garden this year, to make homemade pickles. While I am not a pickle fan I enjoy making them and my family enjoys my efforts. Its really a win/win for everyone!

So I had mentioned to my husbands Aunt & Uncle that we were planning on making pickles this year. They asked if I had a recipe, to which I answered not really, just the few I've seen in the Blue ball canning book. Lucky for me they shared Uncle Gene's Great Grandma's Dill pickle recipe. A pickle recipe that's been handed down for generations has got to be good, right? Oh boy, it really is and this from someone who doesn't love pickles! I am one happy Witch to have made pickles from the garden produce and moreover that they're really really good.

Being the Kitchen Witch I, of course, had to add some things to the recipe, namely garlic, to make them into kosher dills. These pickles have a tart yet mellow flavor, the dill and garlic work well to bring you a true dill pickle flavor. The only complaint we have is that we didn't get more cucumbers from the garden this year because our stash of pickles is almost gone already!

Dill Pickles
From Uncle Gene's Great Grandma
makes 1 quart jar - 16 servings per jar approx
~*~This recipe is easily doubled or tripled depending on how many cucumbers you have. The brine will fill about 1 1/2 jars as written.~*~
1 quart size mason jar, cleaned and sterilized
enough cucumbers to fill the jar (about 12 small or 4-6 large)
4-6 heads dill
1 c cider vinegar
4 c water
1 T pickling salt
4 cloves garlic

Clean and sterilize the jar in boiling water for 10 minutes.

Bring the vinegar and water to a boil.

Slice the cucumbers into quarters if large, you can leave whole if they're small.

Put 2 cloves garlic and 2 heads dill in bottom of jar. Put salt in next. Pack jar with pickles tightly but not crushing them.


Top off with remaining garlic and dill. Pour hot vinegar solution over top, leaving 1/4 inch headroom.

Top with new sealing lid and screw ring tightened to finger tight.

Can in a water bath for 10 minutes. Remove from bath and allow to cool on counter overnight. Once cool store in a cool dry place for a minimum of 2 weeks before enjoying. Unopened will last up to 2 years, once opened use with in 2 months.


Nutrition Facts provided by SparkPeople recipe calculator
Amount Per Serving
Calories 17.9
Total Fat 0.2 g
Saturated Fat 0.0 g
Polyunsaturated Fat 0.1 g
Monounsaturated Fat 0.0 g
Cholesterol 0.0 mg
Sodium 438.6 mg
Potassium 181.1 mg
Total Carbohydrate 4.3 g
Dietary Fiber 0.9 g
Sugars 0.9 g
Protein 0.8 g

~*~Don't forget to enter my drawing for a FREE $45 gift certificate to any CSN store!~*~

Monday, September 27, 2010

Donut muffins

This recipe has been floating around the blogosphere for a while now. I saw Teauna, the author of From Cupboard to Cupboard post about them, twice, and knew that it was time to make them. If you haven't done so already, please do check out Teauna's site, she has some fantastic recipes, everything I've tried from her was delicious! Thanks Teauna for another delicious recipe!

These yummy little treats are really easy. They mix up in less than 5 minutes and take about 15 minutes to bake. So in less than 30 minutes you can have fresh baked donut muffins for your family. I was able to get mine made while the coffee brewed and the bacon fried. They made for a fun and delicious breakfast.

The muffins themselves are gently spiced with nutmeg and cinnamon. After they bake you dip the muffins in melted butter and then cinnamon sugar. They have a very tender crumb and texture is very much like a cake donut, but with out the messy (and high calories) of deep frying. Easy peasy, perfect for lazy Sunday mornings, delicious with coffee or a tall glass of apple cider.

Donut Muffins
makes 6 servings, 2 muffins each
from Teauna at From Cupboard to Cupboard
1 3/4 c AP flour
1 1/2 t baking powder
1/2 t salt (table salt)
1/2 t cinnamon
fresh grated nutmeg, about 1/8t OR 1/2 t dried grated nutmeg
1/3 c oil
3/4 c sugar
3/4 c milk
1 egg

Topping:
1/3 c butter, melted
1/3 c sugar
1 T cinnamon

Preheat oven to 350F. Spray muffin tin with non stick spray liberally.

In a medium size bowl mix the flour, baking soda, spices and salt. Whisk to incorporate.

In a separate bowl mix the sugar, egg, milk and oil. Whisk well.

Add the wet ingredients to the dry. Stir about 10 times with a rubber spatula until the mixture is wet but lumpy. Lumps are ok, they give the nooks and crannies that muffins are famous for. Do not over mix!!

Pour batter into the muffin tin dividing it evenly amongst the 12 openings. Bake for 15 minutes or until it tests clean with a toothpick. Allow to cool on a cooling rack for 3 minutes before inverting onto the cooling rack.


Dip each muffin top into the butter then immediately into the cinnamon sugar. Roll it around to evenly coat and place on a tray. Repeat with all muffins. You can also dip the bottoms of the muffins in the butter and into the cinnamon sugar, if desired, after coating the tops. Its easier to do this in 2 stages, the muffins tend to get too wet & soggy if you try to dip the entire thing in butter at once.

Mini muffins can be made instead of the larger ones, should yield 24 mini muffins or 12 large size ones.


Nutrition Facts provided by SparkPeople recipe calculator
Amount Per Serving
Calories 489.4
Total Fat 23.1 g
Saturated Fat 7.6 g
Polyunsaturated Fat 4.1 g
Monounsaturated Fat 10.2 g
Cholesterol 29.8 mg
Sodium 330.6 mg
Potassium 49.6 mg
Total Carbohydrate 67.2 g
Dietary Fiber 1.7 g
Sugars 38.2 g
Protein 4.9 g

Sunday, September 26, 2010

Fried Rice - with chicken and veggies

Fried rice is something that the Witch craves like nothing else. For years she tried to make it at home and had little success. Ok, no success. Turns out there are a few tricks to making successful fried rice at home, and lucky for you the Kitchen Witch is here to share those secrets.

First secret: You DO need cold cooked rice. And this does NOT mean minute rice. I've tried many many times to use minute rice and the results are dismal. Having a rice cooker helps immensely as well, if you're rice cooking challenged like the Witch is. I got my rice cooker - its a small 3 cup one - for $10 at Walgreens. It works great, too!

Second secret: Have all your ingredients ready to go so you can just cook, not prep & then cook. Stir frying goes fast. From start to finish we're looking at 5 minutes of cooking time, max. Having all your veggies, eggs and meat ready to go will only assist you in the cooking process. Don't ignore this secret!

Third secret: Cook in batches. Don't try to cook the veggies, then cook the eggs and then add the rice. You will end up with a nasty, ugly mess of egg covered veggies and slimy rice. Been there, done that. Cook the veg first, remove it. Cook the eggs, remove them. Cook the rice then add everything else back to the pan, stir it all together and that's that!

Fried rice isn't that hard once you learn the techniques. Experiment with the veggies and flavors that you like the most. Its a great way to use up left overs and recreate them into a whole new, yummy and different dish. Enjoy!

Fried Rice
makes 4 generous servings
3 cups cold cooked white rice (basmati is nice)
3-4 T oil
4 green onions sliced thin, including 1/3 of the green part (reserve 1T for garnish)
1 carrot diced fine
3 cloves garlic, minced
1 red or green bell pepper, diced fine
1 stalk celery sliced thin
4 eggs, whipped for scrambled eggs
3-4 T soy sauce
1 chicken breast, cooked and diced
1 handful of frozen peas

*~*Kitchen Witch Tip: Prep all your ingredients and have them ready to go. This is very important when making fried rice or stir fries because they move quick and you won't have time to slice & dice while the 1st step is cooking. Take the time to gather your mies en place (a French term meaning everything in its place, as in set up before cooking) and you'll have a far greater success.~*~

Heat a wok or large cast iron skillet over high heat. Once its screamin' hot, literally smoking, add 1 T of the oil and the veggies. Stir rapidly to ensure even cooking and avoid burning. Cook the veggies for 1-2 minutes or until they start to brown and wilt. Remove from pan and set aside.

Add a touch more oil to the hot pan. Add the whipped eggs. Scramble eggs and remove from pan once they've just set up. You will be adding these back to the rice so a little underdone now is fine, they'll cook longer later in the process.

Add the remaining oil to the hot pan. Add the cold rice and press it down into the pan to maximize surface contact. Let it cook undisturbed for 30 seconds to 1 minute. Using a spatula stir fry the rice, scraping up any cooked on bits from the bottom of the pan. Cook rice until its nicely fried and has color on most of the grains. Add the soy sauce, chicken, veggies and 3/4 of the scrambled eggs. Stir well to incorporate all ingredients. Cook for 1-2 minutes or until everything is warmed through.

Transfer cooked fried rice to a serving bowl and top with remaining eggs and reserved green onions. If desired drizzle with soy sauce before serving.


Nutrition Facts
provided by SparkPeople recipe calculator
Amount Per Serving
Calories 413.6
Total Fat 16.4 g
Saturated Fat 2.5 g
Polyunsaturated Fat 4.0 g
Monounsaturated Fat 8.3 g
Cholesterol 246.7 mg
Sodium 1,033.2 mg
Potassium 632.5 mg
Total Carbohydrate 41.8 g
Dietary Fiber 1.7 g
Sugars 2.8 g
Protein 24.9 g

Saturday, September 25, 2010

Sour Cream Coffee Cake

Here's another yummy recipe that I made while we had house guests. This cake came together quick, which is very important when you're baking at 6:30 am WHILE drinking your coffee. This delicious coffee cake is directly from the King Arthur Flour recipe collection. Every thing I've made from them has turned out perfectly. Their test kitchen really knows what they're doing!

I made my coffee cake in a bundt pan, it was really pretty when baked. You can also use a 8x8 pan if you don't have a bundt. The recipe calls for 1/2 the cake batter in the pan, then add 1/2 the cinnamon filling, cover with the rest of the batter and top with the remaining cinnamon filling. The Witch decided to add the filling first, so the top layer of my bundt cake could have a crunch cinnamon topping. This was NOT a great idea as it turns out! Despite my generous hand in the application of non stick spray, the sticky power of melted sugar proved too powerful, and yup, stuck! 1/2 of my beautiful cake stuck to the pan. Sigh. That's what I get for trying to improve on King Arthur's recipe.

Despite the sticking, the cake was amazing. Tender, slightly tangy, incredibly most but not mushy. It would have been PERFECT with coffee, alas I drank mine while making the cake. I recommend baking the cake the night before and actually enjoying the coffee cake with coffee. Treat your family to a special treat this weekend with this cake, they'll thank you for it!

Sour Cream Coffee Cake
makes about 12 generous servings

Cake
1/2 cup (1 stick) butter
1 cup sugar
2 eggs
2 cups All-Purpose Flour
1 teaspoon baking powder
1 teaspoon baking soda
1/2 teaspoon salt
1 cup sour cream or yogurt

Topping
1/2 cup sugar
2 teaspoons cinnamon
2 teaspoons vanilla
1/2 cup chopped walnuts (optional)

Cream together the butter, sugar, and eggs. In a separate bowl, mix together the flour, baking powder, baking soda and salt. Add the flour mixture to the butter mixture alternately with the sour cream or yogurt, stirring after each addition.

Grease and flour a regular-sized (9 1/2-inch) tube pan or bundt-style pan, or a 9 x 9-inch pan. Spread half the batter in the pan, and sprinkle with half the topping mixture. Repeat with remaining batter and topping.


Bake the coffeecake in a preheated 350°F oven for 25 to 30 minutes, or until the cake tests done. Cool it for 10 to 15 minutes, then remove it from the pan. (If you've baked it in a 9 x 9-inch pan, just serve it right from the pan.) Place the cake right-side-up (topping up) on a plate to serve.


Nutrition Facts provided by SparkPeople recipe calculator
Amount Per Serving
Calories 295.5
Total Fat 12.7 g
Saturated Fat 7.6 g
Polyunsaturated Fat 0.6 g
Monounsaturated Fat 3.7 g
Cholesterol 64.5 mg
Sodium 180.7 mg
Potassium 65.8 mg
Total Carbohydrate 42.4 g
Dietary Fiber 0.9 g
Sugars 25.0 g
Protein 3.9 g

Friday, September 24, 2010

Crack Pie

A few weeks ago I ran across a copy of Bon Appetit, it was the 2011 Restaurants edition. I normally don't browse this mag but something told me that I needed this copy. So I got it. I brought it home & pretty much forgot about it for 3 weeks. A few days ago I ran across it again and started to thumb through the pages.

There were some delicious looking dishes in there, let me tell you. Then I saw an ugly brown pie. Ugly brown pie, what the heck is that doing in here with all this luscious food porn? It just didn't belong! Or did it...

After further looking past the ugliness of this pie I saw something titled "Crack Pie".

"Crack Pie"? Like crack good, get addicted and want more & more? Or "Crack Pie" like you have to be on crack to even be able to eat it?

A quick browse of the ingredients led me to believe that it was the first. Oh yeah, gotta be the first.


After all, all Crack Pie is is an oatmeal cookie crumb filled with a caramel custard. Think oatmeal cookie meets pecan pie filling, minus the nuts. Its good. Buttery, sweet, rich and salty all at once. Decadent and bad. But you want more. No, you need more. After all, it IS Crack Pie!

Crack Pie
makes 1 pie, about 10-12 servings per pie
From Bon Appetit: written by Christina Tosi, head pastry Chef Momofuku Milk Bar

Oat cookie crust:

* Nonstick vegetable oil spray
* 9 tablespoons (1 stick plus 1 tablespoon) unsalted butter, room temperature, divided
* 5 1/2 tablespoons (packed) golden brown sugar, divided
* 2 tablespoons sugar
* 1 large egg
* 3/4 cup plus 2 tablespoons old-fashioned oats
* 1/2 cup all purpose flour
* 1/8 teaspoon baking powder
* 1/8 teaspoon baking soda
* 1/4 teaspoon (generous) salt


Filling:

* 3/4 cup sugar
* 1/2 cup (packed) golden brown sugar
* 1 tablespoon nonfat dry milk powder
* 1/4 teaspoon salt
* 1/2 cup (1 stick) unsalted butter, melted, cooled slightly
* 6 1/2 tablespoons heavy whipping cream
* 4 large egg yolks
* 1 teaspoon vanilla extract
* Powdered sugar (for dusting)

print a shopping list for this recipe
Preparation

For oat cookie crust:
Preheat oven to 350°F. Line 13 x 9 x 2-inch metal baking pan with parchment paper; coat with nonstick spray. Combine 6 tablespoons butter, 4 tablespoons brown sugar, and 2 tablespoons sugar in medium bowl. Using electric mixer, beat mixture until light and fluffy, occasionally scraping down sides of bowl, about 2 minutes. Add egg; beat until pale and fluffy. Add oats, flour, baking powder, baking soda, and salt and beat until well blended, about 1 minute. Turn oat mixture out onto prepared baking pan; press out evenly to edges of pan. Bake until light golden on top, 17 to 18 minutes. Transfer baking pan to rack and cool cookie completely.


Using hands, crumble oat cookie into large bowl; add 3 tablespoons butter and 1 1/2 tablespoons brown sugar. Rub in with fingertips until mixture is moist enough to stick together. Transfer cookie crust mixture to 9-inch-diameter glass pie dish. Using fingers, press mixture evenly onto bottom and up sides of pie dish. Place pie dish with crust on rimmed baking sheet.


For filling:
Position rack in center of oven and preheat to 350°F. Whisk both sugars, milk powder, and salt in medium bowl to blend. Add melted butter and whisk until blended. Add cream, then egg yolks and vanilla and whisk until well blended. Pour filling into crust.


Bake pie 30 minutes (filling may begin to bubble). Reduce oven temperature to 325°F. Continue to bake pie until filling is brown in spots and set around edges but center still moves slightly when pie dish is gently shaken, about 20 minutes longer. Cool pie 2 hours in pie dish on rack. Chill uncovered overnight. DO AHEAD: Can be made 2 days ahead. Cover; keep chilled.

Sift powdered sugar lightly over top of pie. Cut pie into wedges and serve cold.


Nutrition Facts provided by SparkPeople recipe calculator
Amount Per Serving
Calories 359.6
Total Fat 22.2 g
Saturated Fat 13.2 g
Polyunsaturated Fat 1.3 g
Monounsaturated Fat 6.8 g
Cholesterol 142.8 mg
Sodium 244.1 mg
Potassium 146.4 mg
Total Carbohydrate 48.6 g
Dietary Fiber 1.2 g
Sugars 37.3 g
Protein 3.1 g

Thursday, September 23, 2010

Zucchini Bread

Ah, the zucchini. A favorite of many gardeners to plant and grow due to its prolific fruits. But what do you do with all that zucchini? After you've grilled it, stuffed it, covered it in cheese and anything & everything else you can think of, you're still stuck with a few HUGE zukes at the end of the season. At least the Kitchen Witch is!! When I discover the big boys in the garden, you know the ones, they start small and you say "I'll harvest you tomorrow, you'll be perfect then" and then forget, come back a day later and WOW! its MONGO zucchini? Zucchini loses its flavor and texture the bigger it gets which is why those big ones are perfect for making bread!

The addition of zucchini to a quick bread adds fiber and moisture and (thankfully for zucchini haters) very little flavor, which is why the big ol' ones are perfect for bread. The base flavor of zucchini bread is cinnamon, ideal with am coffee. This version of zucchini bread is a less sweet, lower in fat and calorie version. It retains all of the original moisture thanks to the yogurt. Perfect with a drizzle of honey.

If you're using a 'normal' sized zucchini you'll probably need 2. If you have a giant one, cut it in half, scoop out the seeds then grate. The Kitchen Witch does not squeeze the moisture out of the shredded zucchini - I want all that moisture in my bread, thank you very much! Zucchini bread also freezes extremely well so make a few loaves and treat yourself to a slice long after the harvest is history.

Zucchini Bread
makes 2 loaves, each loaf serves 8
2 cups shredded zucchini
1 cup sugar
2 eggs
1/2 c canola oil
1/2 c plain yogurt
1 t vanilla
3 t cinnamon
2 c AP flour
1 t baking soda
1 t baking powder
1/2 t table salt

Mix the eggs, oil, sugar, vanilla and yogurt together in a work bowl until thoroughly combined. Add the zucchini and mix well.


In a separate bowl combine the flour, baking soda & powder, salt & cinnamon.

Add the dry ingredients into the liquid in 3 installments, scraping down the sides of the bowl between each addition.

Divide batter into 2 loaf pans that have been sprayed with non stick spray. Bake in a preheated 350F oven for 30-40 minutes, or until a toothpick tests clean.

Allow to cool and remove from loaf pans. If freezing, wrap cooled loaf in plastic wrap then wrap again in aluminum foil. Will keep up to 6 months in the freezer.


Nutrition Facts provided by SparkPeople recipe calculator
Amount Per Serving
Calories 184.6
Total Fat 7.6 g
Saturated Fat 0.7 g
Polyunsaturated Fat 2.2 g
Monounsaturated Fat 4.3 g
Cholesterol 26.9 mg
Sodium 167.9 mg
Potassium 125.4 mg
Total Carbohydrate 26.4 g
Dietary Fiber 0.8 g
Sugars 13.8 g
Protein 3.1 g

Wednesday, September 22, 2010

Sweet & Sour chicken

Sweet and sour chicken was one of the first 'Chinese food' dishes the Witch ever tried. I have no doubt that its about as inauthentic of a Chinese dish you can find, but boy is it ever good! Deep fried chunks of chicken and a gloopy red overy sweet sauce, mmm sounds great, right? Ok, so maybe it does, but it doesn't have to be a deep fried over sweetened nightmare, not if you employ a little Kitchen Witchcraft.

I used the velveting technique for the chicken, exactly like I've done before for Schezwan Chicken, rather than deep frying it. Deep frying might taste delicious but boy, is it a caloric blow. Velveting the chicken makes it very tender, soft on the outside and really allows the gently sweet and tangy sauce cling to the meat and veggies.

Speaking of veggies, I went with a tomato of all things! A tomato in Chinese food, really Kitchen Witch? Yes! When I made the Pan seared steaks with sweet & sour sauce the recipe called for an onion and 2 tomatoes. It was delicious! I knew then that I wanted to use the same sauce pretty much and the same veggie combo. I wasn't sorry, either. The tomato really cooked down into the sauce and added great sweetness, sourness and fresh flavor. A red bell pepper and an onion round out the flavors. I also added a drained can of water chestnuts, mostly because I had them but also because I really enjoy their crunch. Play around with the veggies, use whatever you have on hand and what you like.

All in all I have to say this was pretty good. The sauce wasn't over overpoweringly sweet or sour, which was nice. I do think that next time I'll cook my onions first, they didn't really get cooked down enough for my liking (we all know how I adore caramelized onions!) so I'd do the onions first, then add the garlic & ginger, then the rest of the ingredients. That just means I'll have to make this again. I'm pretty sure the family will be happy as they all really liked this dish.

Sweet & sour chicken
makes 4 servings

Chicken and velveting marinade
2 chicken breasts cut into bite size chunks
1 T corn starch
1 T white wine
1 T oil
1 egg white
1/2 t kosher salt

Sauce
2 T ketchup
2 T rice wine vinegar
1 T soy sauce
1/2 c chicken stock or water
2 T sugar
1 T corn starch

Veggies
1 bell pepper cut into 1 inch pieces
1 tomato peeled and cut into chunks
1 onion sliced thin
1 can water chestnuts
2 cloves garlic minced
1 t ginger fresh grated

2 T oil for stir fry
cooked rice

Cut chicken into bite sized pieces. Place in a bowl and add the kosher salt, mix well to coat. Then add the wine, mix well to coat. Next add the egg white mixing well but not enough to froth the egg. Next sprinkle the corn starch over the chicken, mix well. Finally add the oil and mix to coat. Cover and allow to marinade at room temp for 30 minutes.

While this is marinading prep all veggies and assemble the sauce. Reserve 3 T of the sauce and mix the 1 T corn starch in, making a slurry. Set aside until later.

Bring a pot of water to a boil. Work in 3 batches and add the coated chicken to the boiling water. Allow to simmer for 30 seconds to 1 minute. You will pull the chicken just after the outside turns white. It is NOT fully cooked at this time. Repeat until all chicken is done this way.

Heat a large cast iron skillet or a wok over high heat. When pan is hot add the oil, the garlic and ginger, stir fry quickly until it starts to brown, about 30 seconds max.


Add the veggies and chicken next. Stir fry and cook about 5 to 10 minutes, until veggies are tender crisp and chicken is cooked through.

Add the sauce and stir to coat everything in sauce. Add the corn starch slurry and stir well to distribute. Once thickened remove from heat and serve with hot cooked rice.


Nutrition Facts provided by SparkPeople recipe calculator
Amount Per Serving
Calories 303.6
Total Fat 12.1 g
Saturated Fat 1.2 g
Polyunsaturated Fat 3.5 g
Monounsaturated Fat 6.5 g
Cholesterol 69.1 mg
Sodium 592.4 mg
Potassium 418.2 mg
Total Carbohydrate 16.8 g
Dietary Fiber 1.1 g
Sugars 9.1 g
Protein 29.5 g

Tuesday, September 21, 2010

Tomato bisque with tortellini

The other night I looked out my kitchen window and saw a lot of little tomatoes that needed to be picked. I went out and harvested my small tomato bounty and pondered what to do with them. Most of the fruits were 2 inch diameter max, little babies. but there were lots, so I decided to maximize their fresh flavor by turning them into a soup. A bisque to be more specific.

Peeling the tomatoes before cooking them was a no brainer, these skins are tough and really not what I want in my bisque. A quick plunge into boiling water, then into icy water makes peeling them easy. I then browned and deglazed onions and garlic with white wine, allowing it to reduce and concentrate its flavors, which bring out the best in the tomato as well. Simmering the tomatoes with whole herbs allows for the scent and flavor to infuse into the dish with out risking blackened bits of herb in my final product. A quick whirl in my blender renders the once plump tomatoes into a velvety rich soup. Adding the cream at the finish smooths out the tomatoes sharp edge and makes everything heavenly delicious.

Because I had them on hand I decided to add some Barilla 3 cheese tortellini to the soup. When I was a kid my Dad would make us tomato soup with noodles, a can of Campbells soup, a hunk of velveeta melted in and poured over elbow noodles. Let me tell you that was good. Don't knock it until you've tried it. This soup is a more grown up version of that. The use of tortellini is optional but I highly recommend it. It made for a delightful light dinner, paired with a salad. Summertime in a bowl!


Tomato Bisque with tortellini
makes 3 servings
6 to 8 tomatoes, blanched and peeled
2 cups chicken stock
1 sprig basil
S&P
1/2 onion diced
3 cloves garlic minced
1/3 c heavy cream
1 T olive oil
1/2 c white wine
1 small bag of tortellini (Barilla 3 cheese)

Cut an X in the bottom of the tomatoes, just barely through the skin. Blanch tomatoes in boiling water for 30 seconds. Remove to an ice bath immediately. Remove tomatoes from the ice water and remove skin with a paring knife. Remove any hard core as well.


In a soup pan heat the olive oil over medium high heat. Once hot add the onions and cook for 2-3 minutes, until they start to soften. Add the minced garlic and cook for another 2-3 minutes, until they start to brown on the edges.

Once the onions & garlic have browned add the white wine. Scrape up any browned bits from the bottom of the pan and allow the wine to reduce to about 2-3 T remain.

Crush the tomatoes and add them to the pan. Size doesn't matter here, we'll be pureeing it later on. Add the whole sprig of basil, season with kosher salt and pepper and simmer for 10-15 minutes.

Once tomatoes are soft and breaking down add the chicken stock. Simmer for 10 minutes longer. After cooking remove basil sprig and discard.

Transfer the tomatoes and stock to a blender and puree until velvety smooth. Place the puree back into the soup pot and simmer for 5 minutes.


Remove from heat and stir in the cream. Serve with cooked tortellini and fresh grated Asiago cheese.


Nutrition Facts
provided by SparkPeople recipe calculator
Tomato Bisque with Tortellini
Amount Per Serving
Calories 339.7
Total Fat 13.3 g
Saturated Fat 5.0 g
Polyunsaturated Fat 0.8 g
Monounsaturated Fat 3.5 g
Cholesterol 32.4 mg
Sodium 1,415.9 mg
Potassium 769.0 mg
Total Carbohydrate 44.6 g
Dietary Fiber 6.2 g
Sugars 2.1 g
Protein 9.8 g

Nutrition Facts provided by SparkPeople recipe calculator
Tomato Bisque - soup only
Amount Per Serving
Calories 168.1
Total Fat 7.3 g
Saturated Fat 1.3 g
Polyunsaturated Fat 0.8 g
Monounsaturated Fat 3.5 g
Cholesterol 2.5 mg
Sodium 1,057.7 mg
Potassium 769.0 mg
Total Carbohydrate 19.9 g
Dietary Fiber 4.0 g
Sugars 1.4 g
Protein 3.9 g

Monday, September 20, 2010

Butter Chicken

Pretty, it isn't. What it is is is the best Indian dish I've made to date. There was no coriander in it, which was awesome for the coriander/cilantro hating Witch. I found this delightful dish on Taste Buddies blog. It was my first time visiting her blog but I can guarantee that it won't be the last - if all her dishes are as good as the butter chicken, I'll be back for sure!

I made this last week for my house guests who specifically asked for an Indian dish from the Kitchen Witch. Now, heres a wee confession: I've made & blogged about a few Indian dishes thus far. However, what I haven't told you is that there was SOMETHING about these dishes that just didn't sit right with the Witch. The flavor was good at first, but as I ate it, it just got muddy and yucky and left a really bad aftertaste in my mouth. After much pondering, I discovered it was a combination of 2 things: coriander and too much ginger.

Coriander is the seed of the cilantro plant. I HATE CILANTRO!! I know, I know, some of you say keep eating it, it'll grow on you. But sorry, the Witch just can't. She can NOT add leaves of green that taste like shaved Ivory soap to her food. It is wrong and that taste lingers. Hours later I can still taste Ivory soap. Who wants that??? So, I'm sorry cilantro lovers, you won't see any cilantro or coriander recipes on this blog from here on out. If you really like the flavor of coriander and cilantro, add some! The original recipe calls for it, I just chose to omit it.

Ginger is another problem child. Oh sure, I like ginger. I like ginger cookies and ginger bread, things like that. But fresh grated ginger is a whole 'nother beast. Its very spicy and pungent. A little goes a LONG way. The previous recipes called for upwards of 3 tablespoons of fresh grated ginger, which translates to a hunk about 3-4 inches long. That's a LOT of ginger!!! This wonderful recipe called for a whopping 2 teaspoons, a very much more manageable amount. Again, if you love ginger, feel free to add more.

The chicken was super tender, due to the slow simmering and long marinade in spiced yogurt. Flavors explode on your palette - some familiar like cinnamon and garlic, some unique and exotic like the Garahm Masala spice blend. The sauce was rich and creamy - pink from tomatoes and flecked with spices. Delicious!!

Now lets talk about the name: butter chicken. You'd think it was butter soaked chicken, right? Nope. As a matter of fact there's only 4 tablespoons in the entire recipe. Do you get a big hit of butter? No, you don't. But you do get the richness that the butter brings, and the awesome browning power that it lends to the onions, garlic and ginger.

If you've never made Indian food I highly recommend starting out with this dish. You will need to get a few spices that most of us don't have on hand, but you'll also use a lot that you have in your spice cabinet already. Butter chicken is the perfect "Intro to Indian Food" dish, exotic spices, tender meat, rich sauce and an overall sense of something different and exotic. I do hope you try this soon!

PS sorry there's not more photos, I got distracted while cooking and plain spaced it out!

Butter Chicken
makes 6-8 very generous servings
12 boneless skinless chicken thighs
1 cup plain yogurt
3 tsp chili powder
6 bay leaves
8 green cardamom pods
1/4 tsp ground cloves
1/2 tsp ground cinnamon
2 tsp garam masala
2 tsp of grated ginger
4 garlic gloves, crushed
1 can of diced tomatoes and their juice
2 tsp kosher salt
4 tbs of butter
1 medium white onion, chopped
1/2 cup of cream
2 cups of water

Slice chicken into bite size pieces, discarding any fat and gristly bits.

Combine the yogurt, garam masala, cinnamon, cloves, salt, chili powder, bay leaves and cardamon pods. Stir to mix well. Pour spiced yogurt over chicken, toss to coat chicken evenly, cover and refrigerate for 2-4 hours.

Heat a large sautee pan (I used my 12 inch straight side frying pan) over medium heat and melt butter. Once the foaming stops add the onions, garlic and ginger. Cook about 5-10 minutes or until it starts to brown. Don't let the garlic burn or it will bitter the dish.

Add the yogurt covered chicken to the pan and cook for 5 minutes, you want the yogurt to start to reduce and cook down. Add the tomatoes, their juices and the water. Bring to a simmer and simmer covered for 20 minutes.

After simmering remove the bay leaves and cardamom pods. Remove from heat and stir in the cream. Serve over basmati rice.


Nutrition Facts provided by SparkPeople recipe calculator
Amount Per Serving
Calories 310.6
Total Fat 17.5 g
Saturated Fat 8.9 g
Polyunsaturated Fat 1.8 g
Monounsaturated Fat 5.1 g
Cholesterol 151.4 mg
Sodium 193.8 mg
Potassium 533.8 mg
Total Carbohydrate 7.3 g
Dietary Fiber 0.8 g
Sugars 3.7 g
Protein 30.2 g

Sunday, September 19, 2010

Hot Brown Sandwiches

Made famous by the Brown Hotel in Louisville, KY, the Kentucky Hot Brown is an open faced turkey sandwich, topped with tomato slices, cheese sauce and bacon. This sandwich was delicious!! The Witch is a big fan of hot sandwiches and the hot brown didn't disappoint. The sandwiches came together quickly and made for a very hearty lunch.

A local restaurant used to have a similar sandwich on their menu, however they used English muffins in lieu of the sandwich bread. I think we'll try it that way next time, kind of like an eggs Benedict. Now that I say that, eggs would be awesome in this too! If turkey isn't your thing, try ham or chicken. Really the sky's the limit on the variations you could do with this sandwich. Have fun experimenting!

Hot Browns
makes 4 sandwiches
8 slices good quality white bread
1/2 stick butter, divided
1/8 c flour
1.5 cups milk
4 oz extra sharp cheddar cheese, shredded
1 oven roasted turkey breast sliced thin
12 slices bacon, cut in half and cooked crispy
2-3 large tomatoes sliced
S&P to taste
grating fresh nutmeg

Melt 1/4 c butter in a sauce pan. Whisk in the flour and cook about 2 minutes, or until it starts to smell toasty. Slowly whisk in the milk. Bring to a simmer, stirring often to avoid lumps. Add the nutmeg, S&P along with cheese once the sauce is thickened. Remove from heat and allow cheese to melt into the sauce.

Slice the turkey (or use deli turkey) and heat slices in a preheated skillet. Brown turkey on both sides.

Grill or toast the bread. Assemble sandwiches by piling turkey on toasted bread, then tomatoes, cheese sauce next then top with crisp bacon slices. Enjoy!


Nutrition Facts provided by SparkPeople recipe calculator
Amount Per Serving
Calories 639.5
Total Fat 36.3 g
Saturated Fat 18.2 g
Polyunsaturated Fat 2.3 g
Monounsaturated Fat 11.7 g
Cholesterol 133.0 mg
Sodium 1,976.4 mg
Potassium 671.6 mg
Total Carbohydrate 39.1 g
Dietary Fiber 2.7 g
Sugars 11.3 g
Protein 40.5 g

Saturday, September 18, 2010

Caesar Salad

Recently a good friend of mine made the long trek to Colorado for a visit. We feasted while she was here!! This was one of the many delicious things we made. It was so much fun to share good food, good friendship and good company! She also took the photos for me, which was great, and she used her super fantastic Nikon DSLR, and now I'm beyond jealous. If anyone's looking for a good gift idea for the Kitchen Witch, a DSLR would be great. Just sayin' :)

Caesar salad is so good, and so simple now that I've learned a few tricks from Pam Anderson and the Pioneer Woman! They make this delightful salad using the hearts of romaine and leaving them in large spears, to be eaten with the hands. The Kitchen Witch loves to eat with her hands so this had to be made. Let me tell you, this Caesar salad is indeed scrumptious.

Garlic is pureed with olive oil which draws the bitterness out of the garlic, leaving wonderfully garlicy oil for the croutons and milder garlic for the dressing. The Pioneer Woman uses her food processor for this process but we soon discovered that mine was too large for such a small amount of oil and garlic: the blender was much better suited. Please use whichever you have at your disposal.

We doubled the dressing, making an even easier and quicker lunch the following day. Adding some grilled chicken or shrimp would be amazing as well. The dressing will last for up to 1 week in the refrigerator. The croutons are really only good for a day or 2 max before they get too stale.


Caesar Salad

Adapted from Pioneer Woman: Pam's Simple, Scrumptious Caesar Salad
makes 4-6 servings

Garlic Croutons
4 cloves garlic
A generous 1/4 cup pure olive oil
2 packed cups 3/4″ bread cubes, cut from a good-quality baguette or homemade loaf
Large pinch of salt

Salad
3 romaine hearts, separated into whole leaves
2 tablespoons lemon juice
2 1/2 tablespoons mayonnaise
1/4 teaspoon Worcestershire
4 tablespoon pure olive oil - optional
1/4 teaspoon salt
Ground black pepper to taste
1/4 cup grated Parmesan cheese or Asiago cheese, plus extra for sprinkling.

Heat a skillet over low heat. With motor running, drop garlic cloves through feeder tube of a food processor fitted with the steel blade to mince. (A blender works as well.) Scrape down sides of bowl and add olive oil through feeder tube as well. Continue to process so that garlic releases its flavor into the oil, about 30 seconds. Strain garlic from oil through a fine-mesh strainer; reserve half of the garlic for dressing.


Increase skillet heat to medium. Place bread cubes in medium bowl. Drizzle garlic oil evenly over bread, along with big pinch of salt; toss to coat.

Add bread cubes to hot skillet and toast, turning the cubes and shaking the pan often, until crisp and golden brown, 5 to 7 minutes. Return croutons to bowl and set aside to cool while preparing salad.


Place lettuce leaves in a large bowl.

Whisk lemon juice, mayonnaise, half the reserved garlic, and Worcestershire in a small bowl.


Drizzle lettuce with olive oil, sprinkle with salt and pepper to taste, and toss lightly and carefully. (Clean hands work well.)
*~*Kitchen Witch Note: After making this salad a few times with out this additional olive oil step I have to say that I do NOT think it's necessary. The dressing provides ample flavor and if you're counting calories, the additional oil isn't needed, or missed honestly. I'm also providing nutritional info for both versions, with and with out the extra oil.*~*

Drizzle lemon mixture over lettuce; toss again.

Sprinkle Parmesan over greens; toss again.

Sprinkle croutons over the salad; toss and serve, sprinkling each portion with a little more Parmesan cheese.


Nutrition Facts provided by SparkPeople recipe calculator
6 Servings
Amount Per Serving - with additional olive oil on lettuce
Calories 377.3
Total Fat 26.7 g
Saturated Fat 5.4 g
Polyunsaturated Fat 4.4 g
Monounsaturated Fat 14.9 g
Cholesterol 8.8 mg
Sodium 828.5 mg
Potassium 214.9 mg
Total Carbohydrate 27.3 g
Dietary Fiber 2.4 g
Sugars 0.3 g
Protein 7.9 g

Nutrition Facts
Amount Per Serving - with out additional olive oil
Calories 297.8
Total Fat 17.7 g
Saturated Fat 4.2 g
Polyunsaturated Fat 3.6 g
Monounsaturated Fat 8.3 g
Cholesterol 8.8 mg
Sodium 828.5 mg
Potassium 214.9 mg
Total Carbohydrate 27.3 g
Dietary Fiber 2.4 g
Sugars 0.3 g
Protein 7.9 g

Friday, September 17, 2010

Smashed Potatoes

I love small potatoes; they are so creamy and sweet when baked, not to mention very cute. They also get very golden when the flesh is exposed to heat and oil. The creamy texture is something you just can't get in a larger baking potato. We were having a big fancy steak dinner and potatoes were the side dish. I knew that I wanted the best of both worlds, creamy potato flesh and the crispy skin that you can only get from an oven baked spud and so these were created.

After baking the small tubers I smashed them, exposing the inner flesh and making the sides flat, perfect for crisping up in the oven. A small amount of oil helped the crisping process. Toppings were kept traditional, why mess with a good thing? Crispy fresh cooked bacon bits, grated extra sharp cheddar, tangy sour cream and onion-y chives made for the perfect side dish.

These potatoes were a hit! Not only were they delicious, they're really cute on the plate. The kids and adults alike were really excited to eat them and there were no left overs. I have big plans for these babies, left over chili would be awesome on them, or, they'd make a great side dish for a brunch. Smashed potatoes were a smashing success!

Smashed Potatoes
makes 8 servings

4 slices bacon
8 red bliss potatoes, about 2 inches diameter
2T sour cream
1 oz shredded cheddar cheese
fresh snipped chives
1T canola oil
kosher salt

Heat oven to 350. Put the washed potatoes into the oven and bake for 45 minutes, or until soft.

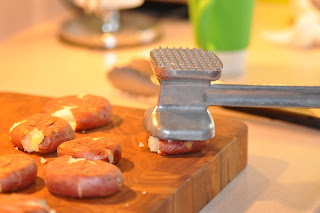
Remove potatoes from oven and put onto a cutting board. Hit each potato with a meat mallet or a heavy pan to smash it flat, bursting the sides open but the potato is still intact in one piece.


Pour the oil onto a sheet pan, rub the potatoes on both sides with oil, sprinkle with kosher salt and bake again for 15 to 20 minutes, until the bottoms are browned and crispy.


While potatoes are baking cook the bacon. I slice the bacon into bits before cooking, it gives more even pieces and cooks up faster. Drain cooked bacon bits.


Top each smashed potato with grated cheddar cheese, a small dollop of sour cream - a baggie with the end cut off works fantastic here, some bacon bits and chives.


Nutrition Facts provided by SparkPeople recipe calculator
Amount Per Serving (1 topped potato each)
Calories 181.7
Total Fat 5.8 g
Saturated Fat 1.9 g
Polyunsaturated Fat 0.6 g
Monounsaturated Fat 1.5 g
Cholesterol 10.0 mg
Sodium 387.8 mg
Potassium 7.9 mg
Total Carbohydrate 27.2 g
Dietary Fiber 2.5 g
Sugars 2.0 g
Protein 5.4 g

Wednesday, September 15, 2010

Pan Seared Steak with Sweet & Sour sauce

Last week the Kitchen Witch had house guests. We cooked and ate to our hearts content. This was one of the delicious things we made. The recipe was discovered on The Steamy Kitchen's blog and what a discovery it is indeed! It was SO GOOD, even the uber picky 3 yr olds liked it! Seared steaks, rich sauce, what more can you ask for?

The sauce is what really sold me on this dish. It has lots of Asian flavors yet isn't 'Asian'. We paired the steak with Caesar salad and smashed potatoes, both of which will be posted in the next few days, and all the flavors paired nicely. We decided to quadruple the sauce for the steaks because 1/2 c sauce just didn't seem like enough for 4 people. Turns out that quadrupling the sauce was a bit excessive - doubling it would have been OK. I am posting the SINGLE batch of sauce recipe here, feel free to double, triple or quadruple it as you see fit. I just ask that you find a bowl big enough to hold it all, unlike the Kitchen Witch.

The key to success here is to have everything prepped and ready to go. The steaks cook faster than you'd think, so if you wait to slice your onions while they cook you run the risk of the steaks overcooking or the onions not being done in time. Either way isn't good. The onions need to be sliced very thin, a mandolin or sharp knife is essential here. The sauce was perfect, sweet, sour, fresh and different, and it complimented the rich beef perfectly. If beef isn't your thing you could put this sauce on chicken or pork, or make it for a stir fry.

Pan Seared Steak with Sweet and Sour Tomato and Onion Sauce
makes 4 steaks
Adapted from Steamy Kitchen

2T canola oil
Four 1 1/4 inch thick steaks, cut your choice (New York Strip was used), at room temperature
salt and pepper to season steaks
1 whole onion, sliced very thin
1 tablespoon minced garlic
2 whole tomatoes, cut into 8 wedges each

Sauce (whisk in small bowl)
1 tablespoons ketchup
1 1/2 tablespoons unseasoned rice vinegar (or white vinegar)
1/4 cup water
2 tablespoons sugar
1 teaspoon soy sauce

Prep the onions, tomatoes and garlic and set aside. Mix the sauce ingredients together as well so they're ready to go when the time comes.


Heat a large skillet over high heat until a bead of water sizzles upon contact and immediately evaporates. You want that pan super hot to get the best sear on the steaks as possible. Add 1 tablespoon of cooking oil to the pan and let the oil heat up. The Witch used a stainless steel pan rather than cast iron here because the sauce is acidic and it would have reacted with the iron pan. Please don't use teflon, it can't get hot enough to sear the steaks properly.

While the pan is heating, brush the remaining 1 tablespoon of cooking oil on each side of the steaks. Season with salt and pepper and carefully lay them in the hot pan, not touching. Cook for 3-4 minutes per side or until you reach your desired level of doneness. Instant read thermometer should read 120F at the center of the steak for medium-rare. Keep in mind that the steaks will continue cooking while resting, so if 130F is your target temp, pull the steaks at 125F.


Remove steaks to a plate and tent loosely with tin foil. Return the skillet to medium heat. You should still have some oil left in the pan. Add the garlic and onions to the pan and cook for 2 minutes. Push the garlic/onions to one side of the pan and add the tomato wedges. Cook the tomatoes 1 minute.


Add the sauce mixture and simmer until slightly thickened and the tomatoes and onions are nicely coated with the sauce.


Now you’ll have to taste and adjust – how sweet and how sour is a personal preference, plus your tomato may be juicy sweet or a bit acidic. (Make sure you taste a bit of the tomato too)

* Too puckery acidic? Add 1/2 teaspoon of sugar
* Not sour enough? Add 1/4 teaspoon of rice vinegar
* Need a little more salt? Add 1/4 teaspoon of soy sauce
* Sweet and Sour too strong? Add 1 tablespoon water

Pour the sweet and sour tomato onion sauce on top of steaks.


Nutrition Facts provided by SparkPeople recipe calculator
Amount Per Serving
Calories 602.5
Total Fat 28.2 g
Saturated Fat 0.5 g
Polyunsaturated Fat 2.2 g
Monounsaturated Fat 4.2 g
Cholesterol 0.0 mg
Sodium 866.0 mg
Potassium 273.1 mg
Total Carbohydrate 16.8 g
Dietary Fiber 1.7 g
Sugars 8.5 g
Protein 65.4 g
Related Posts with Thumbnails